Whether you want to backup your full data or flow video around the sign , having a dedicated NAS ( a.k.a internet Attached Storage ) really come in handy . Recently , I get the24 TB WD EX4100for file away myYouTube videos . And the first trouble I faced was carry backups from the external Hard Drives . To begin with , the file transfer speeds over Wi - Fi are horrible . Switching over to the Ethernet port does improve the transfer swiftness but it still take you to keep the calculator turn ON the entire clip . twist out , there is a better ( and degraded ) way to transfer file cabinet from outside HDD to NAS using the USB 3.0 porthole on the NAS and the WD web portal . Here is how you do it .
Read : estimable USB Encryption Software to Lock Your Flash Drive
Create Background Copy Jobs on WD NAS
Just to put it out there , the 10 Gigabit Ethernet will provide you better written matter stop number than USB 3.0 . You should adhere to the LAN in character of the inner drives but if you have outside drive , I would commend connecting them to the NAS crusade and using the portal backup jobs . On the WD vane dashboard , you have a Backup tab that let you schedule a backup job to copy data through and fro from the NAS to the USB . get me brief you through the intact unconscious process .
Foremost , connect the external HDD or SSD to the WD NAS USB port on the front . ensure you link up the outside drive with the USB at the front since the USB drives at the back are USB 2.0 .
1 . Login to your WD web portal . In case you have not set up an administrator accounting , the default username and password are admin . Once you have enter , tap the Backup tab .

2 . Within the backing tab , you have the option to create backup Job . The jobs are log here and you may see any previously tend backup jobs below . To make a fresh job , snap on the “ Create Job ” clit .
3 . On the Create Job menu , you will have the option to specify the job name which can not be modified afterwards . This field is irrelevant , you could provide the name accordingly . The next field is the Backup eccentric which can be“USB to NAS”or “ NAS to USB ” . For this instance , we are transferring data point from the external cause to NAS , we will select the Direction as “ USB to NAS ” .
4 . Prior to the centering , you have to pick out the Source and Destination folder . Another important parameter is the Backup Type . Now , since this is the first time we are imitate files from the drive , we will select this asCopy .

The other two options areSynchronize and Incremental . In example you select Synchronize , file on the destination brochure will be synchronise with the beginning folder . This will update the existing file on the destination booklet with the reservoir interpretation and erase the destination files if they do n’t exist on the source .
Whereas Incremental will simulate the file change from the source to the finish booklet . It wo n’t delete the terminus files if they do n’t exist on the author .
5 . Additionally , check the selection “ Auto Start When link ” which ensures the line summarise if the external drive is connected . press the Create button and the task should start decently aside .

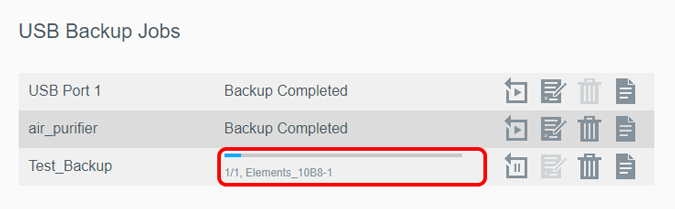
Since this is a quite a little job , you do n’t need to supervise the backup line of work . you could see the backup occupation progress within the same backup Book of Job tab .
On successful completion , the follow substance appear “ Backup completed ” beside the job name . you’re able to also hold in the backup end meter by tick on the Job Detail clit towards the extreme right of the job name . In eccentric the backup has go bad due to connection or storage issue , you will see the same information within the job particular tab .
you’re able to also modify these jobs and reprocess them . In our case , we have a fixed act of jobs depend on the external drives . We just re - execute the job and confiscate the drive to archive the integral data on to the NAS .

Also Read:7 Best Open Source connection Monitoring Tools for Windows and Linux
38 Google Earth Hidden Weird Places with Coordinates
Canva Icons and Symbols Meaning – Complete Guide
What Snapchat Green Dot Means, When It Shows, and for…
Instagram’s Edits App: 5 Features You Need to Know About
All Netflix Hidden and Secret Codes (April 2025)
All Emojis Meaning and Usecase – Explained (April 2025)
Dropbox Icons and Symbols Meaning (Mobile/Desktop) – Guide
How to Enable Message Logging in Discord (Even Deleted Messages)…
Google Docs Icons and Symbols Meaning – Complete Guide
Samsung Galaxy Z Fold 7 Specs Leak Reveal Some Interesting…