iPhone gets small-scale design alteration andfeature improvementsyear on yr which give every new iPhone a slight better than the last one . The iPhone 12 serial publication has comprise a good deal of sophisticated features in the camera section that brings the image and television caliber closer to the professional DSLRs . Even though the port looks childlike , you could change a pile of configurations and use the iPhone 12 Camera app like a pro . We ’re going to take a looking at every camera stage setting , what it does , and how can we utilize it to entrance better caliber trope and videos . Let ’s start .
iPhone 12 Camera Specifications
The iPhone 12 series has two different television camera systems : a dual - camera organisation on the iPhone 12 and 12 Mini , and a ternary tv camera scheme on iPhone 12 Pro and 12 Pro Max . I ’m going to focus on iPhone 12 and 12 Mini in this article as I use the iPhone 12 Mini . The only feature drop on this camera organization are the power to memorialise 4 K telecasting at 60FPS and financial backing for Apple ProRAW for pictures .
Use iPhone 12 Camera Like a Pro
1. Precisely Control the Zoom
The Camera app on the iPhone has nonrational controls and you could seamlessly interchange between the primary sensor and the ultra - wide-cut sensing element by tapping the zoom button . However , if you wish to precisely ascertain the rapid climb , you canpress and hold the zoom buttonto bring up the dial that would let you effortlessly zoom in and out . This also works while recording video .
2. Instantly Record Videos
You ca n’t always have your iPhone recording videos all the time but you could reduce the clip it take on to start recording . commonly , you spread the Camera app , turn to the video mode , impinge on the record button , reach it again to block up and economize the video recording . A better fashion to do this is by simply opening the Camera app and press and make the shutter clit or the volume down button to commence transcription and as soon as you let go , the iPhone stops recording and saves the video . It ’s a much agile and efficient way of enchant moments .
3. Capture Burst Photo
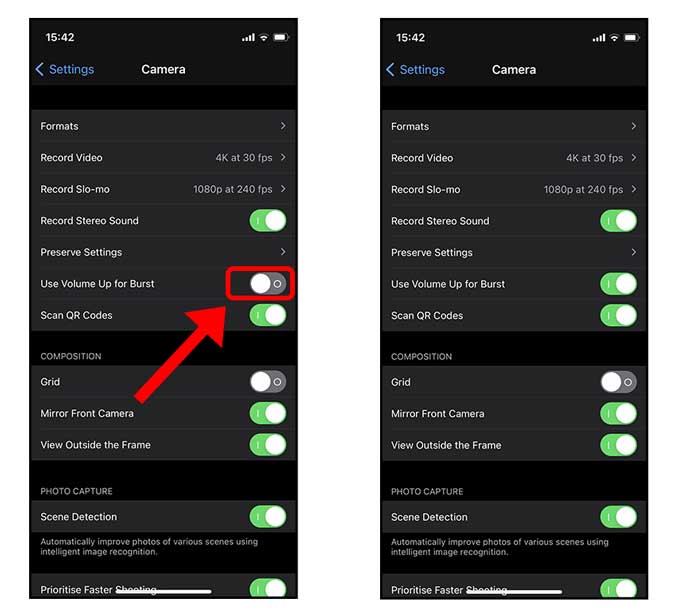
When capture a tight - move subject , master apply a technique called salvo to capture multiple images in one go that allows you to choose the best frame afterward . you’re able to get through a burst on iPhone 12 as well . You just need to enable it in options then use the lineament in the Camera app . To capture a burst , start the Camera , press the bulk up button to start the burst , and allow go of the clitoris to stop capturing .
To activate the burst option in configurations , opened theSettings > photographic camera > toggle the Switch “ Use Volume Up for Burst”on .
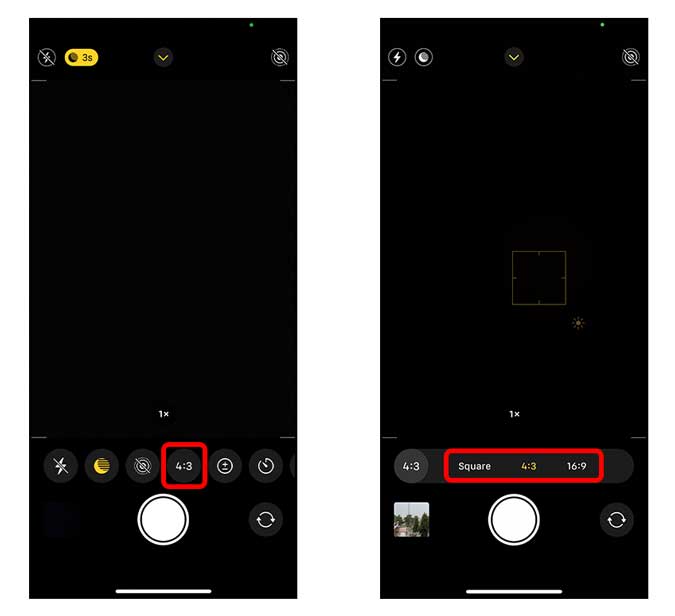
4. Adjust the Aspect Ratio of your Photos
The default option iPhone pictures are shot in a 4:3 aspect proportion but if you want you may change it to shoot in 16:9 or 1:1 which can save you some meter in post - processing . Shooting figure of speech directly in those aspect ratios are easy . Simply tapdance the arrow clitoris on the top to bring in up the extra controls . Tap the Aspect Ratio button on the bottom row and select either of the available aspect ratios .
5. Adjust the Blur in Portrait Mode
Even though the Telephoto Sensor is missing on the iPhone 12 , you could still capture portrayal with varying degrees of fuzz in the background . Thanks to its computational artistry , the iPhone can simulate a fuzz in tangible - time . you could adjust the fuzz by sliding the astuteness of Field slider that goes from f 1.4 to f 16 . but put , the downcast the f value , the greater the fuzz .
You canfind the DOF buttonon the top right nook in the Portrait Mode . solicit the push brings the slider to the bottom where you canslide around to adjust the blurin real - time .
6. Preserve Camera Settings
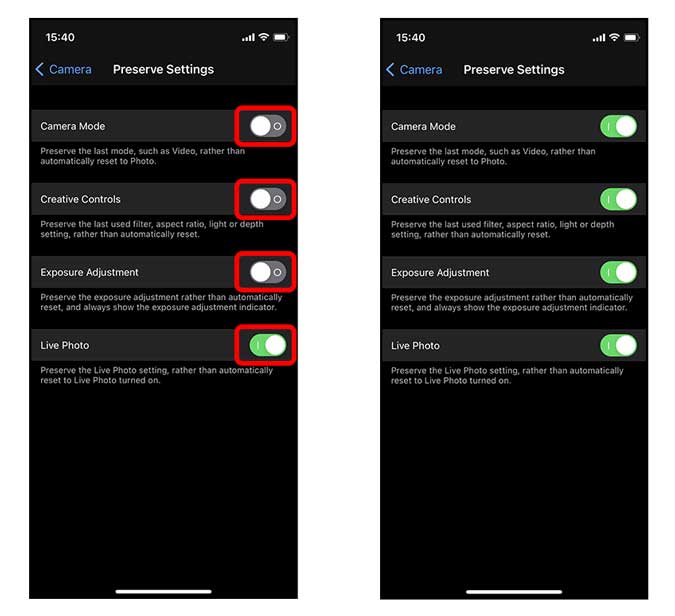
When you capture a photo or record a video recording and shut the app , the Camera app opens on the default mode : Photo . This can be nettlesome because your originative ascendency are reset and you would have to adjust the aspect ratio , lightheaded , deepness circumstance again . iPhone , however , extend an option to enable or disable saving these characteristic in the context . give the configurations app , go to the Camera app , and exploit Preserve configurations .
On this page , you would regain four unlike on/off switch that you’re able to enable to preserve setting . Enabling Camera Mode would give the Camera app in the last used mood . For representative , if you used the Slow - atomic number 42 modal value last meter , the Camera app would open in the Slow - minute next time . Enabling originative controls would keep aspect ratio , light , deepness , and last filter .
If you enable Exposure Adjustment , the iPhone would set the vulnerability to the last determined value . Lastly , turn on Live Photo would allow you to preserve the stage setting which means if you turn Live Photo OFF in the Camera app , it would appease off until you turn it on again .

7. Adjust Video Resolution and Frame Rate
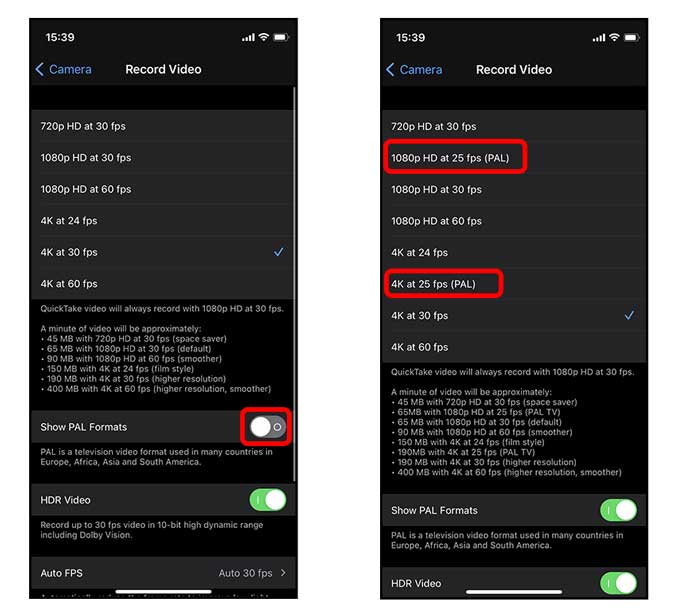
While the option to change the resolution and shape rate for television exists right in the Camera app , there are more innovative controls in the configurations that earmark you to immortalise in different frame rate . To exchange the frame rate and resolving in the Camera app , start the Video mode in the Camera , and tap the release on the top right . Tap the left over button to set resolution and the good button to adjust the framing charge per unit .
iPhone has recently added the choice to shoot in PAL format that is widely used in Europe , Africa , South America , and Asia . It allows you to immortalise videos in 25 Federal Protective Service in 1080p and 4K. To twist it on , start the options app , go to Camera , wiretap Record Video , and on-off switch “ Show PAL Formats ” on .
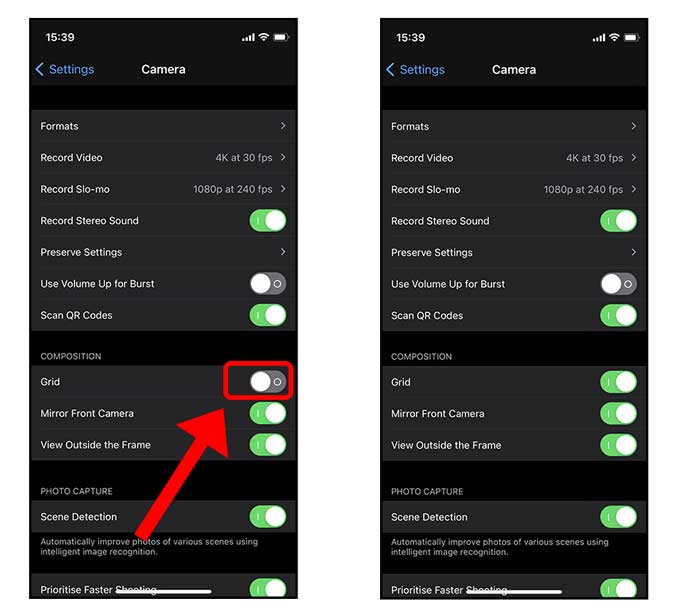
8. Shoot with Grids
Grids are super useful when capturing a picture or a picture as it can help you align the sensible horizon , shoot in third , shoot diagonally , etc . To enable Grids , start the options app , go to Camera , and enable Grids under composition .
9. Mirror Front Camera
Selfies are always finicky as it ordinarily look really different from the trailer . It ’s because we see a mirror view in the prevue and when the iPhone capture a exposure , it flips it again so that the image looks natural to others . you may choose toenable this feature in the preferences . In the Camera preferences , activate the toggle “ Mirror Front Camera ” .
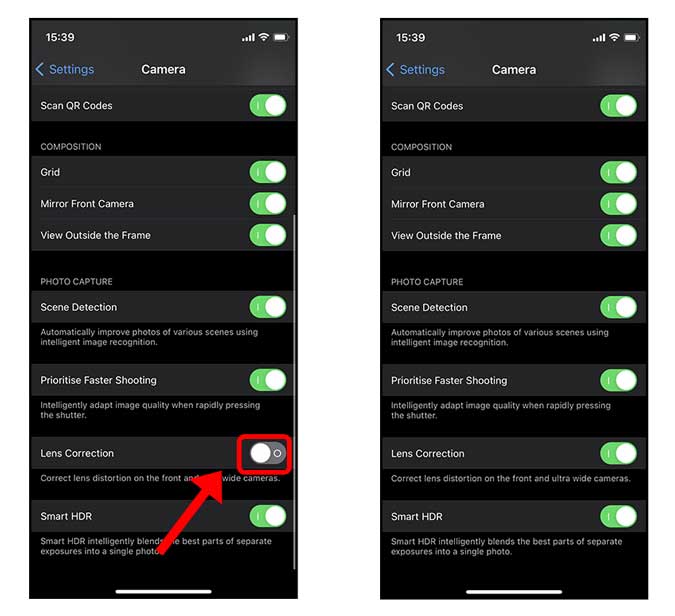
10. Disable Ultra-Wide Lens Correction
The radical - wide sensor and the front tv camera offer a wide field - of - vista that can sometimes make things attend uncanny and distorted . To compensate , the iPhone 12 corrects it with the software but can sometimes make it worse . If you find ultra - wide images tinge like that , try invalid this selection in the preferences . get to the options app , go to Camera , and disable Lens Correction .
How Do You Use the iPhone 12 Camera
These were all the iPhone Camera features and preferences that you should get laid about . Along with the most obvious options , I have also listed some of the lesser - bonk ones . You should also know that these can descend in ready to hand when you ’re face to up your mobile photography biz . What do you think ? Did I escape anything ? Shoot me a tweet and let me know .
12 Underrated iOS Apps You Should Download Now (May 2025)
All iPhone Secret Codes – Tested and Working (April 2025)
Apple CarPlay Icons and Symbols Meaning – Complete Guide
Best iPad for Every Budget and Use Case (April 2025)
Dynamic Island Icons and Symbols Meaning – Guide
Apple Voice Memo Icons and Symbols Meaning – Complete Guide
Apple GarageBand App Icons and Symbols Meaning Complete Guide
How to Restart, Reset, Update Your Apple TV: Step-by-Step Guide
Apple TV (tvOS) Status and Tab Icons and Symbols Meaning…
All Apple Mail App Icons and Symbols Meaning – Complete…