Microsoft Defender , the build - in surety shaft in Windows , is all you want most of the time . While it excels as an automated tool , Defender is notoriously hard to configure manually . One has to leap through multiple menus and setting to do basic labor like disenable SmartScreen or adding an ejection . The developers at Voodoosoft created DefenderUI that unlocks many Defender choice and options and allows users to toggle on / off Microsoft Defender options quickly .
Table of content
Downloading and Installing DefenderUI
Let us first install DefenderUI app on your Windows figurer .
1.Boot your Windows personal computer and open your preferred browser app .
2.Go to the officialdownloads page of DefenderUIby VoodooSoft and tap theDOWNLOAD FREEbutton .

3.Wait for the download to fill in and select it to start the installment process .
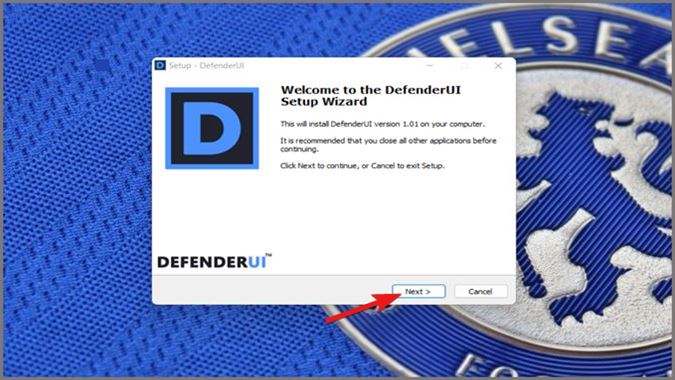
4.On the dialog box that appears , click onnextto Continue
5.On the next dialog box seat , checkI agree to the terms of the license agreementand proceed to click onNext .

6.The Installation process will take place automatically and the programme is now quick to use .
Getting Started With Defender UI
Now we take a look at the UI and how to use the app itself to make out Defender and unlock its various concealed features .
1.DefenderUI should like a shot set in motion after the installation is finished . If it does n’t not , you may always get at it from the Taskbar notification domain . sink in on theShow hidden iconsmenu in the Taskbar .
2.tap theDefenderUIIcon from the Hidden Icons List to open up Defender UI .
3.In the program windowpane that appears , you will be open a list of profiles to choose from . Casual users can select any from theRecommended , Default , orInteractiveprofiles . We will be selectingAggressiveto unlock all option for tweaking and fine - tuning Defender to our needs .
Note : TheAggressiveprofile in DefenderUI is powerful and provides full accession to your Defender preferences . It is always advisable not to fiddle with scene that you are not sure about . Do right research or your system can be will opened to exposure .
4.press the faithful clit in theWelcome to Defender UIwindow that appears .

5.You now have full access to every Microsoft Defender configurations that you ever need .
How to Disable and Enable Defender Easily
musical note thatdisabling Defender permanently is a tough ideaas it is protecting your computer from all sorts of cyber attack like viruses , malware , and ransomware attacks . Do so if you are troubleshooting something , put in a third party app , or something else that ’s temporary in nature .
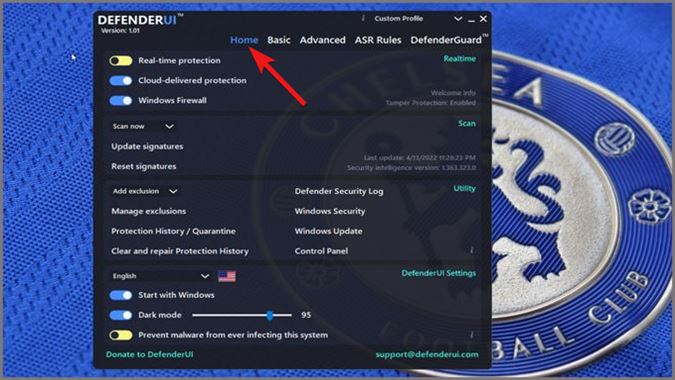
1.Open up DefenderUI and press theHomePage .
2.Simply press the toggle for literal - clock time protection to disable / enable Microsoft Defender ’s material - fourth dimension protection .

3.you may also enable / disable Microsoft’sCloud - based protectionas well as theWindows Firewallusing the toggle belowReal - time Protection .
How to Start a Scan for Threats
Initiating a manual scan to see for threats and vulnerabilities in Microsoft ’s Defender is a tedious mental process . DefenderUI take a leak it super gentle and here ’s how .
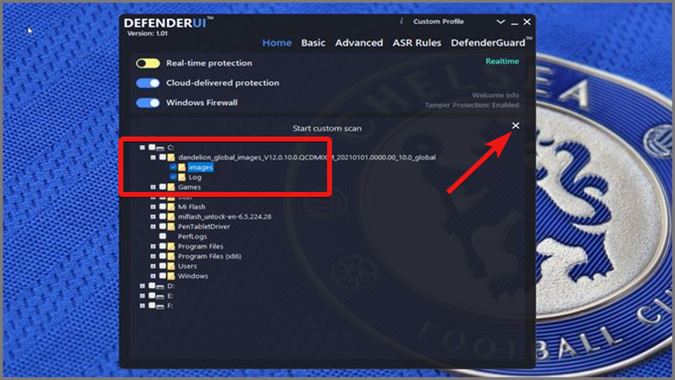
1.On theHomepage of DefenderUI , you will see a consecrated subdivision reserved just for scan .
2 . get through onUpdate signaturesto check that all the terror database in Defender are up to date .

3.Click onScan nowto select the mode of scanning .
TheQuickscan option would do a debauched CAT scan of the most vulnerable and common fix of an approach . AFull scantriggers a total CAT scan of the whole system . AnOffline scanwould do an offline - only scan without using the internet . Custom Scanlets you select the localisation you want to skim on your PC . We will be selectingCustom Scanin this illustration .
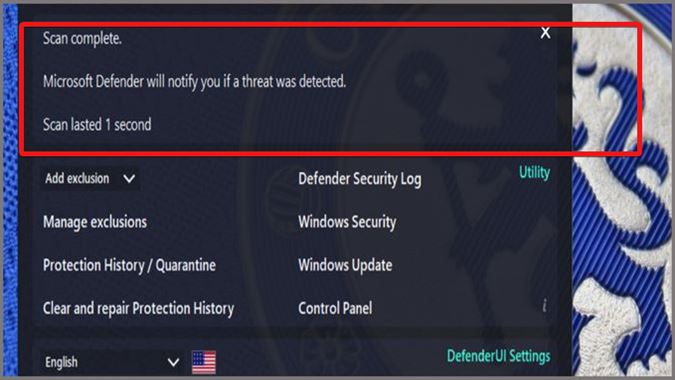
4.Select any emplacement you need and snap on the close button .

5.Click onScan nowagain . You will see a message reporting the results after the scan is stark .
How to Add and Manage Exclusions
Microsoft Defender has a dear system grade threat detector . It however can go overboard occasionally and delete file cabinet that are not a actual threat to the arrangement . DefenderUI lets you easily manage these untrue positives .
1.Click onAdd exclusionoption on the base varlet to start add an exclusion . From the dropdown menu select the option you need . We will be selectingFile / Folderto prevent it from being scanned by Defender .
2.Select the leaflet you want to add to the exclusion list .
3.you could also manage the list of exclusions in DefenderUI . Click onManage Exclusionson theHomePage to view the list of exclusion .
4.From the tilt that appear , you could superintend the exclusions you have made for Windows Defender .
Managing Other Useful Toggles and Settings
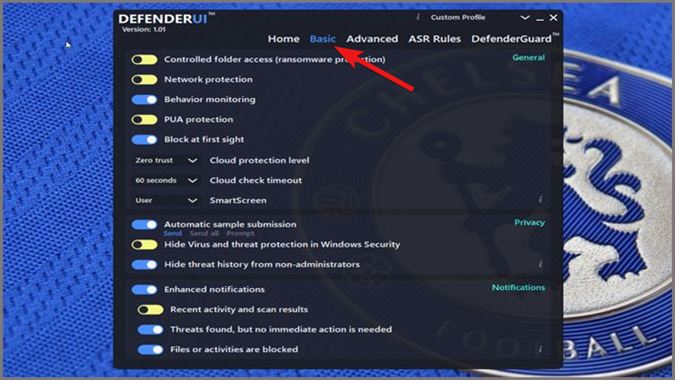
Setting up the Basic Page
1.On theBasicpage , you will see more modern configurations . get across on theBasicpage to go over out the options useable on it .
2 . On theBasicpage , you’re able to look to toggle a bunch of stage setting . The most notable ones admit toggling theRansomware Protectionand setting thelevel ofSmartScreen .
Settings to Check Out in Advanced Page
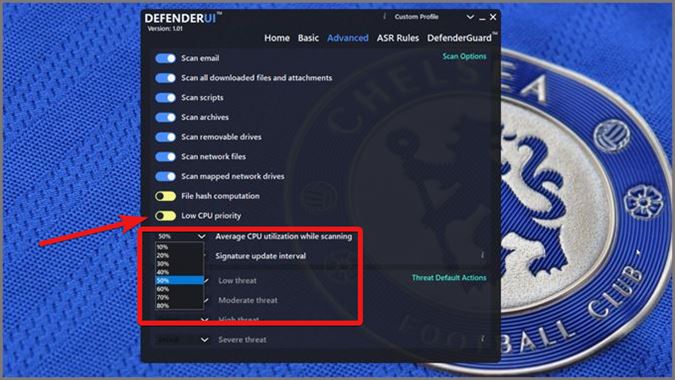
1.In theAdvancedPage , you get even more mastery . select theAdvancedpage to check out the configurations uncommitted on it .
2 . Here you’re able to toggle a bunch of configurations . The most notable ones includeLow CPU PriorityandAverage processor Utilization while Scanning . These configurations help subjugate the overall public presentation impact on your organization resources cause by Microsoft Defender .
Defending Windows OS
DefenderUI commit a triplet over the wild but hefty beast i.e Microsoft Defender . Take this guide as an introduction to the plan as it has a lot more to offer than the scope of this clause . go through each menu and on/off switch lets you understand their affair as most of them are self - explanatory . Be sure to do enough enquiry before fall into place on something that you are not indisputable about .
Are you an advanced user ? Do check outhow to use Terminalto get better control over Windows 11 .
Microsoft OneNote Icons and Symbols Meaning – App/Desktop
50 Years of Microsoft: 11 Times Microsoft Fumbled and Missed…
How to Transfer Windows 11 to a New Drive/SSD (Step-by-Step)
Microsoft Office is Now Free on Desktop – But With…
How to Install Windows 11 on PC With Unsupported Hardware
Windows 10’s End is Near: What Are Your Options?
Windows 11 Camera Not Working? Here’s How to Fix It
Windows 11 “Resume” Feature: Seamlessly Switch Devices
Windows 11 Installation Has Failed? Easy Fixes to Try
Windows 11’s Multi-App Camera Support: How to Enable and Use…