There are times when you want to include the mouse cursor in the screenshot , but most third - party screenshot apps ( include the Windows native selection ) hide the cursor from the screenshot . So I try out multiple screenshots apps and found out a few apps that can help me take screenshots include the mouse Spanish pointer . Let ’s check them out .
Apps to take Screenshots with Mouse Pointer
1. Steps Recorder
dance step Recorder is a build - in help tool used to immortalize actions take by a user on a computer . Once recorded , the information can be place to other users to help with troubleshooting . Anyhow , we can take vantage of this app to take a screenshot with the mouse pointer .
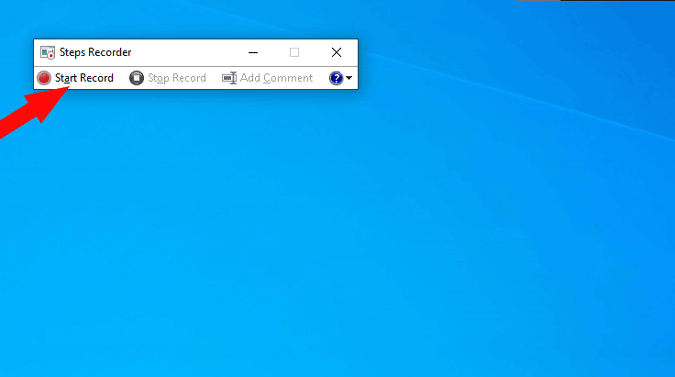
Open Start menu and search for “ Steps recorder ” and open up the app . Now you may see a small window with an option to “ Start Record ” . press it .
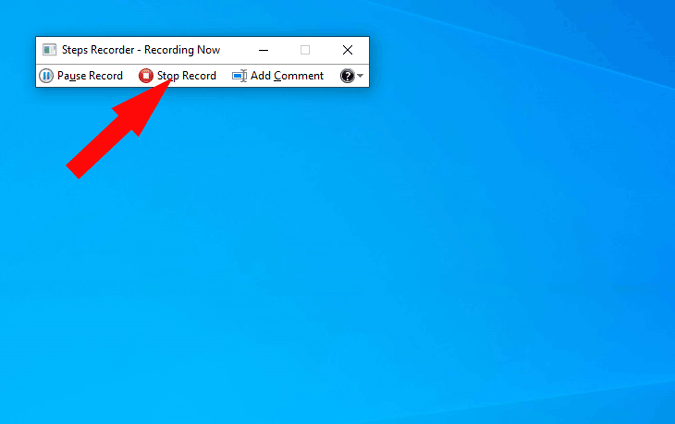
Now minimize the Step recorder window and place the cursor where you want to take a screenshot . Step Recorder app only records your action , so make a left - click with your mouse just like you are opening a linkup . That natural action will be recorded as a screenshot .
Then go back to the Step recorder app and press the “ halt put down ” option .
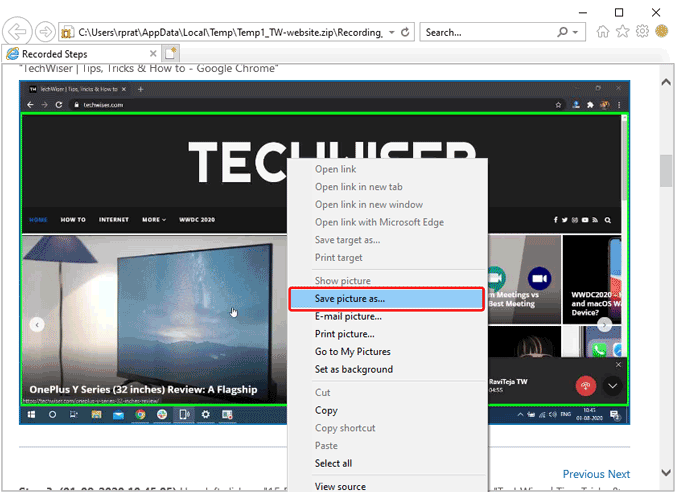
you may see the recorded footmark and screenshots of it . Just tap the save release to save these steps as a zip file .
open up that postal code file cabinet and unfold the MHTML file in it . Here you may bump the screenshots , just right - select the range of a function and select the “ relieve picture as ” option and save it .

And that ’s it , the image along with the mouse cursor will get save up .
Pros
hustle
2. ShareX
Share X is one of the most popular screenshot apps for Windows . It not only lets you take screenshots with the shiner pointer , but also fond screenshots or screenshots for specific window , pill , card , etc . If you are already a ShareX user , here is how you could take a screenshot with a black eye using Share X.
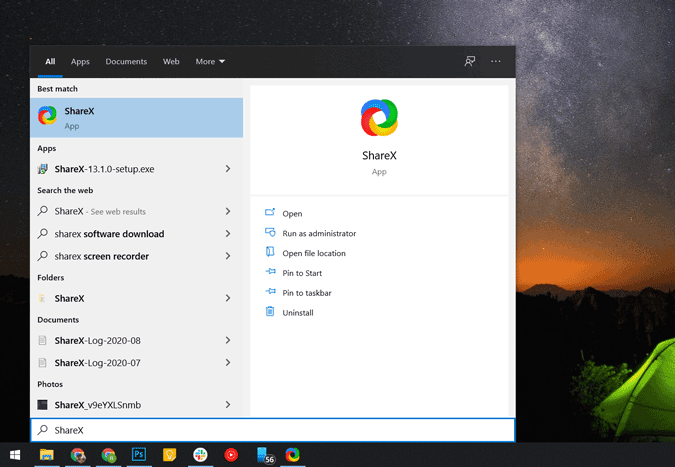
Download theShare Xapp and open it .
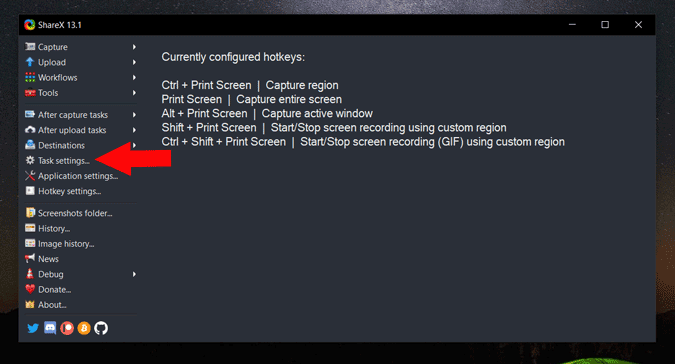
Now select the Task options choice .

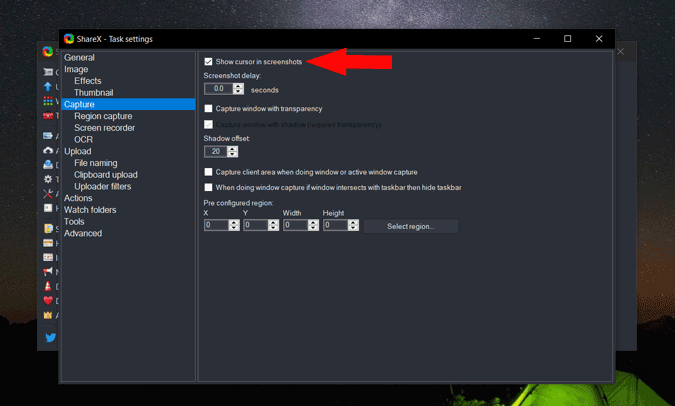
you could see a Task preferences window , pick out the option “ Capture ” . Here make certain that “ Show cursor in the Screenshots ” is checked .
Now place the cursor when you want to take the screenshot and press ctrl + PrtSc , now you could move the mouse and pick out the portion you need to take a screenshot . That ’s it screenshot will be taken when you leave your mouse cursor .
Now you could spread the Share X app , preview the screenshot of you desire and then the right way - select it and fall into place on the “ Download ” option .
3. Greenshot
As the name say , Greenshot is a screenshot tool that takes screenshots with mouse pointer by default . Among the remaining apps in the list , the process of taking a screenshot with Greenshot is much simpler and faster .
To get jump , download theGreenshotapp and install it on your arrangement . The hotkey for taking a screenshot for this app is ctrl + PrtSc . If you are birth any existing shortcut with that hotkey , this app will automatically overturn it .
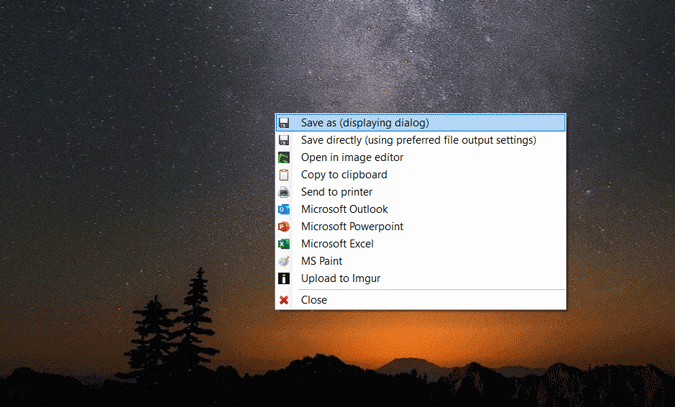
Once download , just place the cursor where you want to take a screenshot and insistence ctrl + PrtSc . The app will take a screenshot and show you a popup card . you could move your pointer and click “ Save as ” option to save the image now
Or you’re able to press “ open up in range of a function editor ” to take a trailer and make some change like range before save the screenshot .
Pros:-
Cons:-
4. Irfan View
Irfan View is one of themost popular icon viewer or convertor app on windows . It is a feature - rich app and also supports the screenshot functionality . Here is how you could do that with Irfan View .
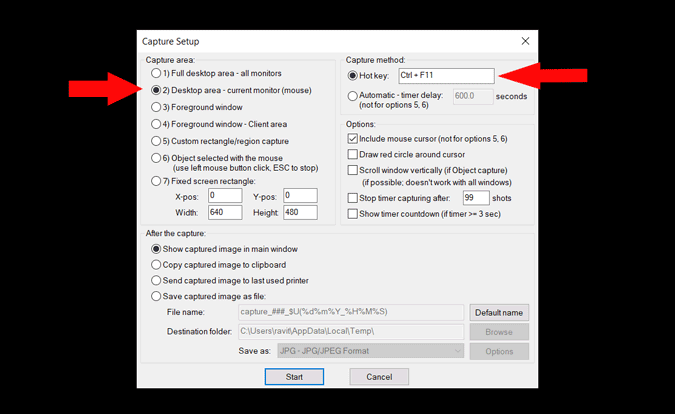
First , download theIrfan Viewapp and set up it on your windowpane . Then look for for the app in the scratch menu and open it . The app will open with a black-market blank screen . tick on Options and select Capture / Screenshot .
In the pop - up windows that appeared , select the pick desktop area and verify the Hotkey is set to ctrl+F11 . select the outset alternative at the bottom of the pop - up window
Now site your pointer where you want to take the screenshot and crusade the hotkey ctrl+ F11 . Irfan View app will pop - up with the image of your screenshot . you could chatter S and save the image to your system
Wrapping up
Microsoft OneNote Icons and Symbols Meaning – App/Desktop
50 Years of Microsoft: 11 Times Microsoft Fumbled and Missed…
How to Transfer Windows 11 to a New Drive/SSD (Step-by-Step)
Microsoft Office is Now Free on Desktop – But With…
How to Install Windows 11 on PC With Unsupported Hardware
Windows 10’s End is Near: What Are Your Options?
Windows 11 Camera Not Working? Here’s How to Fix It
Windows 11 “Resume” Feature: Seamlessly Switch Devices
Windows 11 Installation Has Failed? Easy Fixes to Try
Windows 11’s Multi-App Camera Support: How to Enable and Use…