Over the years , Wi - Fi has grow tremendously but sharing huge single file or for that matter , a whole cause is still not efficient . You get halter up speed and your data is execute through a public duct . I would any 24-hour interval opt share a drive or transfer data over LAN overseas telegram . On that billet , the following is the footprint by measure guide to reassign files between PC ’s using an Ethernet cable .
Just in case , if the file you desire to transfer is small and the systems are in the same connection then consider doing it over Wi - Fi . Here are a fewsoftware to utilise to transfer datum over Wi - Fi .
When to Use LAN Cable
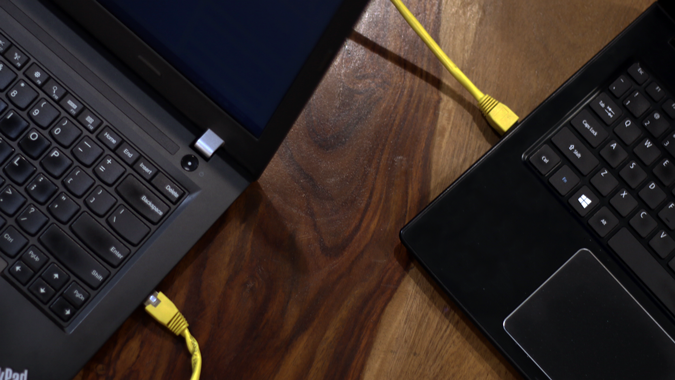
Dropping an Ethernet cable television service makes things dim-witted with libertine data speed . The chintzy of CAT5e cable supports speeds up to 1000 Mbps . To give you some perspective , USB 2.0 support speeds up to 480 Mbps . So , transferring information over Ethernet should be the obvious pick .
Related:7 Ways To Access Your Computer ’s Files From Anywhere In The human race
The advantage of LAN cable length Over others
The main vantage of using the ethernet cablegram method acting is quick transferee speeds , at least quicker than your regular flash drive and Wi - Fi . If you have a lot of data to channelize then using the ethernet cable television is the best elbow room to go . We have tested this on all mainstream Windows versions . i.e , on Windows 7 , 8 , and 10 .
Things You Need
Also study : Best Airdrop Alternatives for Android , iOS , and Windows
Share Files Between Two Computers Using LAN Cable
footstep 1 : Connect Both PCs With LAN Cable
Connect both information processing system to a LAN cable television service . you could utilize any LAN cable length ( crosswalk or ethernet cable ) ; it does n’t weigh on a modernistic calculator . Because both of them habituate the same larboard and have very few functional differences .
Step 2 : Enable connection Sharing on Both PCs

Now that you have physically connected both personal computer with a LAN transmission line , we have to deform on web Sharing on both computers to exchange files between them . It is a simple-minded operation step - by - step process . verify you do this on both PCs .
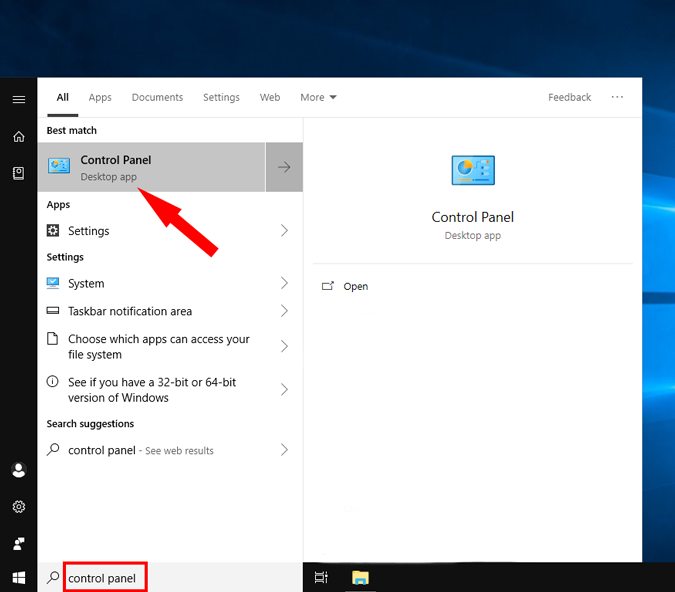
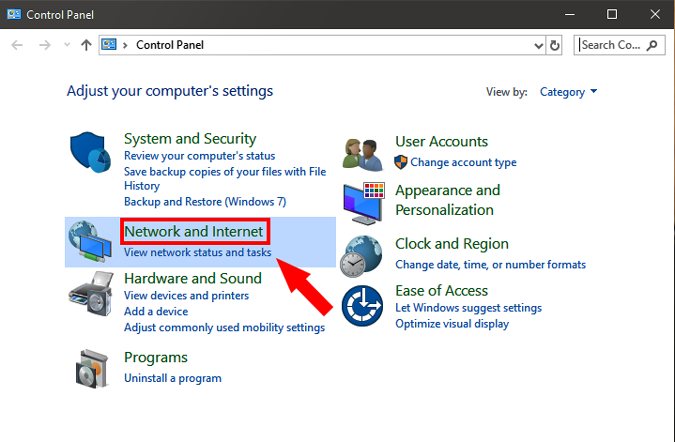
To enable sharing , go to the Start computer menu and seek “ Control Panel ” . Once you see it , press it , to open it .
Once the Control Panel window open , press connection and Internet .

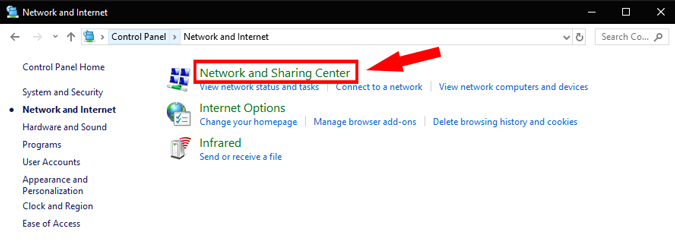
In the next dialogue box , subject web and Sharing Center . Alternatively , you could also typewrite “ control condition Panel\internet and Internet\internet and Sharing Center ” in the search boxwood of Control Panel and attain Enter key . This will airt you from Control Panel to web and Sharing Center .
On the remaining - hired hand side of ‘ internet and Sharing Center ’ window , tap “ Change advanced sharing configurations ” .
Here , you ’ll regain three networks – Public , Private and All connection . Public web is for places like airports and coffee shops , Private electronic web is for an organization or your home electronic web and All web comprises of both . To check that , the frame-up is unflawed , we ’ll urge you take “ All Networks “ .

Next , elaborate All Networks by flick on the drop - down icon . Here , we ask to enable Public share-out so that the microcomputer can get at files from each other over the LAN cable . To avoid more configuration , justTurn off countersign protect sharing .
By doing so , you activate the other figurer to access shared data without providing any certificate . This is not a good security drill by since you are sharing your data with people you trust , you’re able to make this one - time exception . Once you are done with file cabinet sharing , make indisputable you Turn on countersign protected communion .
Once done , snap Save Changes . Just as I aver in the beginning , repeat the same step for the other PC .

Step 3 : Setup Static IP
Now that you have enable web communion on both PC , it ’s time to bring both the computers on to the same web . We will do this by set a static IP address of the same class . Just like the old step , you need to do this on both microcomputer . The following are the steps .
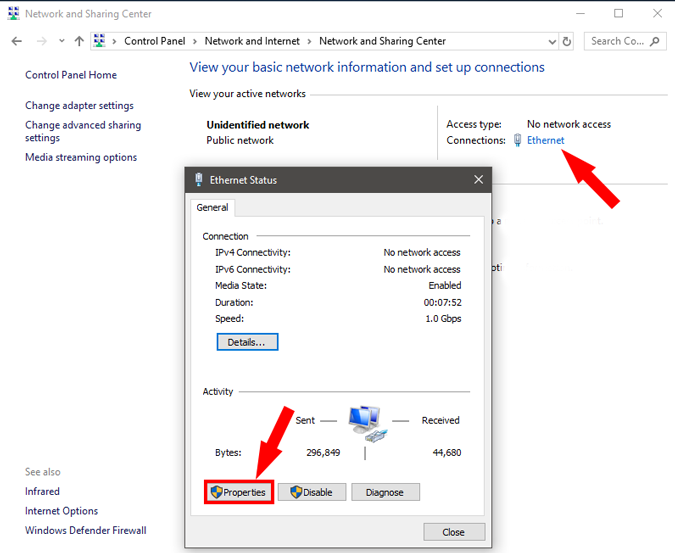
1 . To set up a Static IP , open Control Panel , browse to internet and Internet and click onNetwork Sharing Center . Alternatively , you’re able to also properly - press the Start Menu and select connection Connections .
2 . On the next windowpane , you will see the active connections which should be Ethernet , since both PCs are connected with a physical LAN cable . tap the Ethernet connection . A new dialogue corner will open up , here sink in on the Properties button .
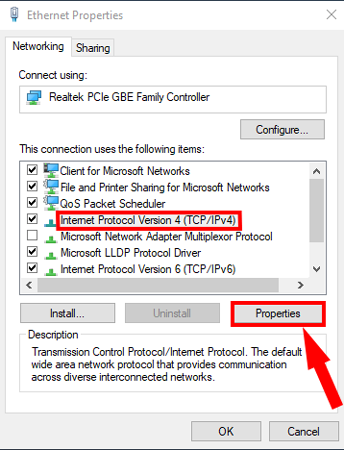
3 . In the next pa - up , select “ Internet Protocol Version 4 ( TCP / IPv4 ) ” . Now , press Properties . This will open another dialog box .
4 . Here , you need to configure the two microcomputer with different IP configurations .
On calculator 1 , pick out the alternative “ employ the following IP destination . ” and , put the following value
Of of course , it ’s not necessary you use these IP address . you’re able to use any Class A or B IP reference . In instance you are not sure what this all means , proficient stick with this instance .
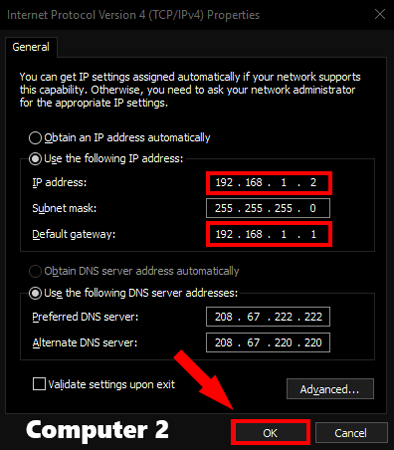
On the second computing gadget , do like steps , but alternate the IP computer address and Default gateway value
What we are doing is keeping the subnet mask the same and alter the IP computer address .
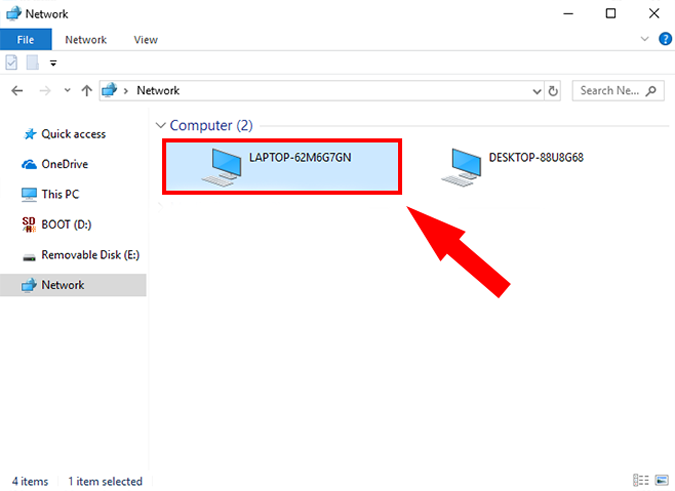
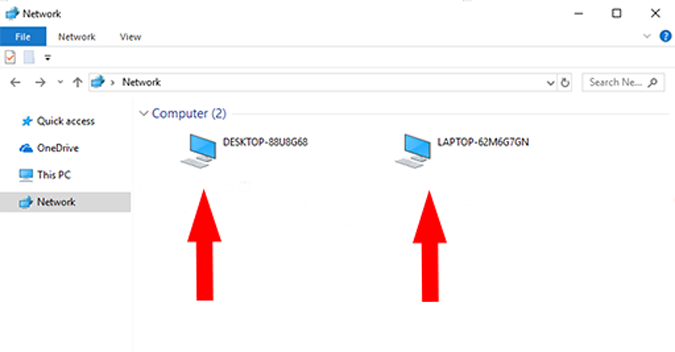
Next , open up your Window ’s File Explorer and sink in on internet tab key at the odd side of the windowpane .
If you have set up everything ripe , both the PCs should appear in this connection windowpane on both computers . Now , you’re able to just press the other PC ’s picture and browse the file . But wait , you still need to configure one last setting .

Step 4 : Share a folder
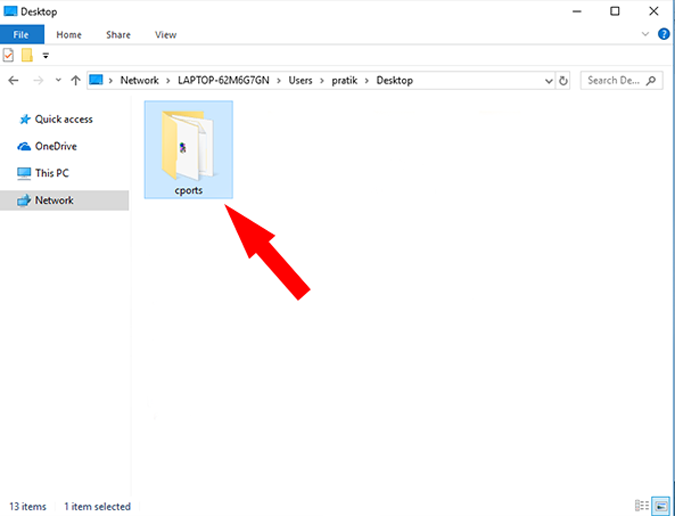
Assuming that you have associate the cable properly , enabled the communion options , and configured the IP addresses . Now , it is time to send files from one PC to another . For that , you first need to share the objective folder on LAN . I ’ll recommend , you may create a new folder on your screen background , and copy glue all the files that you want to move to another computer in that folder .
Next , select the folder you want to share and decent - clack on it . From the context menu , navigate to “ Give accession to ” and select the selection “ Specific the great unwashed . ”
3 . In the File Sharing window , chooseEveryonefrom the drop - down computer menu . tap theAddbutton next to it and finally hit the Share button .
Once you have partake it , the next window will show you the internet placement of the folder .
That ’s it . Just go back to the other personal computer from where you want to reach the file , launch the Networks panel and press the other computer ’s name .

Here , you will see the brochure you just partake in . From there , just start the folder and shift the file and folders as you normally do . i.e , by written matter and paste . Similarly , you’re able to repeat the same steps from the other computer .
close Words
In case of any queries , I would hint youwatch this videotutorial . The same procedure has been described visually .
This method acting would work only between Windows PC . For Mac or Linux , you need to use a dissimilar file deal agent like Samba . If you have furthermore queries , strike down down a comment and I will be happy to answer them .
Also read:10 mode to Share Files between Two Computers
38 Google Earth Hidden Weird Places with Coordinates
Canva Icons and Symbols Meaning – Complete Guide
What Snapchat Green Dot Means, When It Shows, and for…
Instagram’s Edits App: 5 Features You Need to Know About
All Netflix Hidden and Secret Codes (April 2025)
All Emojis Meaning and Usecase – Explained (April 2025)
Dropbox Icons and Symbols Meaning (Mobile/Desktop) – Guide
How to Enable Message Logging in Discord (Even Deleted Messages)…
Google Docs Icons and Symbols Meaning – Complete Guide
Samsung Galaxy Z Fold 7 Specs Leak Reveal Some Interesting…