Microsoft has upgraded thehardware requirements for Windows 11making TPM 2.0 necessary to deploy the latest version of Windows on your electronic computer . What if you want to try Windows 11 without leaving the Windows 10 interface ? What if you do not haveTrusted Platform Module 2.0 ? Well , the good news is that installing Windows 11 still is possible without ask TPM 2.0 module using Hyper - V. Here is how you may arrange up a virtual machine on Hyper - volt and install Windows 11 even if your computer lacks TPM 2.0 .
If you are incognizant , Hyper - American Virgin Islands a native Windows virtual machine tool that allow you to install and screen various flesh on practical hardware . Although it is not enabled by default , you may chop-chop deploy the required modules and start using them on Windows 10 .
How to Enable Hardware Virtualization
Before follow the Hyper - five facility footprint , you must confirm whether virtualization is enabled or available on your computer or not . The Task Manager shows if hardware virtualization is potential on your computer or not . For that , open theTask Managerand switch to thePerformancetab .
Select the CPU tab if it is not selected , and find out out theVirtualizationlabel . If the condition isEnabled , you do not have to do anything and can skip to the Hyper - V instalment part .
However , if the status isDisabled , you have to enable it in UEFI . The setting can be enshroud somewhere in the Features or CPU Configuration chit .

Here is how you canenter the UEFI modality .
It entirely reckon on which C.P.U. you are using , and dissimilar producer place this option at different locations . That said , it is good to explore for SVM Mode , Virtualization Technology , Intel Virtual Technology , Intel Virtualization Technology , etc . in UEFI and enable it .
Otherwise , you’re able to check your mainframe manufacturer ’s support or noesis base to discover the accurate locating . Note that Mouse does n’t ferment in UEFI modality , so you will need to use the keyboard . You will find the instructions at the bottom of the UEFI screen which varies from PC to PC .

How to Setup and Install Windows 11 on Hyper-V
The follow steps show how you’re able to set thing up on Hyper - V. Then , you’re able to install Windows 11 like any other Windows version .
1.press the Taskbar hunting loge , search for “ turn window feature on or off , ” and press the respective hunting outcome .
2.After opening the Windows Features windowpane , search forHyper - Vand enable it ( check it ) .

3.Click theOKbutton to start the installation process andRestart Nowto finish installing it .
4.Search for “ hyper - fin handler ” in the Taskbar search boxwood and tap the corresponding search result to spread the Hyper - fivesome Manager windowpane .
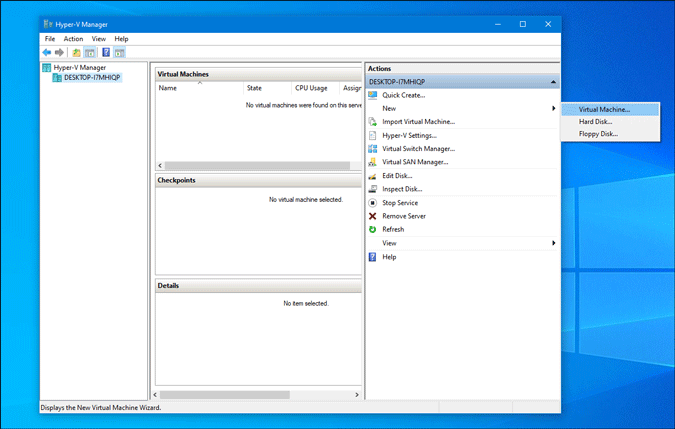
5.tap yourcomputer nameon the left side and selectNew > Virtual Machineon the right side of the window .
6.Skip the first appearance window by clicking the Next button and select the virtual machine name in theSpecify Name and Locationtab . Then , click the Next clit again .
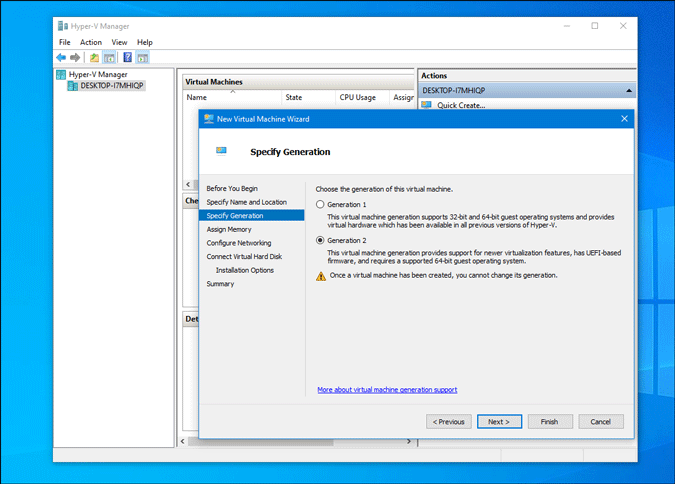
7.SelectGeneration 2 in theSpecify Generationtab and fall into place on the Next clitoris . If you pick out Generation 1 , you could not install Windows 11 .
8.In theAssign Memorytab , prime at least 4 GB of RAM so that your virtual ironware can execute the OS swimmingly .

9.In the next check , Configure Networking , expound the throw away - down list , and selectDefault Switch .
10.Next , you have to take theCreate a practical operose diskoption , enter the name of your VHDX , take a locating , size , etc . Once done , click the Nextbutton .
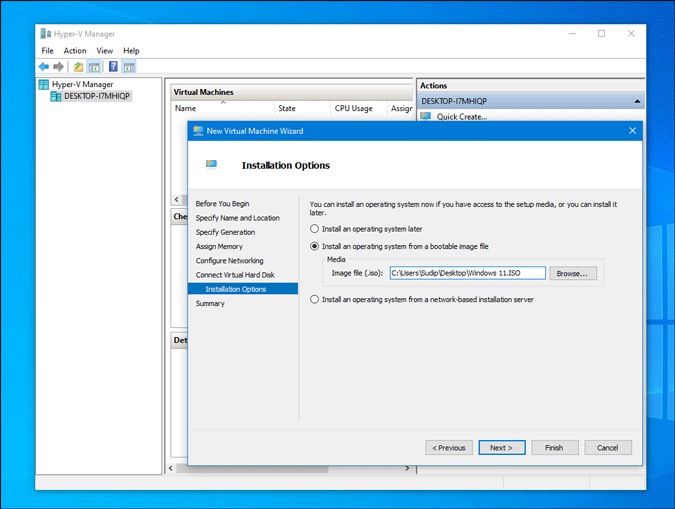
11.Now , you have to select the Windows .ISO Indian file . For that , choose theInstall an operate system from a bootable image fileoption , select theBrowsebutton , and take the ISO file .
If you do not already have the Windows 11 ISO data file on your electronic computer , you may use theUUP coldcock mastery - wrinkle toolto download it .
12.Go to the next discussion section , and click theFinishbutton .
Now you shall find the virtual machine on your screen . However , you have to enable practical TPM to startle the instalment process . For your information , it is not mandatory to have forcible TPM 2.0 module for enable VMTPM in Hyper - V.

13.Right - snap on the virtual machine and selectSettingsfrom the linguistic context menu .
14.Switch to theSecuritytab and tick theEnable Trusted Platform Modulebox . Then , click theOKbutton to preserve the change .
15.Click theStartbutton to start out Windows 11 installation .

The installation process of Windows 11 is the same as any other older version of Windows like Windows 10 , 8.1 , and 7 .
Wrapping Up: Setup and Install Windows 11 on Hyper-V
Setting up a Windows 11 virtual simple machine on Hyper - V is not that difficult . The skillful matter is that you’re able to test the latest interlingual rendition of Windows even if you do not have the actual Trusted Platform Module . Do let us know if you encounter any problems while installing Windows 11 on Hyper - V.
38 Google Earth Hidden Weird Places with Coordinates
Canva Icons and Symbols Meaning – Complete Guide
What Snapchat Green Dot Means, When It Shows, and for…
Instagram’s Edits App: 5 Features You Need to Know About
All Netflix Hidden and Secret Codes (April 2025)
All Emojis Meaning and Usecase – Explained (April 2025)
Dropbox Icons and Symbols Meaning (Mobile/Desktop) – Guide
How to Enable Message Logging in Discord (Even Deleted Messages)…
Google Docs Icons and Symbols Meaning – Complete Guide
Samsung Galaxy Z Fold 7 Specs Leak Reveal Some Interesting…