Today , everything happens on the cyberspace from on-line classes to bureau meetings . It would be large to take advantage of remote cultivation by recording it . The obvious welfare is that you may get back to it later for future mention . If you are using Google Meet and want to record your confluence , then here ’s how to record Google Meet meeting on both background and Mobile River .
Let ’s set off with the in - built option that ’s already uncommitted on Google Meet .
Table of Contents

1. Record Google Meet Using Native Option in Google Workspace
Google Meet has an in - built option for transcription coming together , but only for paid Workspace users . It is useable forBusiness Standard , Business Plus , Enterprise , and Education Plus plan . So if you are on the free plan or the Business Starter plan , you may not see this option . you may continue with third - political party recording tools which I overcompensate by and by below .
Before getting started , remember that if you are not the boniface of the meeting , it will ask for permit from the host when you set forth memorialise . The recording will get started when the server grants permit by react to the prompt . It will also notify everyone in the get together that you are recording the Google Meet coming together . trap people , opening subtitle , etc . will not be record though . That being said , here ’s how you could memorialize on Google Meet .
1.While you are in the meeting , click onActivities > Recording > Start recordingandStart .

2.If you are not the host of the meeting , then the server will get a prompt to accept your transcription request . Once the host clicks onAccept , the transcription will get get . Also , all the people in the meeting will be send word that their merging is being recorded .
3.Once completed , flick onStop recordingon the bottom measure and again click onStop recordingin the pop - up to substantiate . The transcription will stop automatically when everyone leave the meeting .
4.The recorded video will be redeem to Organizer’sMeet Recordingsfolder in Google Drive . An e-mail will be station to you and the host of the get together for access .

5.If it is a scheduled meeting , then the link will be added to the Google Calendar event . So that all the people who can get at that meeting event , can also get to the transcription .
If you are using the supported architectural plan , but can not get to the recording option , check that you have enabled transcription in the Admin Console . To do that , openAdmin console table > Apps > Google Workspace > Google Meetand click onMeet Video preferences . Then click onRecordingand check theLet people memorialize their meetingsbox . change will take place at the organization level within few mo to up to 24 hours .
The in - built option has few drawback . It is not available for everyone and redeem the recorded video recording in the organizer ’s Google Drive or else of yours . So not just you , all the the great unwashed in the meeting can get at your recordings .
2. Vmaker | Screen Recording Tool
I have tried a wad of cover recording tools and lastly shoot down on Vmaker for two reasons . One , it put down both the system audio frequency and mike audio at the same prison term . So you could listen to both your and your team ’s voice in the meeting . secondly , there are n’t any watermark and ads . The app offer liberal recording for up to 720p . You need to get the starter pack for 4k recording , CRT screen annotations , etc . They also allow for a Team pack for scheduled recording , real - time collaboration , etc .
The free plan is good enough for recording Google Meet meetings though . Here ’s how .
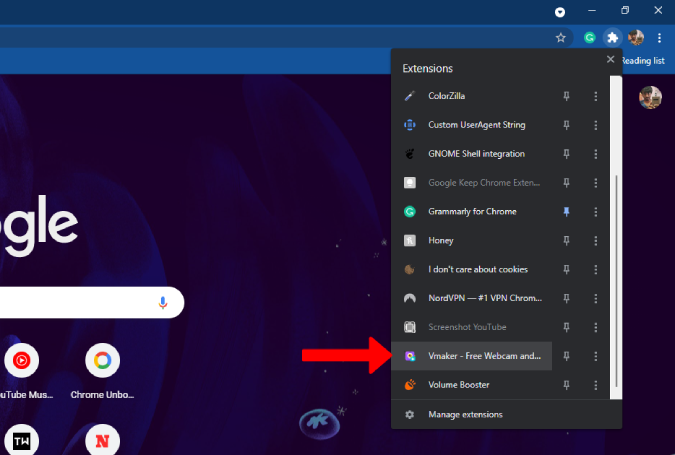
1.First install theVmaker chrome extensionfrom the Chrome Web Store .

2.Now select theExtensionsicon at the top right nook and then selectVmaker .
3.It will open a belt down - up carte for you to lumber in to the servicing .
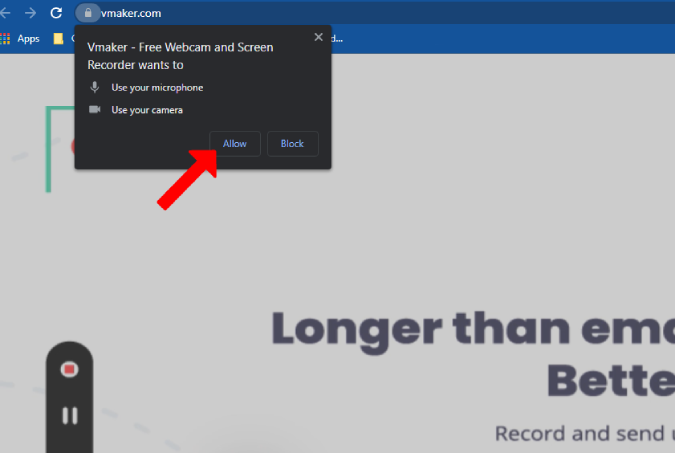
4.Once logged in , again press the Vmaker wing . This will incite for the camera and microphone permissions . Grant them by fall into place on theAllowbutton .
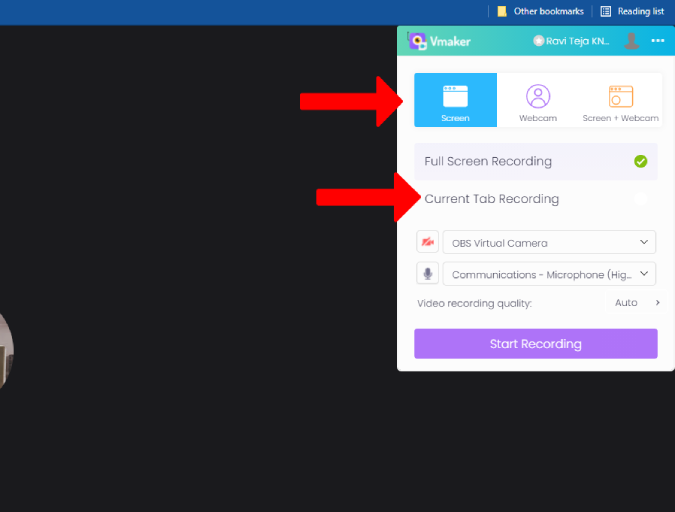
5.The set - up is complete and you are good to go . To immortalise , press the Vmaker extension at the top ripe street corner while you are in the merging . This will start the overflow menu for you to select how you require to record .
6.At the top of the menu , you’re able to select whether you desire to record screen , camera , or both screen and television camera . you’re able to selectScreenas you are record Google Meet . Also , prize whether you want to record the intact screen or just the Google Meet tab .
7.Then , pick out the mic if you are using headphone or an external mic . you’re able to also deepen the video quality of the transcription by click the dropdown next toVideo recording quality .

8.Once you are done with setting up preferences , tick onStart Recording .
9.Unlike the aboriginal way , this will immortalize all the actions like pinning , captions , opening schmooze , etc . While recording , you shall see a whatchamacallum on the left with options to pause the transcription , delete , turn off the microphone , etc . To stop the recording , select the record icon in the widget .
10.This will airt you to a newfangled windowpane where you’re able to represent your recording . you could scroll down and access other choice to delete , edit , and download the Google Meet transcription .
11.you’re able to get at past recordings underVmaker Chrome wing > three - superman carte du jour > My Videos .
12.This will enter the Vmaker dashboard where you’re able to get at all the recording .
Though the Vmaker Chrome wing is easy to use and spare , it can not record in high resolution . You need an upgrade to a starter inner circle that costs $ 10 / calendar month . But if you prefer high - quality transcription for gratuitous , then you could use services like OBS Studio .

3. Using Obs Studio for Better Video Quality
1.First , you require to download theOBS Studio . Once downloaded , afford the file and set up the OBS Studio app just like any other software program . OBS Studio supports Mac , Windows , and Linux .
2.Launch the program once it is installed . Now , open theSettingsoption from the bottom proper turning point of the app .
3.Here , take theVideooption to select the resolution that you want to register Google Meet get together in . It will be coiffe to high - resolution by default .

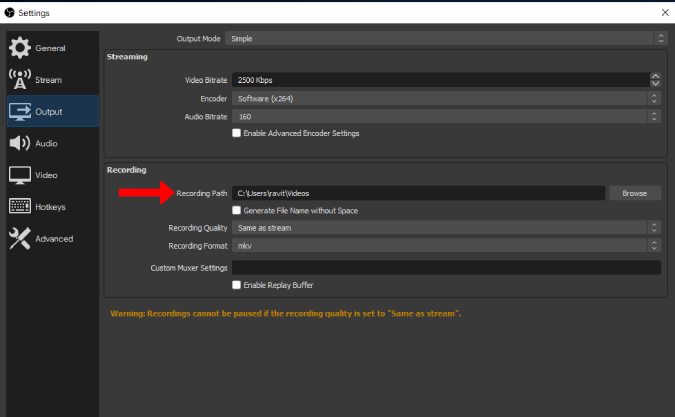
4.Then go to theOutputoption to change the Recording Format and Recording Path . Once done , click onOKto save changes .
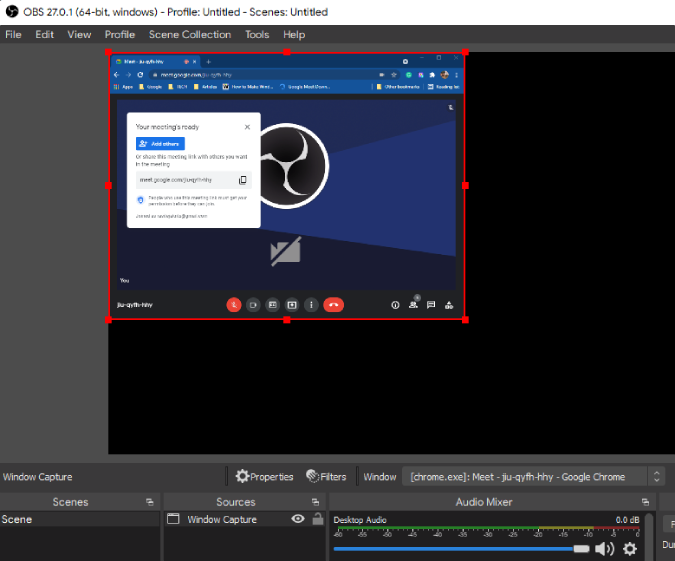
5.Now , tap thePlus(+ ) iconunder theSourcestab and then selectWindow Capture .
6.Just click onOKin the bulge - up window . Then tap the drop curtain - down picture beside theWindowoption and selectGoogle Chrome(or any web browser that you are using for Google Meet ) and clickOK .

7.This will show you Google Chrome in a preview . If you have Google Meet pill open , you could discover the Google Meet in a preview just like in the screenshot below .
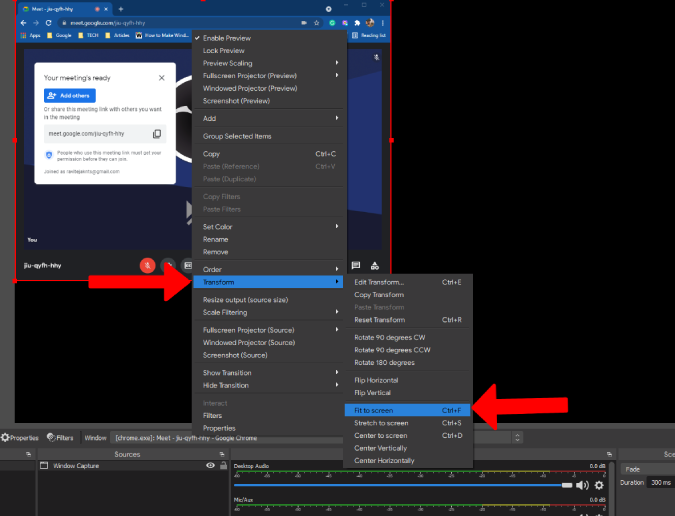
8.Just right - clink on the prevue and selectTransform > Fit to block out .
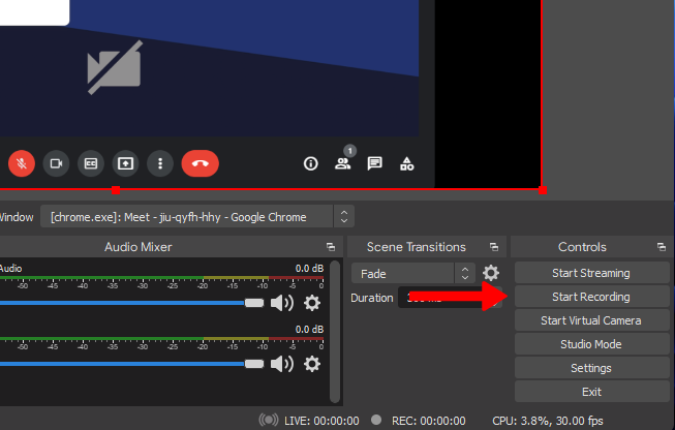
9.Once done , snap on theStart Recordingoption at the bottom right niche . Now you could open Google Meet and proceed your meeting just like normal .

10.To stop the recording , capable OBS and fall into place on theStop Recordingoption at the bottom good street corner .
This will save the recording to the Recording path you had set in the context before .
4. Native Screen Recorders on Android and iOS
If you are looking to immortalise Google Meet meetings on your earphone , go for the native method if you are on a corroborate workspace plan . The entire process is similar to desktop . Others can apply a screen door recording app on Android and Io as most earpiece these day offer a native elbow room to book screens .
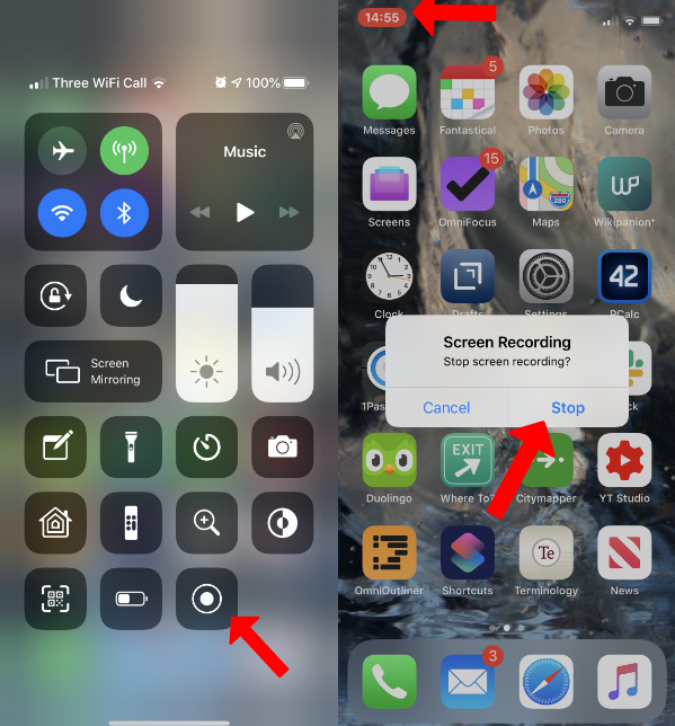
On iOS , go toSettings > Control Centerand hydrant on the Plus(+ ) icon besideScreen Recordingto cover recording feature to Control Center . Now openControl Centerand tap on theScreen Recordingicon to go the recording . To stop , again go to the Control Center and tap the same icon again . you could find recordings saved in the Photos app .
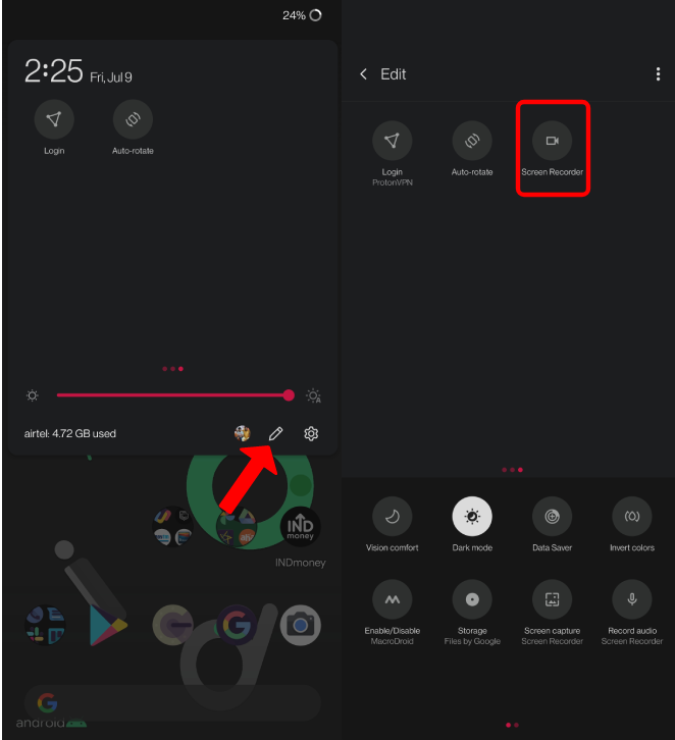
On Android , subject theQuick Settingspanel and seem for theScreen Recordingbutton . If you ca n’t happen it , pink on theEditoption and search for the screen transcription button to add it to quick configurations . Now just reach the quick setting again and wiretap on the screen transcription button to start put down . To halt , again tap on the same Screen Recording button . The single file will be saved to the screen show folder in your local storage .

Not all Android earpiece have the blind transcription option built into the O . If you could n’t find the screen door transcription option on your phone , then you’re able to go for the third - party recording apps one of which we discuss below .
5. Screen Recorder | Play Store
There are a plethora of CRT screen recording apps for you to choose from on Android . But I have picked theScreen Recorderapp from Kimcy929 as it replicates the in - built cover recording equipment on Android phones . Once you have download the app , spread out it and grant storage permission to save the recording data file .
1.OpenQuick Settingspanel and tap on theeditbutton . Now you will get hold a Screen Recording tile created by the app that you have put in . Drag and drop to add the tile to your quick options panel .
2.Open thequick settingsand tap on theScreen Recordingtile to start recording .

3.To stop , again intercept on the sameScreen Recordingtile . The file will be saved to the Screen transcription pamphlet in your local storage .
What to Choose to Record Google Meet
you may use the in - built option if you are a Workspace substance abuser with a supported plan . If you are not or if you need to keep the transcription to yourself , Vmaker is a no - brainer . But if you are looking for a better quality outturn than 720p , then you could choose the OBS Studio . In - built options on Android and iOS works slap-up . We commend ask for the consent of all the people in the coming together before memorialize as recording without permissions can be illegal .
Also Read :
Android 16 Is Coming: 6 New Security Features to Keep…
Android 16 Bubble Bar: 7 Things Google Could Add To…
38 Google Earth Hidden Weird Places with Coordinates
Google Accidentally Reveals Material 3 Expressive: Android’s Future and it…
5 Features We Hope to See in Google’s Desktop Mode…
Small Phones Are Making a Big Comeback: Why Now?
The Great Android Exodus: Chinese Smartphone Makers Plan To Build…
12 Underrated iOS Apps You Should Download Now (May 2025)
13 Surprisingly Useful Underrated Android Apps (May 2025)
Canva Icons and Symbols Meaning – Complete Guide