No doubt , Windows is a popular OSwhen it comes to screen background . But , the pop OS has its own fair share of problems . Due to the diverseness in hardware and the amount of built - in bloat , Windows has never been as static asmacOS . To add to that , unneeded background knowledge service which you may not disable . All of these lead to an underperforming system and that ’s why you see so many article around the web stating “ How to make Windows 10 quicker ” . Well , I am not gon na talkabout disk fragmentation , use your Pen Drive as a RAM , Uninstall apps and all those tricks .
We will tattle about some strongsoftware changes and computer hardware upgrades on Windows . So , here are 9 hacks to speed up up Windows 10 .
How To Make Windows 10 Faster
1. Turn off Cortana
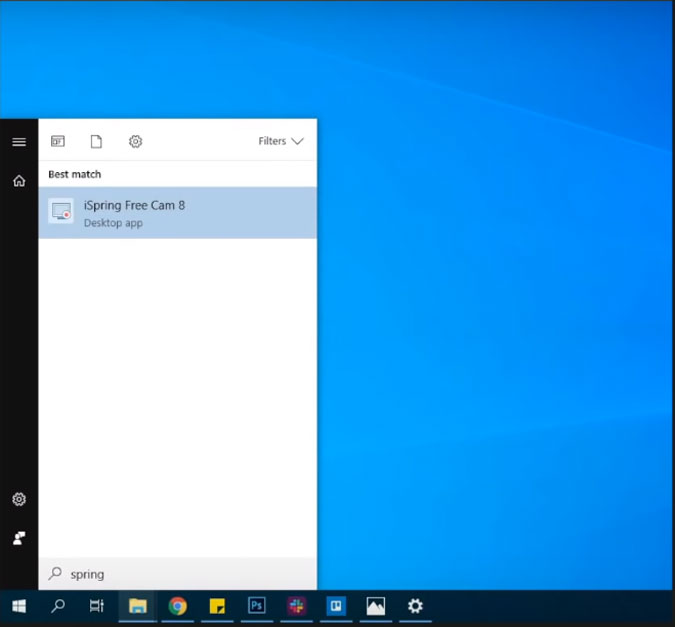
Now , I do n’t really like when companies start pushing services on you . There is no problem with Cortana but it ’s not reasonable when you do n’t have the choice to incapacitate it . With Cortana on , you have invariant service running in the background signal . Not only that , it does touch on the search upshot . For object lesson , I wanted to search for an software called “ iSpring Free Cam ” . Below is how the hunting results look with Cortana and after Cortana disabled .
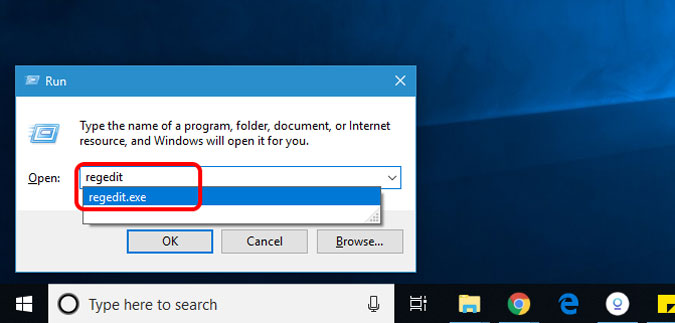
Now , Windows does n’t permit you disenable Cortana after the recent update . But , you may still do it by editing the registry entries . But , before you do that I recommend youtake a backupfirst . In slip , you end up with an upshot , you could always roll back to the previous backing period . Now , to edit the registry entries , go to the run menu and type “ regedit.exe ” .
We have to make a folder under Windows . To do that , right select Windows and take New and select Key . Name the key as “ Windows Search ” .

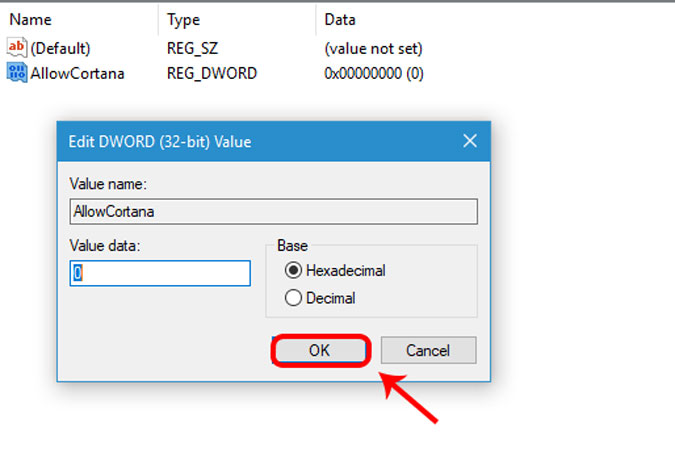
Now , in the Windows Search brochure , make a D - Word entry . Name it as “ permit Cortana ” and put the economic value as 0 . Once done , press hunky-dory and restart Windows .
In case you are too slothful to do all of these , here is the contact to a zip folderwhich has 2 registry launching : Allow Cortana and Disable Cortana . Just double tap Disable Cortana and it should do the problem for you . restart the PC once and carry that you should have Cortana disabled . The hunting saloon for Cortana will be invisible now and the web consequence and mesmerism during the search will also be disable .
2. Disable native Indexing
After you have switched off Cortana , have ’s move to Windows Search . It is n’t the good out there . Plus , you have the Search services continuously run in the background . It search for email , forefinger files , and other contents . This consumes a lot of resource in the background signal and slows down your startup time even further .
So , if the aboriginal Windows search is n’t any faster so why not just turn it off and save some resources . To do that , we require to remove entries from the Indexing list . Go to the Windows Search for the last time and search Indexing options .
Read : How to interchange Key Functions on Windows 10/8/7
In the Indexing Options carte , we need to remove all the entries . For that , press the “ Modify ” clit .
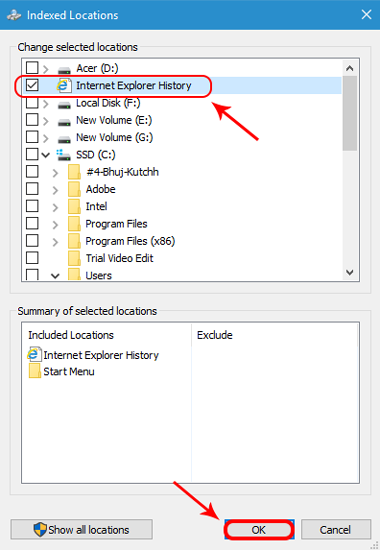
Now in the Modify Indexed Locations menu , uncheck all the Selected Locations . you could leave Program Files if you need because of its a habit of start to Start Menu to open up apps . This will remove the folders from being indexed . If you ca n’t find the booklet , tap the Folders under “ Summary of take Locations ” section below and it will redirect you to the Location in the “ Change selected locations ” subdivision . Once you have unchecked everything , dawn on OK to keep launch the change .
Once you have saved the change , the selected folder will reflect on the Indexing Options fare . end the Window and now Windows Search wo n’t index any files . But it ’s still running in the background , you’re able to stop it altogether from Services.msc by incapacitate the service “ Windows Search ” .

Right press the Windows Search service and press Properties . In the Properties window , quality Startup Time as“Disabled ” .
Now that you have disabled aboriginal Indexing on Windows , it ’s clock time to swop to a better Window ’s search app called Everything .
Everythingis a popularWindow ’s utilitythat replaces the native Windows search . Compare to Windows hunting , Everything is right smart quicker and lets you do all the purpose that you may go through the Windows Search .

3. Analyze Startup Impact
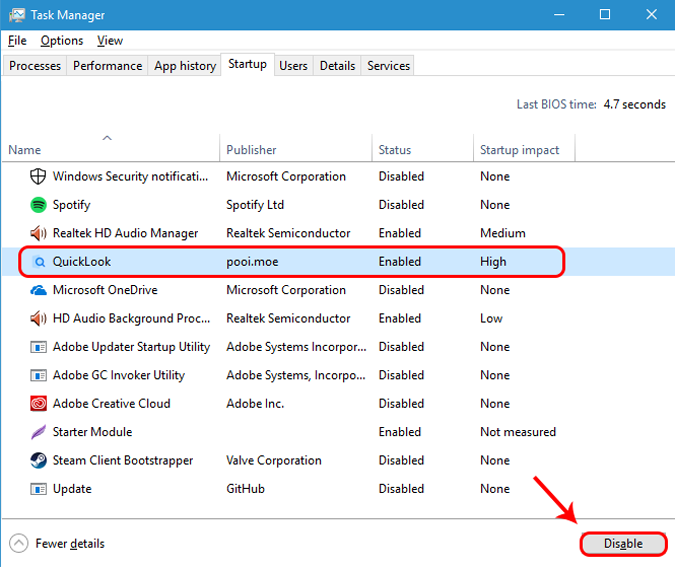
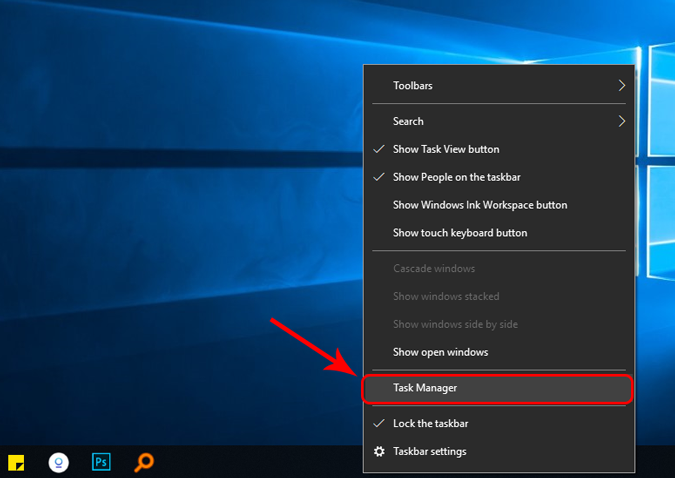
Most Windows organisation take a lot of time to reboot up . The component which has a direct wallop is Startup Programs . Unlike most people , I would n’t recommend you to disable all Startup Programs . That ’s just being uninitiate ! I recommend you discipline the startup impingement and stop the apps with higher impact . To do that spread out the Task Manager . you may right select the taskbar and chatter on “ Task Manager ” . Alternatively , you could also press Ctrl + Shift + Esc to trip Task Manager .
In the Task Manager , pilot to the Startup pill . In the Startup tab , you will see the Startup programs and corresponding to it the “ Startup Impact ” . If you see some program ’s impact as not appraise , reboot the organization once and it should be measured . Now , If theStartup Impact is gamey , then the program devour more time and resources during the inauguration . We need to disable these programs and to do that , clack and select the programme and hit the Disable button at the bottom - rightfield .
Post this , you should see a significant betterment in the response time after the Windows inauguration .
4. Best Performance Mode
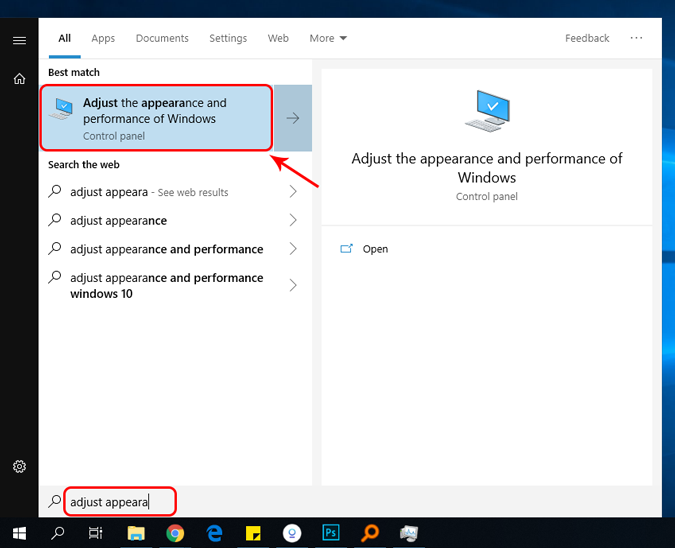
Now , these are some drastic cadence . If you are system is acquit too sluggish and jittery with the art , I would advocate switching to Best Performance Mode . However , this will bring down down several animations and computer graphic options . To interchange to the Best Performance Mode , go to the Start Menu and type “ aline appearance ” . You will see a setting pop up send for “ correct the show and public presentation of Windows ” , press it .
Read : Unlock Windows With Android Fingerprint With This New App
Now , in the Performance Options window , select “ Adjust for Best Performance ” . By default , the selected option will be “ aline for unspoilt visual aspect ” . After you have selected Adjust for Best Performance pick , you will see animations and nontextual matter choice which will get handicapped in the below section . In fount , you require some specific graphics like “ Show Thumbnails rather of icons ” , you may check on it and turn on the graphic . select the Ok button to file the changes
Once you have enabled the Best Performance Mode you will see a few graphics changes . The noticeable ace would be icons alternatively of Thumbnails and no dark under window and shiner arrow , etc . The graphics difference of opinion in this way is huge but it speeds up the native File Explorer as well as reduces the stress on the graphics rendition .
5. Battery Settings
Windows by default option execute the organisation at mediocre mise en scene to save battery . sprain it to the highest setting may cause your barrage to debilitate faster . But , it does improve the operation of your organisation . Here ’s a quick way to toggle Battery modes , press the Battery icon on the bottom - right of the taskbar . It will institute up a Battery optimisation carte du jour wherein the nonpayment mode is set for Better Performance . sweep up the slider to the uttermost right to go under it to Best execution mode .
6. Turn off Windows Defender
Windows Defender is baked into Windows 10 . It melt down several services in the background to guarantee the system of rules is protected against malware and virus . Recently , Windows Defender also convey the sandboxing characteristic which ensures that a computer virus - infected app does n’t crooked other files . Windows Defender is a estimable aboriginal Robert William Service to apply but if it ’s causing a toll on your system or you get annoyed by the frequent notification you could twist it off .
However , like Cortana , there is no direct way to do it and you have to blue-pencil Registry keys . But , before you do that I recommend youtake a backupfirst . In caseful , you end up with an consequence , you may always roll back to the previous backup point . Now , to edit the registry entries , go to the run fare and typecast “ regedit.exe ” .
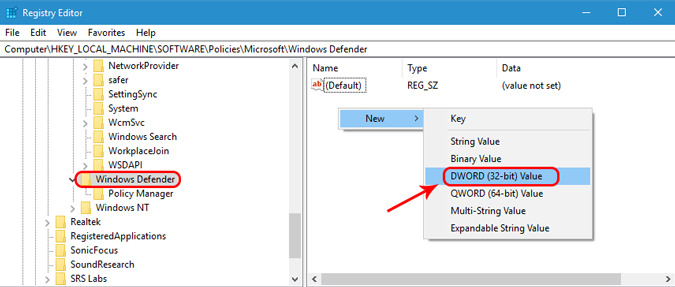
You will already regain a data file call in Default . Now , to incapacitate Windows Defender we have to create a new D - Word file . To do that , right press the empty space in the right and choose New . Under New , dawn on “ D - WORD ( 32 - morsel ) value ” .

Name the Florida key as “ DisableAntiSpyware ” . Change the value to 1 by twice - clicking on the Florida key . Once done , tap the Ok button
reboot your PC for the change to take upshot . After the restart , Windows Defender services should not be draw .
Note : This might make your microcomputer vulnerable to viruses and malware on the Internet or via obliterable devices

7. Turn off One Drive Sync
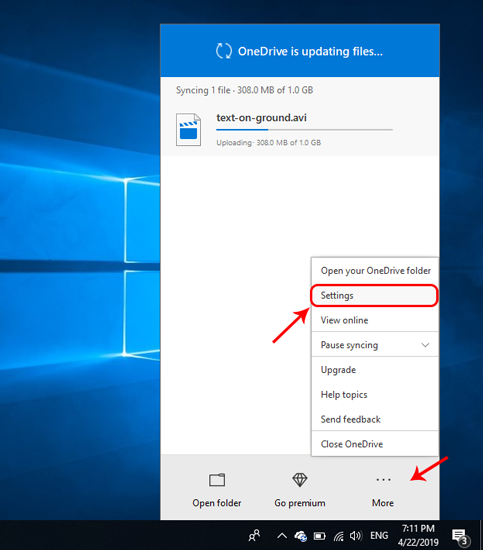
Microsoft added One Drive Sync in Windows 10 which mechanically backs up your data . But , it unendingly tries to synchronize Indian file from windows to the swarm which takes a fair number of resource . In my suit , I use Google Drive so I do n’t demand One crusade sync . Hence , I turned it off . To do that , flick on the One Drive icon at the bottom - right hand of the taskbar .
In the One Drive carte du jour , snap on the More button at the bottom - right wing . From the elongated menu , press configurations .
In the Microsoft One Drive preferences carte du jour , go to the Account Tab . In the One Drive Storage plane section , you will see a hyperlink titled “ Unlink this personal computer ” . snap on it and it will intermit all the syncs from your system forever .
Now , the sync is stopped but One Drive will still run for every time you resume your system . To disable that , go to the configurations tab and uncheck the first option under the General surgical incision . After that , tap the fine button to register the changes .
8. UnderVolting
You might already know about OverClocking . But , Overclocking is not always supported by every BIOS and there are several consequences you need to consider . So , here is another concept hollo Undervolting . Before , we begin with Undervolting we need to see what it actually is . The CPU and GPU are often provide with a slightly extra voltage which they do n’t in reality want . Now , this superfluous voltage leads to the propagation of Thermal energy which causes thermal choking . In simple words , when your CPU is heated up to the max temperature it tries to fall to normal temperature by shedding load .
So , if your PC does get heated up a lot while doing normal stuff , you should try undervolting . To undervolt , you may use theIntel ’s XTU appfor Intel processors . If you habituate an AMD processor you may use a third - party app call Throttlestop . I am on an Intel i5 - 7200U , so I am using the Intel XTU app .
To undervolt your CPU , open up the XTU app and go to the Core section .

Now what you may do is , minify the amount of potential drop being supplied to your C.P.U. . To diminish the voltage , we have to go towards the negative side . Please be careful while doing this and make certain you do n’t go to the positive side as this would go to overvolting . Overvolting causes more electric potential to be cater and thus frequent heating system of your personal computer . In my lawsuit , the processor is Intel i5 - 7200U , so I have undervolted it to -0.1 V. you may google your CPUs Undervolt limit or just try decreasing it discontinue - by - stop and see where your microcomputer freezes . The previous voltage full point should be the mellisonant spot . If at any footfall , your system freezes just resume your PC and it would reset the undervolt limit .
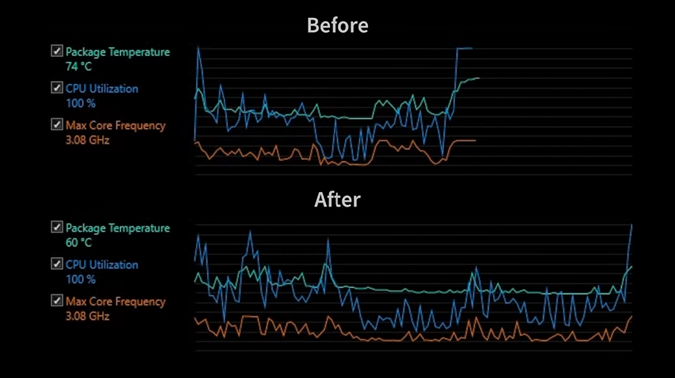
you’re able to emphasise tryout within the app and see the before and after remainder . I have got almost a 10 - grade temperature remainder after Undervolting . This not only hold on thermal throttling but also increases the living of your processor .
But do n’t exaggerate this and I would n’t commend doing this for your GPU . Undervolting is less complicated than overclocking but does give long condition benefits .

9. Hardware
So , this is the maximal performance boost you may accomplish on SW . At the end of the day , there is no alternative for good ironware . you could begin by extending your random memory memory . People do n’t understand how important of a difference a RAM can make . It lets you use your CPU to the maximum extent .
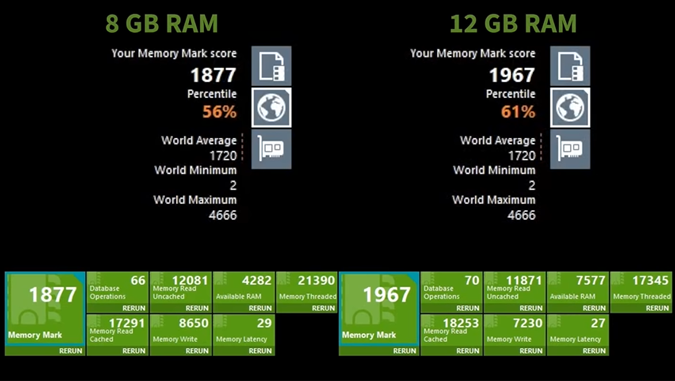
Now , I went on Amazon and got myself a all important 8 GB RAM with a 2400 megacycle clock rate . I would n’t recommend a random memory with a higher clock speed . Because of most of the CPU ’s max out at 2133 Mhz . If your CPU supports a RAM of higher frequence , buy a one with 3000 Mhz .
After the RAM switch , you’re able to see the benchmark score with 8 GB of RAM and 12 GB of RAM . It does make a significant amount of difference .
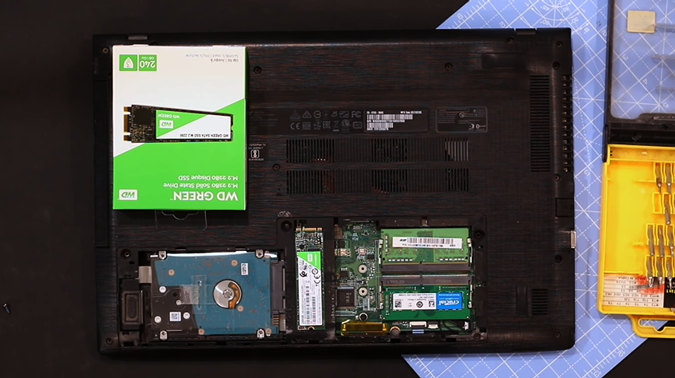
In pillow slip you have an extra SSD slot in your PC , go ahead and buy an SSD . SSD significantly ameliorate the overall functioning of your PC . They have now catch inexpensive and remember internal SSDs are cheaper than external SSDs . you’re able to get a 2.5 7 mm or M.2 Internal SSD look on your PC expansion slot . you’re able to easily google your laptop specs online . After you have the SSD , swop your broadcast file cabinet and OS to the SSD with the assistant ofMiniTool Partition Wizard . The tool lets you clone your C drive to the SSD so you’re able to boot from the SSD side .
Read : How to shift Windows 10 permit to New Computer , Hard Drive , or SSD
Wrapping Up
So , these were some of the ways to importantly boost your windows operation . If you require to switch off all Windows natural process include Windows Defender , Firewall , Update military service , etc , you could use this GitHub handwriting . However , I would urge that you study the Instructions and empathize what service you are disabling .
Also Read : Best Windows Utilities You Should Be Using In 2019 .
38 Google Earth Hidden Weird Places with Coordinates
Canva Icons and Symbols Meaning – Complete Guide
What Snapchat Green Dot Means, When It Shows, and for…
Instagram’s Edits App: 5 Features You Need to Know About
All Netflix Hidden and Secret Codes (April 2025)
All Emojis Meaning and Usecase – Explained (April 2025)
Dropbox Icons and Symbols Meaning (Mobile/Desktop) – Guide
How to Enable Message Logging in Discord (Even Deleted Messages)…
Google Docs Icons and Symbols Meaning – Complete Guide
Samsung Galaxy Z Fold 7 Specs Leak Reveal Some Interesting…