Telnet is the oldest reckoner communications protocol that allow two computers to speak to each other over the Internet or local area internet . However , Microsoft decided to remove the Telnet waiter from Windows 10 and Windows Server 2012 onwards . It ’s a good step believe that Telnet does n’t support encryption and the data point go through the web in manifest text . But , what if I need Telnet for educational intention ? Or what if I do n’t require to configure SSL since I am dealing with a public server .
So , here are few ways to enable Telnet guest as well as Telnet server on Windows version 8 , 8.1 , 10 or Windows Server 2012 and high-pitched . Let ’s start with the client first .
Read : Best Windows Package Manager to Auto Update Apps

How to enable Telnet Client in Windows 10
If you type in telnet inthe bidding promptyou will get an error stating “ Telnet is not recognized as an intimate or external command . ” . This is because telnet client is disabled in Windows 10 by nonremittal . To enable Telnet , go to the starting time menu and case “ Turn window features on and off “ .
On the next pop - up , browse toTelnet Client . snap the checkbox beside it and hit Ok .
window will take some clock time to establish Telnet and once done , you could utilize the telnet dictation in CMD or you could displace the telnet public-service corporation from the search menu . To do that , press Win+S and type Telnet .

This will reach the telnet customer direct within CMD and the window should look like the one below .
How to enable Telnet Server for Windows 10
Telnet clients let you connect to other Telnet Servers . you’re able to not join to your own organisation and flaming distant bidding . For that , you need a Telnet Server and alas , there is no native way to enable it in Windows 10 . You have to install third - company apps to set forth serving Telnet on porthole 23 .
My two preferred public utility company to do so areHK Telnet ServerandKpyM Telnet Server . Both of them serve well a dissimilar audience .
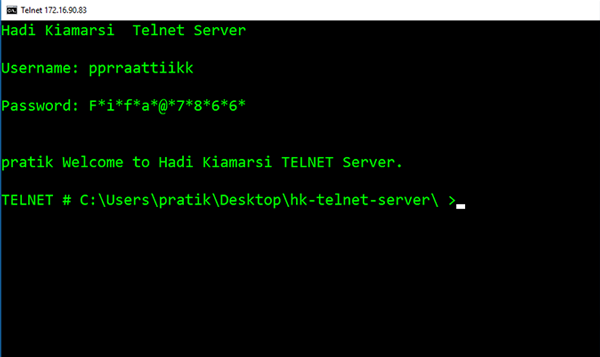
If all you want is to turn on the telnet server to dismiss distant bid to your simple machine , I would advise HK Telnet server . It is fairly easy to set up . Simply , download the app and launch the app . It is more of like a portable app rather than an exe . As presently , as you launch the lotion , you get a floating window .

Here , you’re able to enrol the interface turn where you want Telnet to accept the connections from . The UI is pretty simple-minded with minimal options . you’re able to set a user ID and password for the telnet login .
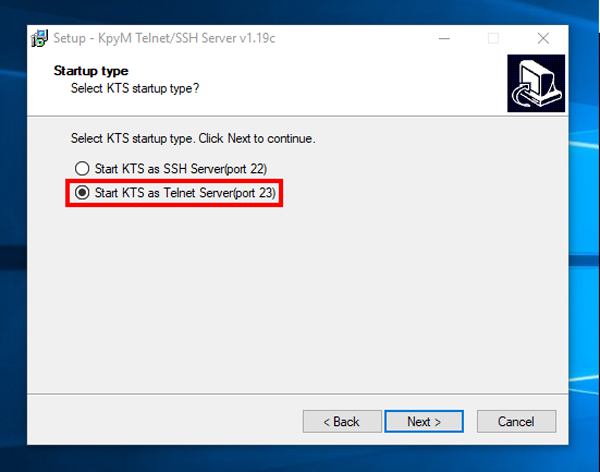
The app does n’t provide an option to drive SSL or encoding . If you require a bigger resolution with SSH like custom login message and IP blocking then you need to get on KpyM Telnet Server . During the installation of the app , you will be propel to start the host either at larboard 22 ( SSH ) or port 23 ( telnet ) . In case , you are buy the farm to run telnet choose port 23 now because this is the only time you will be ascertain GUI in this app .
Once you have finished installing it , you’re able to configure further through the KTS daemon . Go to theStartmenu and typewrite “ Setup kpyM Telnet SSH Server “ . This will open a black dialog box seat where you may configure mount like use SSL , interface number , login_message , password etc . The same fiend also furnish the options to start or stop the telnet waiter .

Closing Words
Security was one of the major concern due to which Telnet Server was remove from Windows . It is advisable not to utilise telnet when you are deal with sensitive data point . However , in the case of public server , it is okay if you do n’t want to set up encryption central credential and SSL .
Also Read:6 Best Android SSH Client You Should Try
38 Google Earth Hidden Weird Places with Coordinates
Canva Icons and Symbols Meaning – Complete Guide
What Snapchat Green Dot Means, When It Shows, and for…
Instagram’s Edits App: 5 Features You Need to Know About
All Netflix Hidden and Secret Codes (April 2025)
All Emojis Meaning and Usecase – Explained (April 2025)
Dropbox Icons and Symbols Meaning (Mobile/Desktop) – Guide
How to Enable Message Logging in Discord (Even Deleted Messages)…
Google Docs Icons and Symbols Meaning – Complete Guide
Samsung Galaxy Z Fold 7 Specs Leak Reveal Some Interesting…