TheSamsung Gallery appis one of the best native gallery apps . It gives rugged contention to numerous third - party gallery apps . Not only it does a great job as a gallery app but it offers delightful photo editing capacity on Samsung Galaxy phone . you’re able to pasture pictures , add photos to another motion picture , resize , change background effects , and much more . Let ’s search how to blue-pencil pic on the Samsung Galaxy Phone using Samsung Gallery .
Samsung Gallery Photo Editing Tips
You will find most of the editing choice when you press the Edit icon on a picture .
1. Crop Photo
you may crop freely or prefer from the usable standard options . start the picture to craw in Samsung Gallery and tap on theEditicon . By default , the exposure will reach the free craw fashion . Use the photo edges to dress the exposure as per your need .
To crop in standard sizes , tap on theFreetext under the first tab . Select the harvest size .
2. Rotate and Flip Photo
Often some Gallery apps miss out on the basic thing . Fortunately , Samsung Gallery is n’t one of them . you’re able to easily go around and flip photo using this app .
Go into the redaction mode of the exposure . hydrant on theRotateandFlipicons under the first tab key to rotate and flip the photo severally .
3. Resize Photo
The Samsung Gallery app also offers the power to resize photo . When the photo is in the edit mode , tapdance on thethree - point iconat the top and selectResize . prefer the resize portion from the available options .
4. View Original Photo
At any point , while editing the photo if you want to compare it with the original photo , plainly touch and hold the pic . That will show a preview of the original photo .
5. Change Intensity of Filters
Samsung Gallery offer several interesting filter flop inside the app . With the photo in the editing modal value , tap on the second tab next to the Crop tab . Here you will find various filters . Tap on the one to give to your photo . Use the skidder under the filter to adjust the intensity of the filter . If you want to remove the applied filter , tap on the first filter known as the Original .
6. Download New Filters
If you do n’t wish the existing filter offered by the Samsung Gallery app , you do n’t need to flip-flop to a third - party photo editor program . you’re able to download more filter in the Samsung Gallery app . For that , go to theFiltertab under the photo editing way . Scroll to the extreme right final stage of the filter leaning . Here you will see aDownloadicon . Tap on it . You will be taken to the Camera and photo personal effects screen where you will rule a salmagundi of filters . add the ones that you wish .
7. Add Picture on Top of Another Picture
Many exposure editors fail to offer the functionality to add a water line to your photograph orlayer photograph on Android , Gladly , Samsung Gallery is able of letting you add a photo on top of another photograph using the Stickers feature .
launch the photo in editing style . Tap on theStickertab at the bottom and hit theGalleryicon . You will be capable to select a unexampled photo that you require to bring to the be photo . Tap on the photograph to add it . Once the photograph is added , you could reposition , resize , and splay . Similarly , you canadd multiple photos to one photo .
8. Doodle on Photos
If you desire to pull in on your photo , you’re able to easy do that from the Samsung Gallery app . While delete the photograph , tap on theDoodletab at the bottom and choose the brush color from the uncommitted option . or else , pink on the Color picker icon to pick out a color from the photograph .
you’re able to even change the brushing sizing and style . Simply , tap on theBrushicon to do so . Similarly , you’re able to line up the eraser size . Tap on the Eraser picture doubly to turn on the size of it mount .
9. Add and Style Text
On the photo editing screen , go to the school text tab key to add text to your characterization . Start typecast the text in the available box . you may change the textual matter color , font mode , alliance , and ground color from the available pick on the screen .
10. Add Color Pop-up Effect
You might be cognizant of the colour bolt down - up event where one particular in the icon is colored and the rest is monochromic . you’re able to tally the same consequence within the Samsung Gallery app .
Go into the editing style of the picture and tap on thethree - Zen iconat the top . ChooseSpot colorfrom the computer menu .
water tap on the item whose colour you need to show . If some other items also show up in color , you’re able to bump off the color using the eraser shaft at the bottom .

11. Create Collage and GIF
These two are the only feature that you will find outside the editing mode . enter the Samsung Gallery app and tap on thethree - battery-acid iconat the top . select toCreatefrom the bill of fare accompany byGIForCollagedepending on your pauperization . Then select the picture that you require to use for your GIF or Collage and edit as per your essential .
12. Change Background Effect
For photos lease in the Portrait mode , you get the ability to change the scope blur and even the core . get to the Portrait mode photo in the Samsung Gallery app . You will see theChange background effectoption at the bottom . water faucet on it . On the next screen , using the uncommitted options at the bottom , you’re able to change the background effect . Check outbackground eraser apps for Android .
13. Keep Original Photo After Editing
Typically , when you are done editing a photo in the Samsung Gallery app , you will tap on the Save option at the top . However , doing so will replace the original written matter with the edited photo . If you need to save the edited photo while keep up the original copy , tap on thethree - dot iconinside the edit mode . ChooseSave copyfrom the menu instead of the Save button .
14. Revert to Original Image After Editing
In slip you do agitate the Save button instead of the Save copy clit , do n’t interest . you’re able to still get back your original picture using the Revert feature . Basically , the edited imaged can be reverted to the original photo after editing . For that , launch the edited photograph and go into redaction mode again . You will see that theRevertoption at the top is activated . rap on it to get the original image . As obvious , you will lose all the modifications that you have made to the picture .
Fix: Unable to Edit Photos in Samsung Gallery
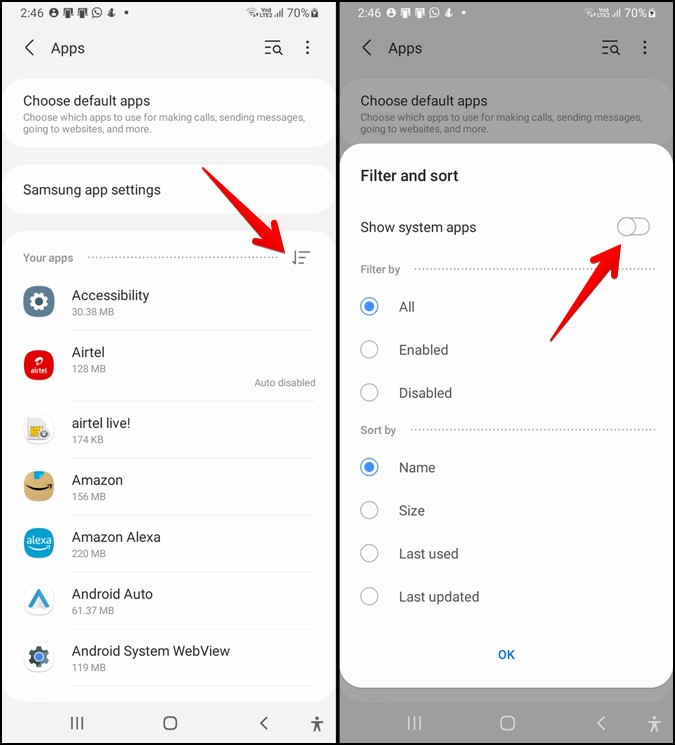
For that , openSettingson your phone and go toApps > organisation apps . If you do n’t see the System apps option , tap on the three - back breaker icon at the top and select System apps . Or tap on the Sort option and start the toggle next to Show scheme apps .
What’s More in Samsung Galaxy Phones
On some Samsung Galaxy earpiece , you will also have the feature to remove blemishes and aim from your photos . you may evencreate live wallpaper on Samsung earpiece . Also acquire thebest tip to take screenshots .
Android 16 Bubble Bar: 7 Things Google Could Add To…
Google Accidentally Reveals Material 3 Expressive: Android’s Future and it…
5 Features We Hope to See in Google’s Desktop Mode…
Small Phones Are Making a Big Comeback: Why Now?
The Great Android Exodus: Chinese Smartphone Makers Plan To Build…
13 Surprisingly Useful Underrated Android Apps (May 2025)
How to use Gboard’s New “Browse” Feature for Emoji Kitchen…
How to Find Clipboard on iPhone and Android (Including Samsung)
Android Auto Icons and Symbols Meaning – Complete Guide
One UI 8 Update: Features, Eligible Devices, Release Date and…