As a blogger , I have to take frequent screenshots of my MacOS . And gratefully , there is a progress - in selection for that ( Cmd + Shift + 4 if you do n’t already get it on )
But there is one big way out , by default MacOS saves all screenshot to png format , which although is the best option when it comes to schoolbook , but the Indian file sizing is too big for online websites .
relate : Why Screenshot Are Always Saves As Png ?

To give you an idea , following are two full - size screenshots of my 5k iMac ’s and although there is no noticeable difference in caliber , the png single file is over 5 MB while the jpg screenshot is just 32 KB . So , long story short , if you often upload the screenshot on the WWW , change the default option screenshot format to jpg .
And here is how to do it .
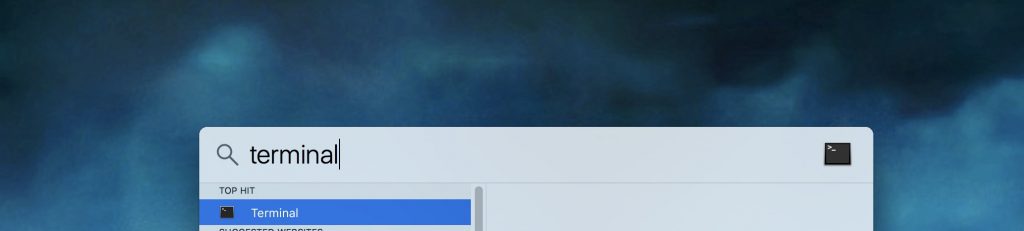
1 . Launch Terminal on your Mac . To do that , press spacebar and cmd , to bring up spotlight search and then seek for and select “ Terminal ” .
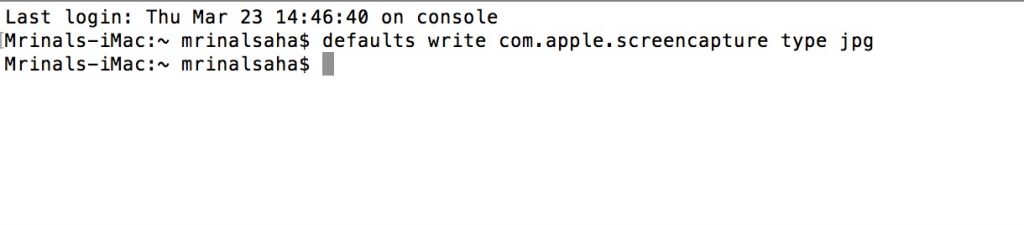
2 . eccentric or copy / paste the following mastery into the Terminal windowpane and then fight the enter key
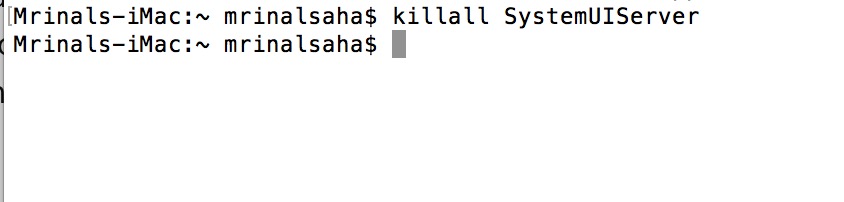
4 . From now on , the default data format of your screenshot will be jpeg . However , the effect will take place only after you re-start your Mac . Or , you could typewrite the following command to resume the port host , ( the finder windowpane ) and it ’ll do the same thing .
5 . Press record headstone . And that ’s it . From now on , when you take screenshots on your MacOS , the nonpayment single file format should be jpeg .
What if you want some other file format?
you could pluck any other file format like – gif , pdf , png etc . The bidding is same as the method acting we used above for JPG . Just replace the jpg part in the end of the Terminal command with the file data formatting you require . For example –
Change Screenshot Format to GIF
Change Screenshot Format to PDF
Change Screenshot Format to PNG
How to change the location where screenshots are saved?
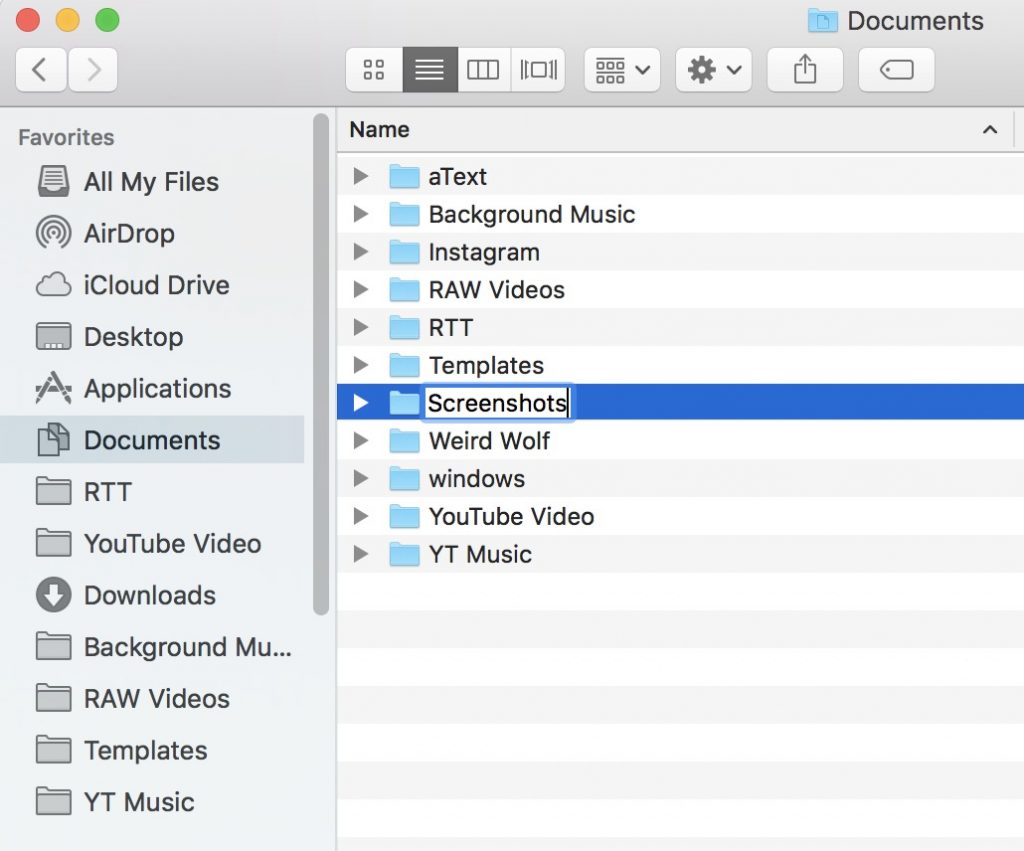
By default , MacOS saves all the screenshot on the background . But in the long run , this can clutter up your screen background , so it ’s good to make a new directory for all the screenshots . And here is how to do it .
1 . make a new folder , where you need to carry through your screenshots . Open view finder , go to Documents > create a new pamphlet , let ’s called it Screenshots .
2 . Again , open up your terminal , and typewrite the following program line and press enter .
ensure to supervene upon the mrinalsaha name with your system ’s username or you could also drag and fell the screenshot folder in the terminus to get its path .
3 . And this is it , now if you take a screenshot , it should get save to the new leaflet you just created .
Related:8 way to Take Screenshots on Windows
Apple iCloud Icons and Symbols Meaning – Complete Guide
Best Macbook in Every Price Range and Use Case: Mac…
Apple Could Launch Its Updated Macbook Air With M4 Later…
Turn Any Website Into Your Mac’s Wallpaper With This App
Apple M5 Chip: Why It’s Sticking to 3nm Technology
macOS 15.2 Beta: Add Weather Widget to Menu Bar on…
How to Check MacBook Battery’s Health and Cycle Count (M…
macOS Sequoia 15.1: How to Enable and Use Type to…
6 New Features Coming to macOS Sequoia 15.1
7 Settings to Make macOS Feel-Like Windows

