WhileTP - Link products are compatible with Alexa , and Google Assistant , we stillcan’t use it with Siri . EnterHomebridge ; anopen - rootage client . JS serverthat integrate Smart devices to the Home app . It is a lightweight waiter that can be rig up on Windows , macOS , Linux , Docker , and even on aRaspberry Pi zero . I had a Raspberry Pi 4 lie around so I ’ll use that alternatively .
Things You’ll Need
Step 1. Install Homebridge on a Raspberry Pi
The first step is acquire the Homebridge server up and running on your Raspberry Pi . It will act as the mediator between the incompatible TP - Link electric-light bulb and the native Home App .
Installing Homebridge is fairly simple , visit thisGithub pageand stick with the footstep - by - step command to install it on your Raspberry Pi . Just check that youinstall Homebridge with UI Xsupport . UI X is a GUI for your Homebridge server that allows you to monitor devices , install plugins and change preferences .
Step 2. Access the Homebridge Interface
Once you have the Homebridge server up and run on your Raspberry Pi , you’re able to access it from any machine on your home web . open up the Terminal on your Raspberry Pi and execute the command “ hostname -I ” tofind out your IP destination . Note it down somewhere as it is the name and address of the Homebridge Server user interface .
Nowopen a web browseron your Raspberry Pi and enter http://YOUR - IP - ADDRESS:8080/. You should see a webpage with a login interface . The default login and password are admin and admin respectively that you could change afterwards .
Replace YOUR - IP - ADDRESS with the IP reference you retrieved in the former step .

Step 3. Install TP-Link Plugin
In purchase order for Homebridge to detect the TP - Link gadget connected to the place internet , we’llinstall a TP - Link Plugin . This Plugin supports the majority of the TP - Link smart home products include LB100 but you canvisit the webpage to checkif your gadget is included in the lean .
afford the Homebridge Interface on your web web browser andgo to Plugins . Type TP - Linkandclick Install .
Once done , restart the Raspberry Piand while it does , proceed to the next stone’s throw .

Step 4. Install the Kasa App
The Homebridge is now ready , we just take to add the TP - Link bulb to the meshwork . To do this , we ’ll have to configure the gadget using theKasa by TP - Linkapp . It manages all the smart equipment made by TP - Link . instal the Kasa Smart appon your iPhone from theApp Storeand lumber in to your chronicle . If you do n’t have an explanation , you’re able to easily make one by signing up .
Once you have the account set up , add the TP - Link bulb to the appby pink the + push button on the top rightfulness . come in the model number , tap the relevant picture andfollow the on - screen instructions to arrange up the bulb on your dwelling connection .
The TP - Link twist should now be seeable in the Homebridge port . spread the Homebridge port on Raspberry Pi andclick the Accessories tab .

Step 5. Add Homebridge to Home App
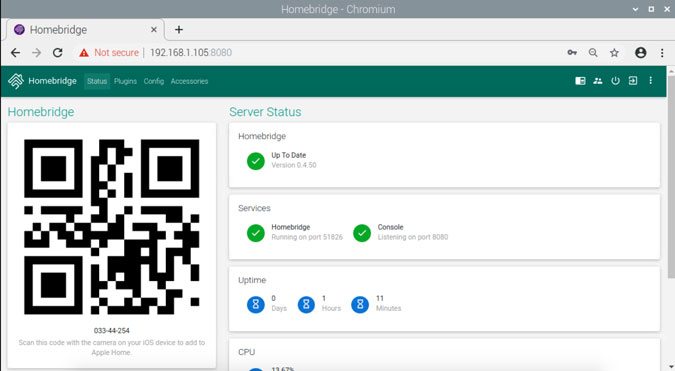
Now , we ’ll link up the Homebridge waiter melt on your Raspberry Pi to the Home app on your iPhone . launch the Homebridge interface on a web internet browser , you should see a QR code on the Status page of the server .
start the home base app on your iPhone and tapAdd Accessory . skim the QR codeby pointing the Camera app on your iPhone . It may show a warning “ Uncertified Accessory”,tap “ Add Anyway ” to continue .
Your TP - Link gadget should mechanically show up on the rest home app and you may simplytap the icon to bike the powerand long press to reveal extra preferences .

you’re able to also enquire Siri to turn over it on and off for you . Give it a try . “Hey Siri , can you turn on the lamp please ”
Final Words
12 Underrated iOS Apps You Should Download Now (May 2025)
Snapdragon 8 Elite 2 Launch and Specs Leaked: What You…
All iPhone Secret Codes – Tested and Working (April 2025)
Apple CarPlay Icons and Symbols Meaning – Complete Guide
Best iPad for Every Budget and Use Case (April 2025)
Dynamic Island Icons and Symbols Meaning – Guide
Apple Voice Memo Icons and Symbols Meaning – Complete Guide
Apple GarageBand App Icons and Symbols Meaning Complete Guide
How to Restart, Reset, Update Your Apple TV: Step-by-Step Guide
Apple TV (tvOS) Status and Tab Icons and Symbols Meaning…