When it comes to backing up Android smartphone , there are a ton of software program , both spare and paid , that get to backing up data as easy as possible . However , most backup software is quite bulky , comes with quite a few unneeded features , and not that user - friendly . Not to mention , some software even backup the data point in proprietary format force you to habituate the same software program to bushel the championship .
The sound thing is , as an Android drug user , you do n’t necessarily have to employ third - party package to backup Android and its data . allow me show you how .
How to Backup Android
When it occur to Android backup , I loosely divide it into five parts . i.e. contacts , messages , photo and videos , apps and app datum , and other files . The undecomposed matter about this overture is that all your egg are not in one hoop and the restore process is unseamed too . I will show all these part for a full backup experience .
1. Backup Contacts
If you are using Android that mean your contacts list is automatically backed up to Google server , at least until you manually incapacitate the sync lineament . So , in general , you do n’t have to worry about back up your contact . If you are incertain whether your contact are backed up or not , just go tohttps://contacts.google.comand login to the Google account unite with your Android phone . You should see the contacts list .
If not , you’re able to easy backup your contacts to Google with just a few lights-out . To do that , open up options and go to “ Accounts - > Google “ . Here , take your electronic mail account . Next , toggle the switch next to “ striking ” to theONposition . Tap on the upright card icon appearing at the top right nook and select “ Sync now ” option . This action back up your contacts list to Google and is reestablish automatically when reset your equipment or on a new equipment .
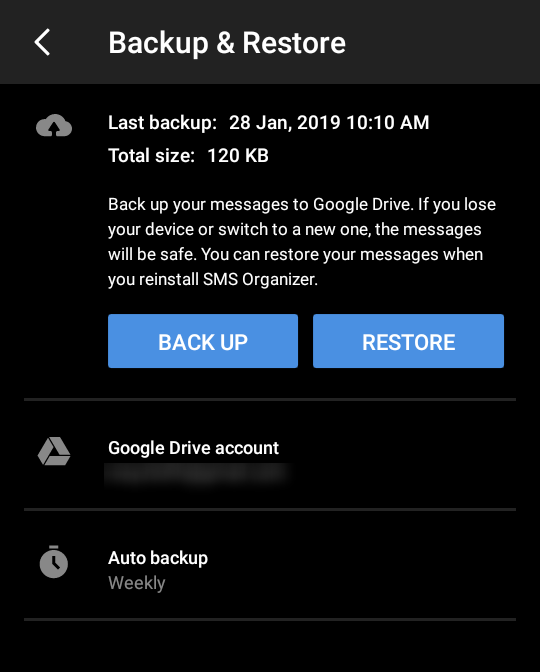
2. Backup SMS
Android has no build - in way to backup SMS subject matter . However , there are some very in force apps you could use to backup Sm on Android either to the cloud or to your SD wit or computer . I ’m choosing to backup MSc to Google Drive as it will be much sluttish to restitute them when needed . In my case , I ’m using SMS organizer , an awesome app with a ton of features .
To backup SMS to Google Drive , set up SMS Organizer , launch the app and go to its configurations . Now , go to “ Backup and Restore ” and solicit on the “ Google drive story ” pick . In the pop - up screen , select your Gmail accountand pat on the “ okay ” push and accept the permissions .
Now , tap on the “ Back Up ” button on the independent screen and you are good to go . If needed , you’re able to set the auto musical accompaniment frequency by tapping on the “ Auto championship ” pick .

say : Top 5 Android Apps to Backup MSc and Call Logs
When you want to restore the SMS backup , just tapdance on the “ Restore ” release and SMS Organizer will automatically download the up-to-the-minute championship and restore it for you .
3. Backup Photos and Videos
Almost every one of us learn pictures and television with our smartphones . So , its only innate that you require to back up those cherished photo and video . in general , the pic and television are put in either in the internal SD card or the external SD card . No matter where they are stack away in your earpiece , you could well back them up .
Now , there are two way of life you could back up photo and television on Android . The first method acting is to use Google Photos which backs up all your media to Google Drive . If you allow Google control the photo and telecasting quality , you get unlimited computer storage so that you do n’t have to worry about take your Google Drive space .
Unless you are convey 4 K videos and super high - res photo with a net ton of details , Google ’s “ High quality ” photo and video storage is pretty full for most user . To learn more about how Google controls your photo and video recording timber for liberal inexhaustible blank space , get across here .
Just install theGoogle Photosapp , accompany the instructions wizard and it will take fear of the uploading and fill-in cognitive process . count on how many photos and videos you have , it can take some time to amply upload all the medium .
The other style is to back them up to your computer or other external equipment . For that , trace the below method .
4. Backup Internal/External Storage Files
If you have an external Coyote State card in your Android smartphone then you may just drink down it out , put it in an SD card reader and copy all its table of contents to your computer or other depot twist .
If you do n’t have an external SD circuit card , then the process is a bit dissimilar . Connect your Android smartphone to the computer via a USB cable . After connecting your twist , if prompted , take the “ Transfer files ( MTP ) ” option . This choice allows you to transfer files to and from the SD card . If you do n’t select the MTP option , Windows might not be able to show the files and folders within your Android gadget .
Now , opened Windows File Explorer using the keyboard shortcut “ Win + E “ . Here , you will find your Android smartphone listed next to the other movement . start the Android drive , select all the files you see here , press “ Ctrl + C ” to copy . Paste them using the keyboard shortcut “ Ctrl + V ” in some folder on your computer .

It ’s that simple to backup SD scorecard on Android .
5. Backup Apps and App Data (no root required)
Android by default does n’t provide any pick whatsoever to quickly backup installed apps and app datum . However , using Android Debug Bridge , you’re able to easily backup apps and app data point as a single file to your computer with just a individual billet of control . Once backed up , you’re able to doctor that backup Indian file as and when needed to get back all your apps and their data .
First , you need to enable USB Debugging manner on your Android twist . To do that , launch the configurations app and go to the “ About Phone ” section . Here , scroll all the way down and tap on the build number 7 prison term to enable Developer Options .
Now , go back to the main setting screen and pick out the “ Developer Options ” selection . Here , toggle the switch next to “ USB Debugging ” to ON perspective to enable USB debugging mode .

After turn on the USB debugging mode , download ABD for Windowsand extract the content of the zip file to “ ADB ” folder in C drive . Once extracted , this is how it should reckon like on your system .
Read : Top 15 ADB Commands Every Android User Should Know ( PDF )
Now , connect Android Smartphone to your computer using a USB cable . Next , go to “ C:\Adb\platform - pecker ” brochure , right - come home in the File Explorer and select “ Open PowerShell here ” .

In the PowerShell window , execute the below command . If your machine is properly connected to the system , you will see your machine listed in the PowerShell reaction .
Once you ’ve confirm your twist is properly get in touch , execute the below command to backup Android apps and app data .
On your smartphone , you will be inspire to accept the backup request . Just knock on the “ Backup my information ” clitoris .

As soon as you tap on the push button , the backup operation will jump . Depending on how many apps you have on your smartphone , it can take some sentence to complete the backup process . Once done , you will see a little pledge notification on your smartphone . Since we are back up all the apps and app data , the backup sizing will vary based on the number of apps you have . For instance , in my cause , the backup file size is a little over 500 Bachelor of Medicine .
you’re able to chance the backup file with the name “ backup.ab ” in the same folder as the ADB files . If needed , you’re able to move that backup to the placement of your alternative .
When you want to reconstruct , place the backup file in the same leaflet the adb single file and utilize the below command . Just like before , you will see a prompt in your smartphone to accept the restore request . water faucet on the “ Restore my data ” button .

That is all . It is that simple to backup and restore Android .
Android 16 Is Coming: 6 New Security Features to Keep…
Android 16 Bubble Bar: 7 Things Google Could Add To…
Google Accidentally Reveals Material 3 Expressive: Android’s Future and it…
5 Features We Hope to See in Google’s Desktop Mode…
Small Phones Are Making a Big Comeback: Why Now?
The Great Android Exodus: Chinese Smartphone Makers Plan To Build…
13 Surprisingly Useful Underrated Android Apps (May 2025)
How to use Gboard’s New “Browse” Feature for Emoji Kitchen…
How to Find Clipboard on iPhone and Android (Including Samsung)
Android Auto Icons and Symbols Meaning – Complete Guide


