Google Photos is an incredible tool that can be used as agallery appbesides a cloud computer storage inspection and repair to store pictures . Just like most other picture gallery apps , Google Photos let you cut photosas well . While it does n’t offer high - ending editing features like layering , masking , etc . , it will work absolutely as an image edit app for regular photos . Let ’s check various tips and tricks to edit photo in Google Photos . We will get with redaction photos on Android first followed by iPhone and iPad .
Photo Editing Tips for Google Photos on Android
You will find all the Google Photos delete tools under theEditoption . unfold any picture in the Google Photos and tapdance on the Edit ikon at the bottom . Then use the take after hint to edit your photos .
1. Use Suggested Edits
If you are lazyat editing exposure , do not occupy . Google Photos takes care of it by offering machinelike editing suggestions for each exposure . All you need to do is tap on the intimate edits and you will see a noteworthy deviation in your word picture without touching other place setting .
1.launch the picture that you want to cut in Google Photos .
2 . Tap on theEditicon . You will see theSuggestionstab with various suggested effects above it . Tap on them one by one to preview them . you may only use one suggested effect at a time .

3.In case you do n’t want to use any suggested edit , tap on the select outcome ( the blue one ) to call on it off . Once you are happy with the final result , pat onSave copyto create a written matter of your photo .
2. Crop and Rotate Photo
It would be disgraceful if Google Photos image editor did n’t offer harvest and rotate tools . Fortunately , both tools are available and can be used as indicate below .
1.To crop a photo , unfold the command photo in the redaction mode of Google Photos by tapping on theEditicon .
2.Then hit theCropoption . Here you will get hold various cropping tools . By default , the free craw tool is activated . Drag the photo from any of the edges using the circular icons to freely trim your photo harmonise to your requirement .

you’re able to also use the slider at the bottom , crop using pre - defined size ( such as 16:9 , 4:3 , etc . ) by tapping on the size icon , or employ the Transformation tool ( on the correct side ) .
3.To circumvolve the photograph as per your need , tap on theRotateicon repeatedly present inside the Crop option .
3. Add Lighting and Color Effects
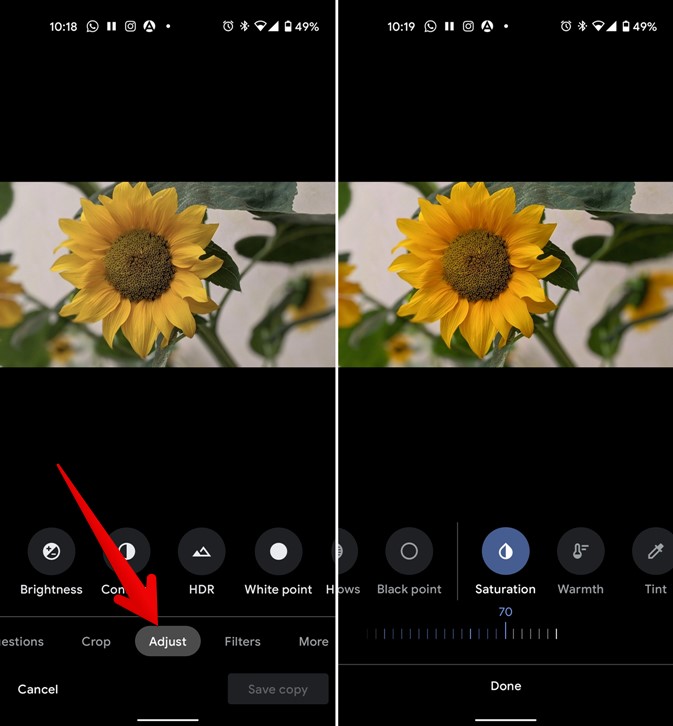
Right next to the Crop peter , you have theAdjustoption . Here you will regain several lighting and color tools such as brightness , contrast , saturation , warmth , tint , denoise , and much more . Tap on any tool to spark it . Then use the yellow-bellied terrapin to adjust the event . Alternatively , tap on the Effect pecker to add it automatically . Once you add an core , the take force icon will turn blue . Tap on theDonebutton to apply the effect .
4. Remove Lighting and Color Effects
When you tot any essence such as light , warmth , etc . , to your exposure , you do n’t take to start from scratch to remove the consequence . Go to theAdjusttab and tap on the added core ( blue - highlighted icon ) . rap again on the same icon to remove it . You will find that the ikon regains its original fatal color . strike theDonebutton to save the changes .
5. Add Multiple Effects and Filters
Once you have add one ignition or color event to your photo , you’re able to easy add more by exploit on any other lighting event .
However , when it comes to filter , you’re able to only add one filter at a metre . If you want to add together multiple filter to the same photo , just economize the photo once with one filter , then add together another filter by blend to the redaction mode .
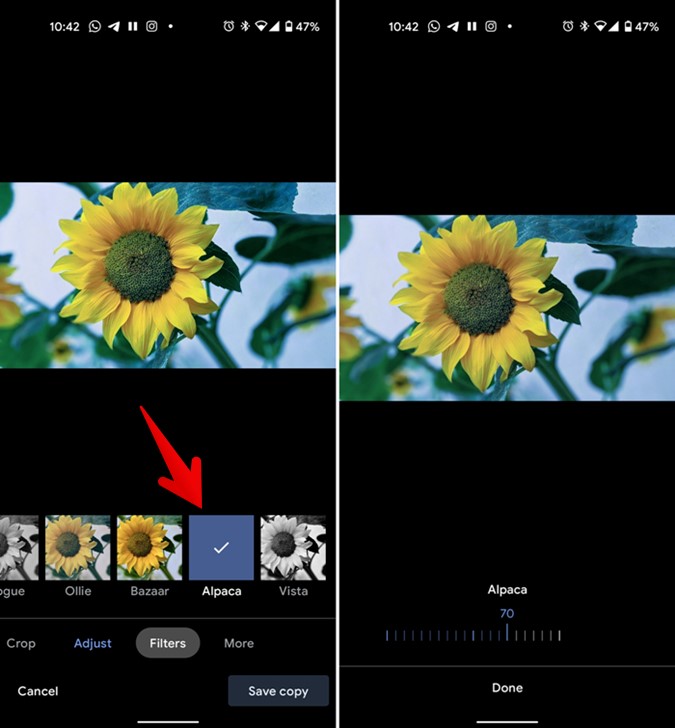
6. Adjust Intensity of Filters
Google Photos offers severalfilters for your photograph . pat on any filter to lend it to your image . What ’s interesting is that you may adjust the loudness of the filter . Once a filter is aerate ( shows checkmark picture ) , tip on it again . A skidder will show up . employ it to adjust the king of the filter . Tap onDoneto save .
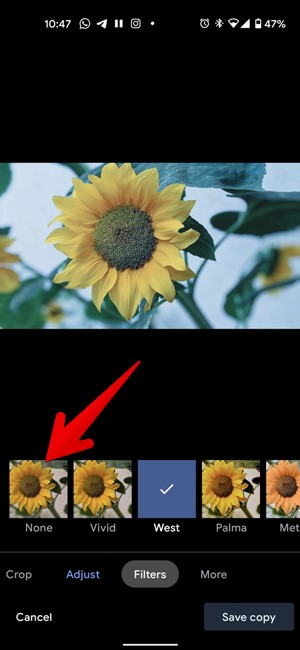
7. Remove Filter
To remove the added filter from your photo , tap on the first option i.e. ,None . present under theFilterstab .
8. Draw and Add Text on Photos
Yes , you say that rightfield . Google Photos rent youadd text and doodleto your pictures .
1.Just dab on theMoretab present at the utmost ripe side of the available options . Then tap onMarkup .
2.Tap on the playpen or highlighter image to get out on the photo . pick out a colouration from the usable option . Tap on the text cock to add text .

9. Compare to Original Photos
When you are editing a exposure in Google Photos , you may compare it to the original photo at any time . Just tap and entertain the effigy to view the original exposure .
How to Edit Photos in Google Photos on iPhone and iPad
Google Photos offers relatively fewer editing tools on iPhone and iPad . you’re able to add filters , adapt light and colour , and craw photos .
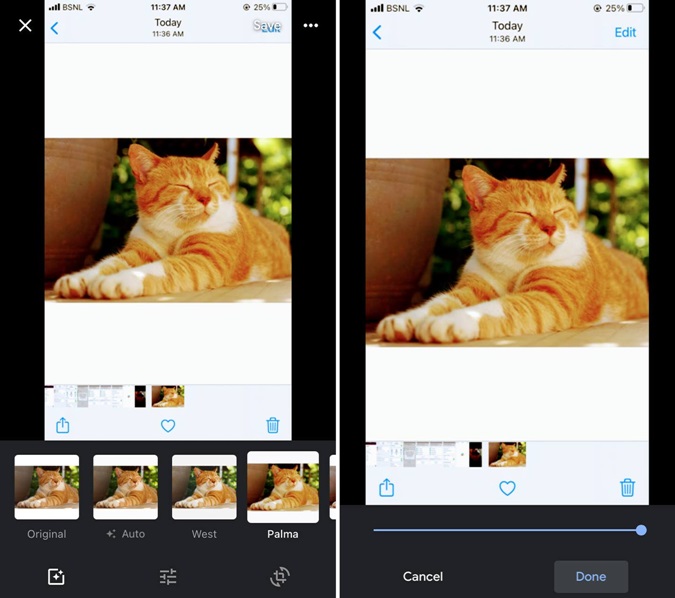
spread the want pic in the Google Photos app . Tap on theEditicon to figure the redaction mode . The first tabloid house various filters . Tap on any filter to add it to your flick . Tap on the filter again to adjust its strength using the useable Pseudemys scripta . Hit theDonebutton . To remove the append filter , tap on theOriginalfilter .
Under the luminosity and color effects , exploit on the small down pointer next to the sliders to view more choice . practice the last tab ( Crop ) to circumvolve and crop exposure . While editing , touch and contain the edited photo to liken it to the original photograph .
On iPhone , you get two alternative to save the photo – SaveandSave transcript . The first one overwrite the original written matter ( which can be draw out afterwards ) while the latter creates a fresh written matter of the emended picture . water tap on theSaveoption at the top to use the first one . To produce a copy , tap on thethree - dot iconand selectSave written matter .
To loosen changes to an edited photo that you saved using the Save choice , open it in the editing mode . Then bug on thethree - doticon and chooseUndo editsto retrieve the original double .
Wrap Up: Editing Images with Google Photos
That ’s how you could edit photos in the Google Photos app on Android and iPhone . If back up and sync is turn on in Google Photos , your edited photos will mechanically become useable on your other machine . Is n’t that awesome ? Want Google Photos to storm you more ? Check out10 Google Photos tips and tricks .
Android 16 Is Coming: 6 New Security Features to Keep…
Android 16 Bubble Bar: 7 Things Google Could Add To…
Google Accidentally Reveals Material 3 Expressive: Android’s Future and it…
5 Features We Hope to See in Google’s Desktop Mode…
Small Phones Are Making a Big Comeback: Why Now?
The Great Android Exodus: Chinese Smartphone Makers Plan To Build…
13 Surprisingly Useful Underrated Android Apps (May 2025)
How to use Gboard’s New “Browse” Feature for Emoji Kitchen…
How to Find Clipboard on iPhone and Android (Including Samsung)
Android Auto Icons and Symbols Meaning – Complete Guide