While YouTube provides motorcar - generate caption for videos , other political platform likeInstagramand Facebook do n’t have such an choice . So , if you are making these subtitles within post - product , here are four prosperous ways to getsubtitles for your videos .
Automatic Subtitle Generator
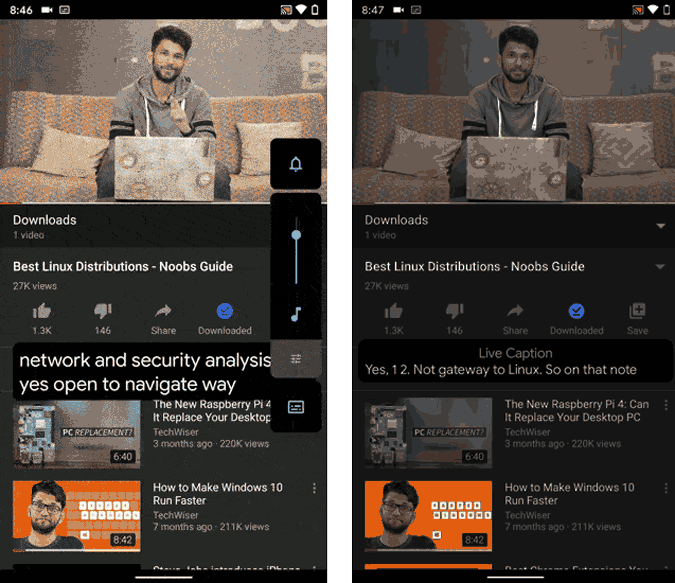
1. Live Captions in Google Pixel
In case you have aGoogle Pixel gimmick , the line of work perplex tremendously well-to-do . Pixel equipment have an inherent feature calledLive Captions , which allow you sire automatic subtitle for any video . However , if you do n’t have a Pixel speech sound , but have memory access to a rooted Android phone , you’re able to still get this feature with thisMagisk modules .
To move around on Live Captions on Pixel devices , lead over to configurations > Search “ Live Caption . ” Once you are on the carte du jour , you may reverse on Live Captions .
Alternatively , you could also toggle on / off Live Captions through the bulk menu . you could exchange the size and placement of the Live Captions by drag on it around the cover . Moreover , you may also pinch to zoom in and increase the font size of the caption .

Now , that you have alive captions running , push the TV to full - CRT screen and commemorate the screen with any screenland transcription app . This elbow room , you would have a video with automatic subtitles .
Google Pixel Live Captions works offline , meaning it does n’t upload your video or spoken communication to the cloud . And yet , it shape for both offline as well as online TV . As of now , Live Captions only supports the English language , but next updates may digest other languages .
Pros :
con :
2. Android App
For other Android machine owners , we can always use third - political party Android apps . Here ’s an app call up Kaptioned that mechanically generates caption for your video . All you have to do is upload the television to Kaptioned , get the app process , select the caption language . In my slip , the language is English .
The first video changeover is costless on Kaptioned . Post that , it is a subscription or remuneration - per - television .
Once the app is done processing , it ’ll demo the caption along with a video timeline . you may correct the caption by editing the captions . Kaptioned also provides you the option to customize the subtitle color , font size , font family , etc . Post the changes , clack on the “ Done ” push button at the top - ripe corner to export the TV .
In suit you are wonder , Kaptioned does n’t have a video time limit . To test that , I essay uploading an hour - prospicient television snip , and the app crashed . So , the sweet point is 7 - 10 mins long video .
Kaptioned supports quite a few language except English , like Spanish , Gallic , German , Portuguese , etc . Compared to Google Pixel Live Captions , Kaptioned had unspoilt accuracy . Although I could n’t find a mention of the API Kaptioned uses , most probably it ’s Google ’s ownSpeech - to - Text Cloud API .
Another caveat with the Kaptioned app is that it is make up . The first video conversion is free , and after that , you have to devote are $ 2 / picture or $ 10.99 / month . amazingly , Kaptioned does n’t need you to cross-file using your email ID , and hence , if you reinstall the app , you get one free picture exportation every time . Hope , they piece this shortly . you could also nobble a 7 - day costless trial from theKaptioned WWW app .

Download Kaptioned ( Android|iOS|Web App )
3. Upload Video to YouTube
The simplest way of life to get subtitle on your videos is via YouTube . Upload your video to YouTube and it ’ll auto - generate caption for your television . Here ’s how .
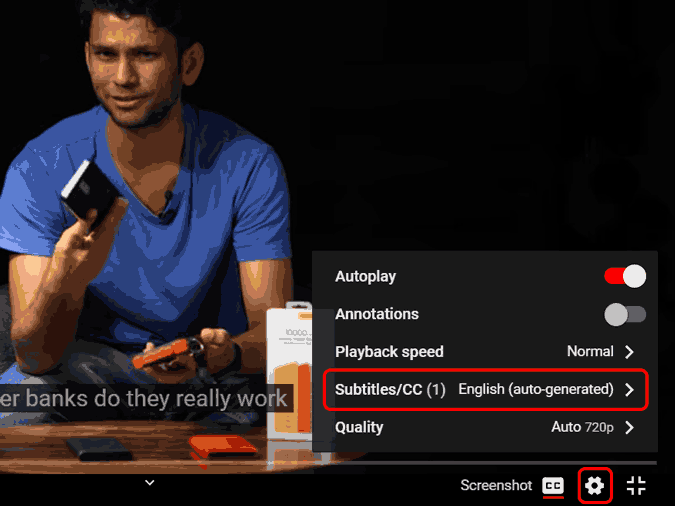
Foremost , upload your video to YouTube . Once you have done that , flirt it , and you would see a “ CC ” image , the bottom - correct corner of the video recording player . tap it to turn on auto - subtitles . YouTube expend machine learning to treat speech to schoolbook . Next , when you have the “ CC ” button on , it ’ll start presenting subtitle . you’re able to make your video full - screen andscreen - phonograph record the entire clip .
There are also YouTube downloaders like4k Video downloaderthat let you download YouTube television with embedded captions . However , in my testing , they have been more of a miss rather than hit .

YouTube Subtitle Customization
YouTube also provides option to change the language , font sizing , background knowledge of the subtitle within Caption preferences . To do that , sink in on thegear iconbeside the CC icon , and next , press the “ Subtitles / CC ” option .
Next , tap the “ Options ” link right beside the “ Subtitles / CC ” label .
On the Captions options menu , you’re able to alter the opacity , background , font color , etc . It lets you customise the preview of the subtitles .
4. The Lengthy way
The job with the above method is that YouTube is n’t good with subtitles if you are not a aboriginal English speaker . There ’s no way to edit the subtitles as well . Hence , another workaround is to extract the subtitles from YouTube , edit it , and imbed it back to the video . This is a 4 - whole tone process .
In subject you are wondering , SRT stands for SubRip Text files . These files hold in the subtitles along with the timestamp . rent ’s start with this cognitive process .
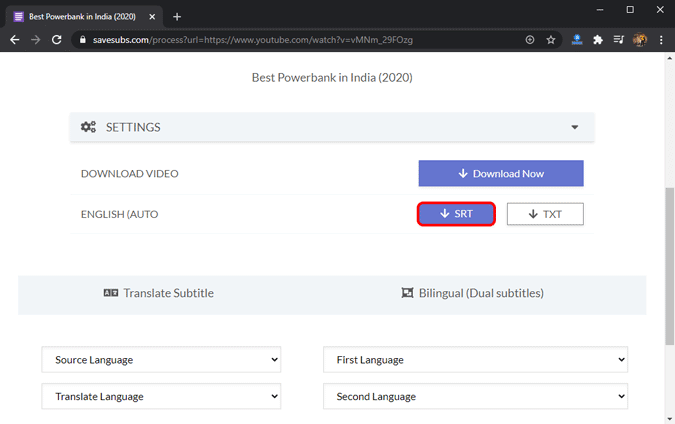
Foremost , upload your telecasting to YouTube and check that it is public . At least , we need it public until we can extract the auto - generated subtitle data file . Once you have the video recording uploaded to YouTube , head over to the “ SaveSubs ” WWW app . Paste the YouTube picture link in the textbox and select the “ Extract & Download ” button .

After the web app has pull the caption , scroll a bit down and you will line up the clit to download theSRT file . The SRT file will contain all the dialogues with timestamps . Here , you could change the caption by opening it in Notepad .
Also : How to Live Stream With 2 + masses on YouTube for Free ( It ’s Easy )
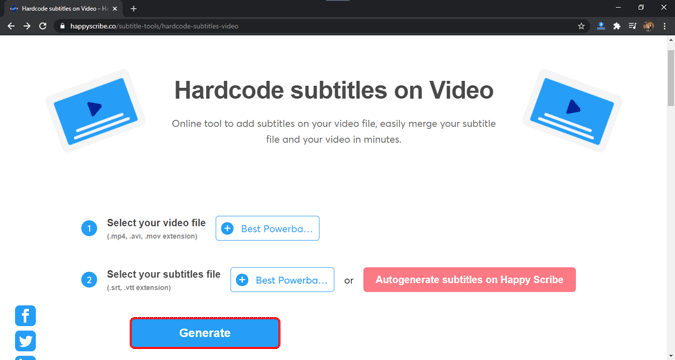
With the SRT filing cabinet and telecasting , guide over to theHappyScribe web app . Upload the SRT and video file by clicking on the “ Select File ” release , severally .

Once you are done upload the files , tap the “ Generate ” release . The vane app will take a while to upload and serve the video . Go , get a deep brown , meanwhile .
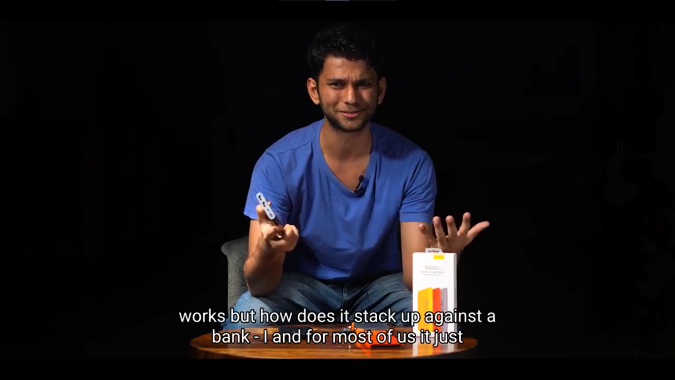
The final video end product will be array right as per the timestamps described in the SRT file .
Closing Words
Also Read : How To Download Your Own YouTube Videos in 4 jet
38 Google Earth Hidden Weird Places with Coordinates
Canva Icons and Symbols Meaning – Complete Guide
What Snapchat Green Dot Means, When It Shows, and for…
Instagram’s Edits App: 5 Features You Need to Know About
All Netflix Hidden and Secret Codes (April 2025)
All Emojis Meaning and Usecase – Explained (April 2025)
Dropbox Icons and Symbols Meaning (Mobile/Desktop) – Guide
How to Enable Message Logging in Discord (Even Deleted Messages)…
Google Docs Icons and Symbols Meaning – Complete Guide
Samsung Galaxy Z Fold 7 Specs Leak Reveal Some Interesting…