ascribe static IPs to each connection gimmick can be awkward . We send word you to do it on your router since it makes thing pretty dim-witted . However , assigning static IP at twist level would override the setting on the router . Moreover , there are times when you do n’t have admittance to the router . For those scenarios , we have a detailed clause onhow to assign static IP address to various machine . We are pass over Ubuntu separately here since it has much more complexness .
So , here are 3 ways to set electrostatic IP on Ubuntu or any Unix based OS .
1. Setting Static IP Address Ubuntu Using GUI
We would be using Ubuntu here for the demonstration . But most of the conformation and preferences would be standardised on any Unix - base OS .
So , there are several ways to deal with the web - manager , GUI being the easiest . If you are novel to Ubuntu and do n’t like the mastery tune , I would suggest changing it through the GUI . Firstly , we would need Subnet Mask before we start setting the static IP . To get these values , properly - snap anywhere on the background to give the terminal .
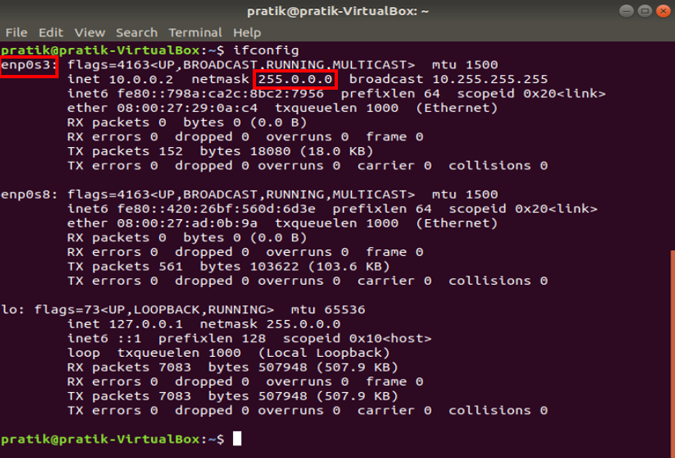
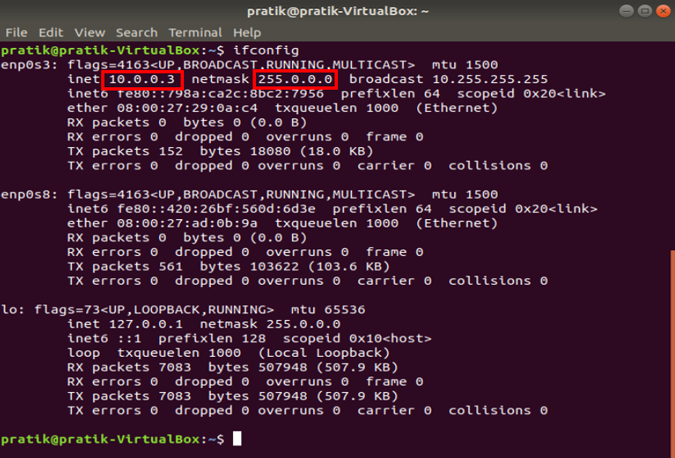
Once the terminal window opens , we need to launch the undermentioned mastery .
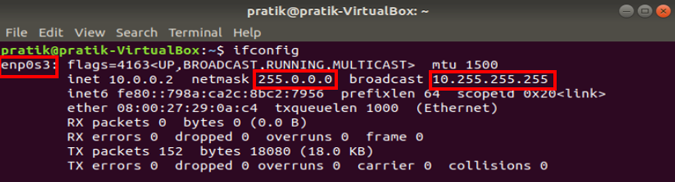
Note down the Netmask and the inet value we will need this in the later steps . In my case , the inet value is 10.0.2.15 and netmask is 255.0.0.0 .
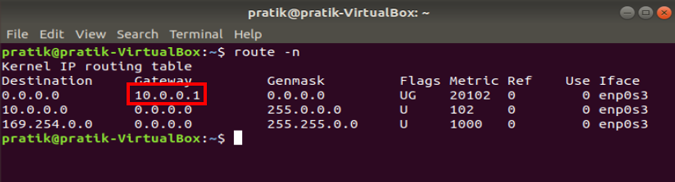
Once you have the subnet mask noted down , we also call for thegateway address . by and large , it ’s the first address of the net but to be sure let ’s just check it . campaign the following command on the depot .
This mastery will show you the IP routing tabular array . The first entry in the table will tell you the Gateway Address . In my case , the first entry is 10.0.0.1 which in turn is the gateway address .

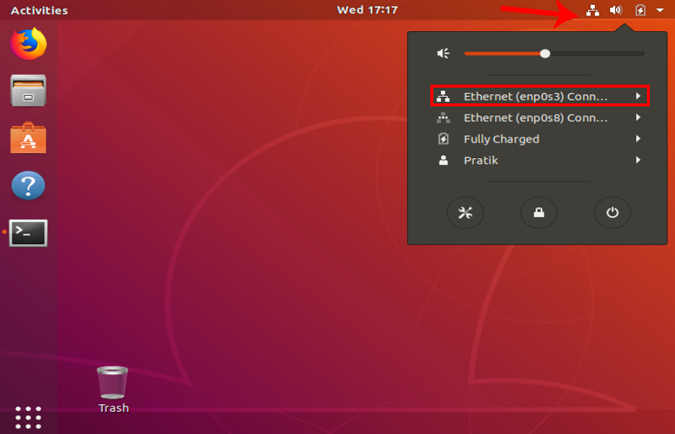
It is moderately simple from now on . loose theNetworksettings . To do that , press the internet Icon at the top right corner of the background .
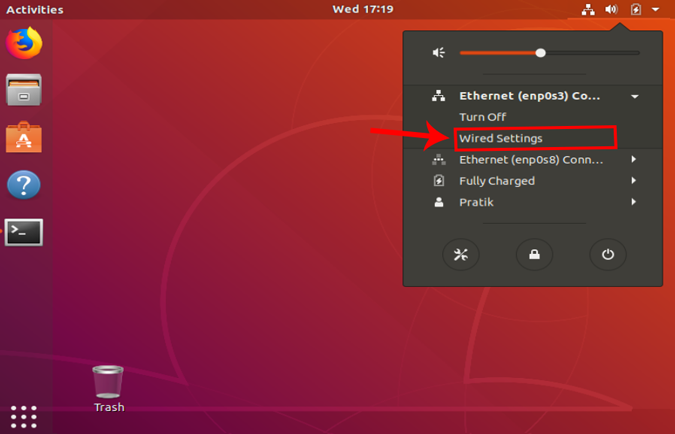
Now , navigate onto the active web . I am connected via a LAN cable so it would be Ethernet for me . In case , you are on Wi - Fi you should get the same in the tray . ensure you press the active web and lucubrate the carte du jour for more options . Click onWired Settingsfrom the extended computer menu to spread out theNetwork place setting .
Once you get the connection options window , ensure you are on the connection pill . press the preferences icon beside the active connection to get to the transcriber properties .
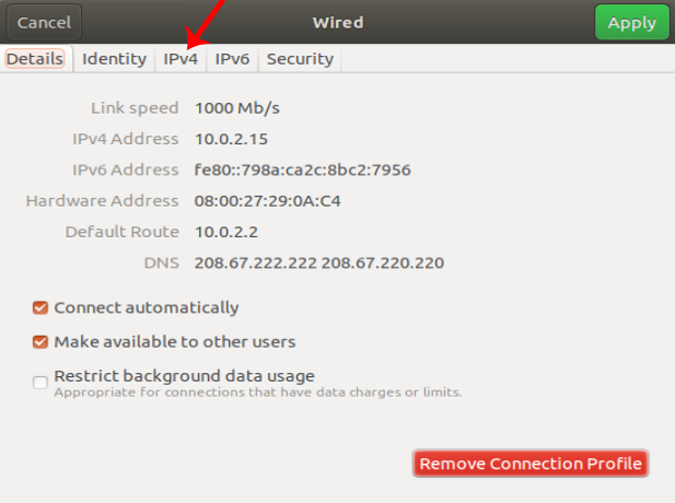
When you get the wired mount pop - up window , pilot to theIPv4tab to change the IP setting .
On the IPv4 tab , pick out the tuner button which order “ Manual “ . A new window will seem with 3 school text orbit – Address , Netmask and Gateway . Now , before you apply the changes , we call for to empathize what are these values .
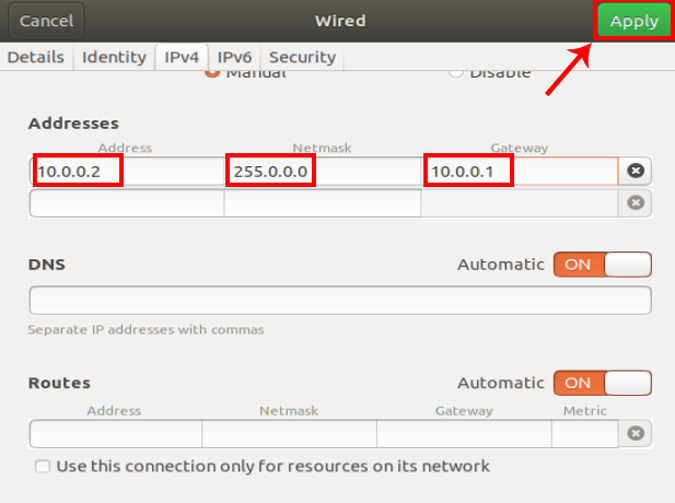
The IP computer address value which you set should be in the range of your earlier IP address . For eg , If your IP speech was 10.0.0.2 , your static IP should be between 10.0.0.1 – 10.255.255.255 . likewise , if it is 192.168.16.1 , your motionless IP should be between 192.168.16.1 - 192.168.16.255 . If you enter values outside your IP range , you might have issues with your cyberspace connection .
Netmask or Subnet Mask is used for subnetting the web . In simpler terms , subnet mask decides the number of IP addresses be allocated within a connection . As , I ’ve cite in the starting of this tutorial , my subnet mask is 255.0.0.0 .
Finally , the gateway , it is the router ’s IP computer address . Usually , it ’s the first IP allocated to the connection , or you could find out by using the commandroute – nas we did above . In my case , the gateway is 10.0.0.1 .
Once you have all these values , you involve to accede the IP speech , Netmask and Gateway Address which we have noted down before accordingly . Once it is validate , you could tap theApplybutton to show the changes .
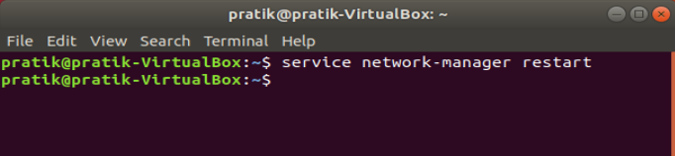
Again you want to restart the connection managing director for the alteration to take core . you may do it manually via command line by just using the following command
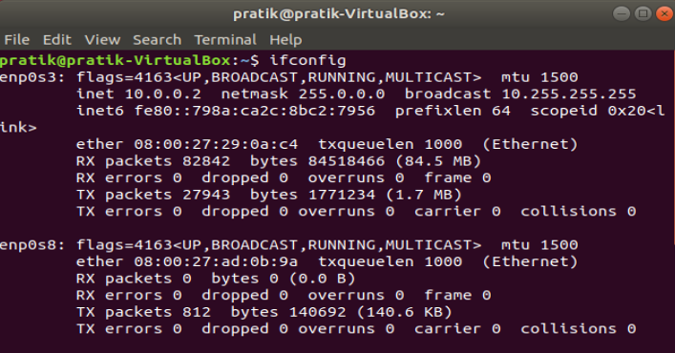
instead , you could just switch off and switch on the web adapter . Once done , runifconfigon the terminal to check the IP address . It should be the same IP address which you have specified in the IPv4 setting .
2. Setting Static IP Address Ubuntu Via Command Line
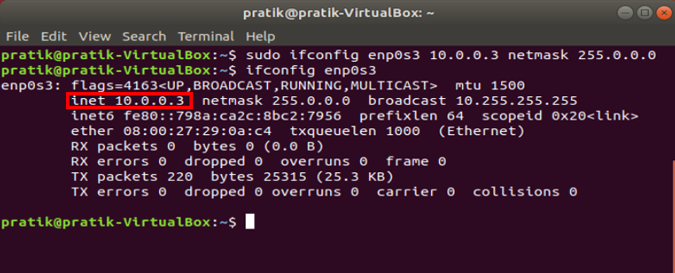
The fastest way to do this would be via command line . If you are undecomposed with commands then this method should do the trick . However , to set a stable IP via pole we would needSubnet Masklike before and also theAdapter name . Do anifconfig -ato fetch those economic value .
Once you have the values , execute the following command .
In this command , eng0s3 should be replaced by your adaptor name ; 10.0.0.3 by your inactive IP address stick to by your netmask .
When you start the undermentioned command , the entry will not be lumber in the constellation Indian file . This is not the standard drill if you are managing a waiter .
3. Setting Static IP Address Ubuntu Via Configuration File
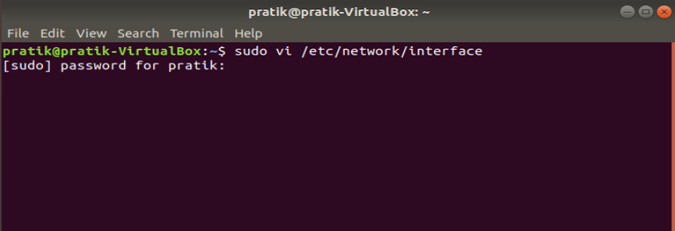
The problem with all the above - mentioned method is you do n’t have thing documented at a place . It ’s not at all recommended to make change this way on a host . The recommend mode is by cut the configuration file . This way all the changes are documented and you’re able to simply override the previous change by commenting the lines .
The constellation file is / etc / net / interface . You require admin permissions to edit out this file . But before , we will call for lots of economic value like Subnet masquerade , gateway address , program address and adapter name . Just runifconfig -aon the depot to get the adapter name , Subnet masquerade party and broadcast reference value .
For the gateway savoir-faire , execute the following mastery on the terminal .
Now we necessitate to start the configuration filing cabinet to supply changes . To do that , execute the next command .
If you are not intimate with vi editor in chief and dominance , you could also use gedit . gedit is a graphical interface for editing files . To start the file in gedit ply the following command
Once the file open , it should either be blank or have previous configurations . In case you have form defined previously , just comment them out instead of cancel . Prefix all the line with “ # ” and the lines would render useless now . Now , we would call for the adapter name , subnet mask and program address which we have noted down earlier .
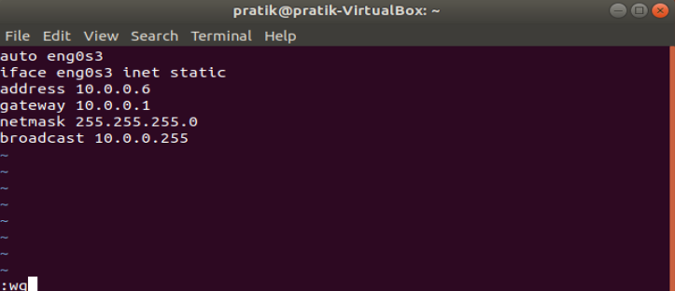
Press “ i ” if you are using vi to get into insert modality . Type the follow codification and replace the values consequently with your own value
auto enp0s3iface enp0s3 inet staticaddress 10.0.0.6netmask 255.255.255.0network 10.0.0.1broadcast 10.0.0.255gateway 10.0.0.1
But before you enter these lines , you take to sympathize the codification . “ auto enp0s3 ” will re-start the interface automatically at booting of the organization . “ iface enp0s3 ” is a postfix for define the port enp0s3 . “ inet ” stands for IPv4 communications protocol while “ inet atmospherics ” mean defining a stable IP for the specified internet arranger . Rest of the lines are pretty ego - explanatory .
If you want to revert back to DHCP , you may change it to “ inet dhcp ” .
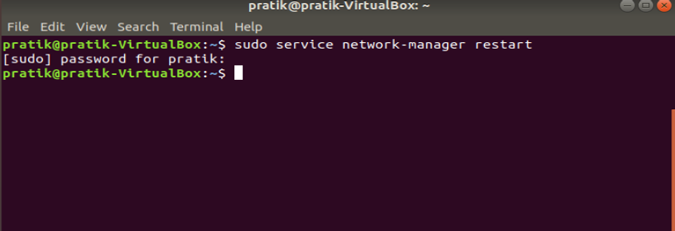
Once you have hang on the code successfully , press Esc and eccentric “ : wq ” to redeem the changes . Now , we involve to restart the web for the change to take issue . lam the following mastery to do resume the web transcriber .
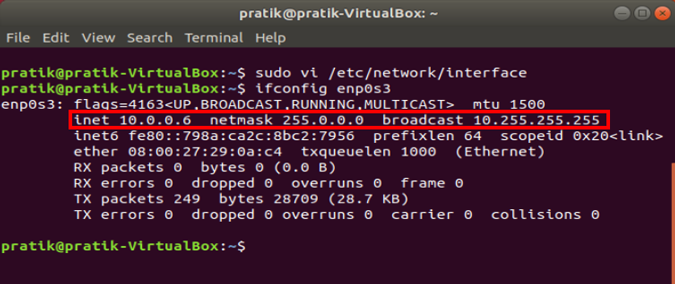
Post the restart , changes would take effect . To catch the change , execute ifconfig again and see the following values . It should match the value that you have defined in the configuration file .
In typeface you want to make change , annotate out the premature lines and append the changes .
Wrapping Up: Setup Static IP Address in Ubuntu
If you are in a home web , then delineate static IP via the router would be the recommended method . In grammatical case of exceptions , you may strain to assign Static IP Address In Ubuntu via GUI or command line . If you manage a host then pursue the good practices and define static IP in the constellation file .
Once you have defined static IP , your machine should use the specified IP and will override the changes made at the router level . Further , you may tryuser direction in Ubuntuor tryChanging Your GRUB 2 splatter Image In Ubuntu 12.04 .
38 Google Earth Hidden Weird Places with Coordinates
Canva Icons and Symbols Meaning – Complete Guide
What Snapchat Green Dot Means, When It Shows, and for…
Instagram’s Edits App: 5 Features You Need to Know About
All Netflix Hidden and Secret Codes (April 2025)
All Emojis Meaning and Usecase – Explained (April 2025)
Dropbox Icons and Symbols Meaning (Mobile/Desktop) – Guide
How to Enable Message Logging in Discord (Even Deleted Messages)…
Google Docs Icons and Symbols Meaning – Complete Guide
Samsung Galaxy Z Fold 7 Specs Leak Reveal Some Interesting…