Editing imagesis quite slowly on Google Docs . However , things become difficult when one need to finagle multiple paradigm , such as stay fresh two icon side by side . Do n’t worry though . you may put two pictures side by side in Google Docs in three way – by resizing image , using tables , and from Google Drawings . Each method offers an advantage over the other . Let ’s see the method .
mesa of Contents
1. By Resizing Images
One of the easiest ways to lend two flick side by side in Google Docs is by resizing them . The image will then automatically come out next to each other .
1.start the Google Docs written document .
2.Place your cursor where you desire to insert the first ikon . Then , go toInsert > Image . Select the source ( data processor , web , Google Drive , etc . ) from which you require to add the prototype .
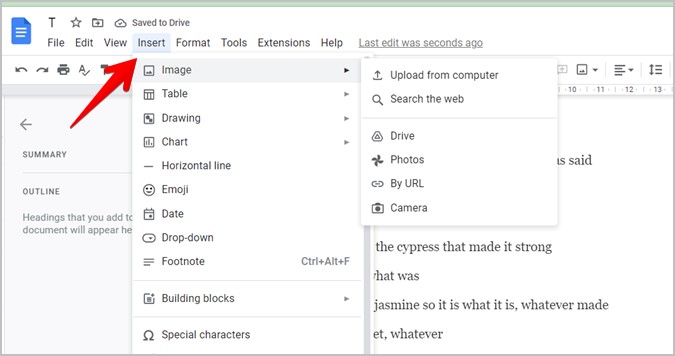
3.Select the image to contribute . It will show up in the document . Similarly , insert the 2nd image .
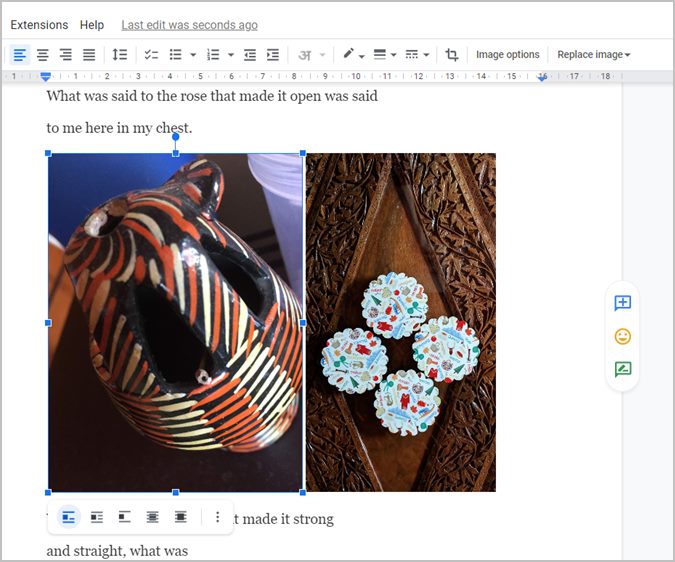
4.Now , penetrate on the first image and using one of the nook edges drag it inwardly to lessen the size of the image . Similarly , decrease the sizing of the 2nd image .
5.In most cases , the paradigm will automatically come out side by side when you resize them to the appropriate sizing . If that does n’t happen , move the 2d image next to the first image using your black eye . For best results , verify the two images are of the same sizing and the first look-alike is n’t bigger than the 2d persona .

Pro Tip : Right - detent on the image to crop and perform other look-alike redaction tasks , which can be get at under Image options .
2. Using Table
The drawback of the above method acting is that it may not always work as you expect it to due to size issues . gratefully , you could add two pictures side by side in Google Docs by using table . This method offers more flexibleness as you’re able to resize one of the images without affecting the other epitome . moreover , you may add as many column or rows as you require and then add together an image in each of them .
In this method , you will need to insert a mesa with two pillar and then impart an image in each column . Lastly , you will have to remove the tabular array edge .
Here are the steps in detail :
1.In your Google Docs document , keep the cursor where you want to place the image .
2 . Go toInsert > Table . Select 2×1 table .
3.Keep the pointer in the first pillar and go toInsert > Image . Select the prototype from the preferred source .

4 . Next , keep the cursor in the second column and again go toInsert > Imageto add the second image .
5 . After supply both the images in the two columns of the mesa , you have to remove the tabular array border . For that , hover your computer mouse over the table and flop - tap it . SelectTable propertiesfrom the computer menu .
6.Expand theColorsection in the Table properties jury that opens on the side . SelectOptin the Table border size of it drop - down box .

That will remove the molding from your table making your images seem side by side .
Pro Tip : take how toadd a tabular array of contents in Google Docs .
3. Using Google Drawing
If the above two method do n’t fit your requirement , you could utilise Google Drawing as well to keep two exposure side by side in Google Docs . The benefit of using this method is that the two images will be group in the written document . Any variety that you make to the concluding effigy will involve both images . you may resize the picture and change their text wrap way as one image instead of two freestanding images .
This method also earmark you to specify how far or near the two images should be in your text file . you’re able to even reuse the two look-alike in other Google Docs papers or other Google products that support Drawings . what is more , you could even download the two images that are side by side as a collage and apply the picture out of doors of Google products .
1.In your Google Docs document , keep the cursor at the billet where you have to bestow the images .

2.Go toInsert > Drawing > New .
3 . The Drawing panel will open up . press theImage iconand insert the picture from the desire source like acomputer , Google Drive , URL , etc .
4 . Again , tap the Image icon in the Drawing control panel to total the second image .

Pro Tip : Perform image editing tasks for case-by-case images in Google Drawing only .
5 . If the 2d paradigm come out on top of the first mental image , move it next to the first image using your mouser . Once the images are side by side , dawn on theSave and close button .
Pro Tip : Learnhow to layer look-alike in Google Docs .

6.The two images will appear side by side in your Google Docs papers . As note earlier the image will be grouped . So any redaction task that you would do will use to both images .
Pro Tip : Create a montage on your computer with two pictures side by side and then add the montage to your Google Doc .
Edit Pictures in Google Docs
After putting two pictures side by side in Google Docs , learnhow to bestow text to images . you may use the text towatermark the imageor annotate it . And , if you wish images in a document , have it away how todownload images from Google Docs .
38 Google Earth Hidden Weird Places with Coordinates
Canva Icons and Symbols Meaning – Complete Guide
What Snapchat Green Dot Means, When It Shows, and for…
Instagram’s Edits App: 5 Features You Need to Know About
All Netflix Hidden and Secret Codes (April 2025)
All Emojis Meaning and Usecase – Explained (April 2025)
Dropbox Icons and Symbols Meaning (Mobile/Desktop) – Guide
How to Enable Message Logging in Discord (Even Deleted Messages)…
Google Docs Icons and Symbols Meaning – Complete Guide
Samsung Galaxy Z Fold 7 Specs Leak Reveal Some Interesting…


