MacBook is a powerful machine with lots of features up its arm . No curiosity why many sayMac is good than Windows . If you are a educatee who use Mac or mayhap recently bought a MacBook , here are some of the most useful and productive Mac tips and deception for scholarly person like you , which will help you relieve your workflow in your everyday life . For better reason , we ’re go to break down this clause into four categories . Let ’s buckle up and dive in .
Table of cognitive content
Productivity Tips
Whether you are a scholar or have a side hustle , productiveness matter . There are numerous productivity tips and tricks for a Mac user , but permit me share some of the tips and thaumaturgy that would be more relevant to you as a student .
1. Share Notes
Many educatee useApple ’s Notes appfor taking notes on their Mac or iPad . And if you have ever been in need of sharing a note with your classmates , you could do so by easily sharing a link to those preeminence . Let ’s learn how to do that in Apple Notes app on your Mac .
1.Open theNotesapp on your Mac .
2.Click onthe noteto choice it that you need to partake in . And then select theshare button .

3.Click onCopy Linkand then tap theemail address or sound numberfield .
4 . Type the e-mail addressof the soul whom you want to share the note with .
5.press thepermission .

6.Selectan optionaccording to your taste .
bakshis : If you do n’t want anyone to edit the note , selectPeople you invite can view only .
7.Now click onShareto share the preeminence with the person .

observe : If you do n’t require anyone to add a someone to the note get rid of the tick soft touch next to theAnyone can add more multitude .
2. Use Voice Memos for Recording Lectures
Mac ’s mic has better a flock since the launch of the first Mac style back in 1984 . you could now record your talking to natively while acquire Notes on your Mac . Mac has an app call Voice Memos for record audio on the go . Let ’s look at how to employ Voice Memos on your Mac .
1.Launch theLaunchpadfrom the dock on your Mac . ( If picture is not seeable in the dock , there are otherways to open launching pad ) .
2.Locate theVoice Memosapp and open it by clicking on it .

3.tap there d record buttonto start recording lectures right on your Mac .
4.Once you ’re done transcription and want to save it , click onDone .
3. Replace Text Easily
One more handy feature of speech of Mac that goes unnoticed by many citizenry is the replace textual matter feature . In other lyric , you’re able to say this works like creating custom abbreviations . Let ’s take a feel at how to create and apply them .
1.Open theSystem Preferenceson your Mac .
2.Click onKeyboard .

3.Now click onText .
4.tap+to add a novel replace text gun trigger word .
5.Type the trigger word of honor , and then twice - tap theblank spacenext to it .

6.Now type the sentence or phrase you want to supervene upon the gun trigger Holy Scripture with and hitenter .
7.shut the System Preferences window by clack on there d dot . And the next time you type the gun trigger word and hit space it will be replaced with the idiomatic expression you just entered .
4. Use Split Screen
Using Split Screen can be really helpful at times particularly when you are a scholarly person . Suppose you have two apps opened on the desktop of your Mac . Here are the step to use Split Screen on your Mac .
1.Take your shiner pointer to thegreen dotand wait for a couple of here and now .
2.select theTile Window to Left of ScreenorTile Window to Right of Screen . For model , I ’m clicking on the left over one .

3.Once the unexpended screen door is engage , tap the otherapp windowto fit it to the good side of the CRT screen .
4.Now both apps are in split silver screen mode , you’re able to go along to use them without any misdirection .
5. Resume Safari Last Session
Many times you must have incidentally close Safari and have mislay all of your ongoing tabs . To make do with such unpleasant scenarios , you could enable a circumstance that allows you to summarize your session after the inadvertent closing of Safari on your Mac . allow ’s take a aspect at the whole step to enable this in the Safari preferences .
1.LaunchSafarion your Mac .
2.Click onSafariin the menu stripe .

3.Now click onPreferences .
4.Once the Safari preferences undefendable , navigate to the General chit and tap the drop - down card calledSafari opens with .
5.ChooseAll windows from last sessionby get across on it . That ’s it , now if your Safari gets closed accidentally , it will touch on all your seance or tabs from the previous academic term .

take note : This can reestablish only normal window and pill . Incognito windows are restricted to do so .
Finder Tips
Finder is an app that as a pupil you are going to encounter daily for managing files , folders , or even projection . Finder offers some of the best features for pull off and organize files and folder on Mac . Let me share some of the best Finder tips and antic that you may use as a student to manage and organize your filing cabinet and folders more effectively .
6. Create Custom Tags
1.tap theFinderin the carte du jour ginmill and then flick onPreferences .
2.Finder Preferences will unfold in a belittled window . clack onTags .
3.select the+to create a raw tag .

4.Nowtype in a namefor the newly created tag . For example , I ’m typecast Lectures .
5.Take your black eye pointer to thecirclenext to the newly created tag and chatter on it .
6 . choose a colorfor the tag by clicking on it .

Now the tag has been created . lease ’s take a look at how to bestow a tag to the file .
7.Locate the data file in the Finder and right - clack on it . come home onTags .
8.press the newly createdtagto add it to the data file .

7. Use Filter While Searching in Finder
Do you use Finder for searching files on your Mac ? If yes , Finder allows you to add extra filter while searching for any single file and folders which is extremely helpful if you have note and tones of files stored on your Mac .
1.launch the Finder and press the search taproom .
2.Type the text or Indian file name that you require to seek for and strike enter . Once the search result appears , select the+to impart a filter to your search solution .

3.press thefiltersand select according to your preferences to refine the results . you could filter out result by name , date , kind , etc .
8. Rename Multiple Files at Once
rename numerous file at a metre can be very tiring . Fortunately , rename multiple single file at once on Mac is effortless . Take a expression at the simple steps to rename multiple file at once .
1.Locate the filing cabinet that you need to rename andselect them allwith the help of your mouse .
2.Right - cluck on the selected Indian file . Click onRenameto get down .

3.you could choose multiple type of renaming formatting . To do so select thedrop - down menuto expound it and show multiple format of renaming .
mention : count on the use of your Mac the drop - down menu may show different names such asReplace Text , Add Text , or Format .
4.Select the format option that you want . For example , I ’m get through onFormat .

Tip : If you replace some text from the name of the file , selectReplace Text . If you need to add text before or after the name of the files , selectAdd Text . If you want to completely commute the name of the file selectFormatoption .
5.Customize the newfangled name for the files from the pop - up and then click onRenameto rename all the files consort to your selected preferences .
9. Delete Items Without Sending them to Trash (Bin)
The normal delete outgrowth on Mac sends the deleted files to the Bin . But if you do n’t require to erase a single file two time i.e , the first prison term from the Finder and the 2d time from Bin , you may permanently edit a filing cabinet on your Mac without sending them to the Bin . Here are the step to follow .
1.Locate thefile / folderin the Finder and pick out it by clicking on it .
2.Now press theOpt + Cmd + Deletekeys at the same time on your keyboard .

3.A pop - up will appear on the screen , cluck onDeleteto permanently delete the file / brochure .
Utility Tips
In Utility pourboire , we will be sharing some utile confidential information and caper that will be super useful while navigating through your Mac . Implementing these tips and trick will help you in saving a few click and keys in everyday workflow .
10. Use Stack on Desktop
If you use the Desktop position on your Mac just like many students out there to invariably transfer data file in and out of your Mac , prospect are that it would be messy . In such a scenario , let me deal an awesome drudge with you that will save you from clean your Desktop in just a few clicks .
1 . Right - clickanywhere on the Desktop .
2.Click onUse lot .

3.All the files and folders will now stack on top of each other and your background will look light and organized now .
11. Remove Unwanted Icons From Menu Bar
Many scholarly person care to install multiple apps on their Macs . As much as apps are helpful they can also be overwhelming for your Mac ’s menu bar making it look full and all cluttered up . And go to each and every app and incapacitate them on the status bar from their setting can be very irksome . Let ’s take a flavor at how to easily get free of those unwanted icons from the carte du jour Browning automatic rifle on your Mac .
1.Hold theCmdkey on your keyboard .
2.Nowclick and dragthe icon toward the screen background ( or away from the menu prevention ) that icon that you need to remove from the menu ginmill .

3.Once you see theXjust drop cloth or leave the icon and it will get removed from the carte stripe of your Mac .
12. Add a Folder to the Dock
Would n’t it be great to access your most used folder directly from the dock of your Mac ? If you are also conceive of a way to make it potential , depend no more . Let me show you the stone’s throw to add your most used brochure to the dock of your Mac .
1.Locate the folder in the Finder .
2.Nowclick and dragthat brochure toward the dock .

3.Once the folder is above the docking facility , justdrop itand it will be add together to the sour grass . Now you could quickly access that leaflet and its contents from the dock , without going to the Finder .
13. Powerful Trackpad Gestures
Mac ’s trackpad gestures are some of the handiest and most utilitarian ones . If you were not using them till now , this is your call to actuate them and apply your Mac to its full voltage . Let ’s take a look at how to enable these trackpad gestures on your Mac .
1.tap theApple logoand then get across onSystem Preferences .
2.Once the System Preferences is open , tick onTrackpad .

3.There are three types of gesture family , i.e , Point & Click , Scroll & Zoom , and More motion . clack on each of them to turn on the desire motion to get the most out of your Mac .
Tip : Access Launchpad by Using Trackpad Gesture on Your Mac .
14. Use Spotlight for Faster Calculations and Conversions
glare is an extremely herculean hunting tool that ’s present on your Mac . From finding files that you worked on last week to finding something on-line , Spotlight can keep open you a circumstances of time . But very few people know that you’re able to use Spotlight search for doing maths calculation , social unit changeover , and even currency conversions . Let ’s take a face at how to do so .
1.Press theCmd + Spacekeys on your keyboard to launch the Spotlight hunt on your Mac .
2.Type thecalculation promptin the Spotlight hunting . For lesson , I ’m typing to do a simple multiplication without start the reckoner .

3.you could also trycurrency conversionsin the Spotlight search just like this . You just demand to type the prompt and Spotlight will show you the result in an heartbeat .
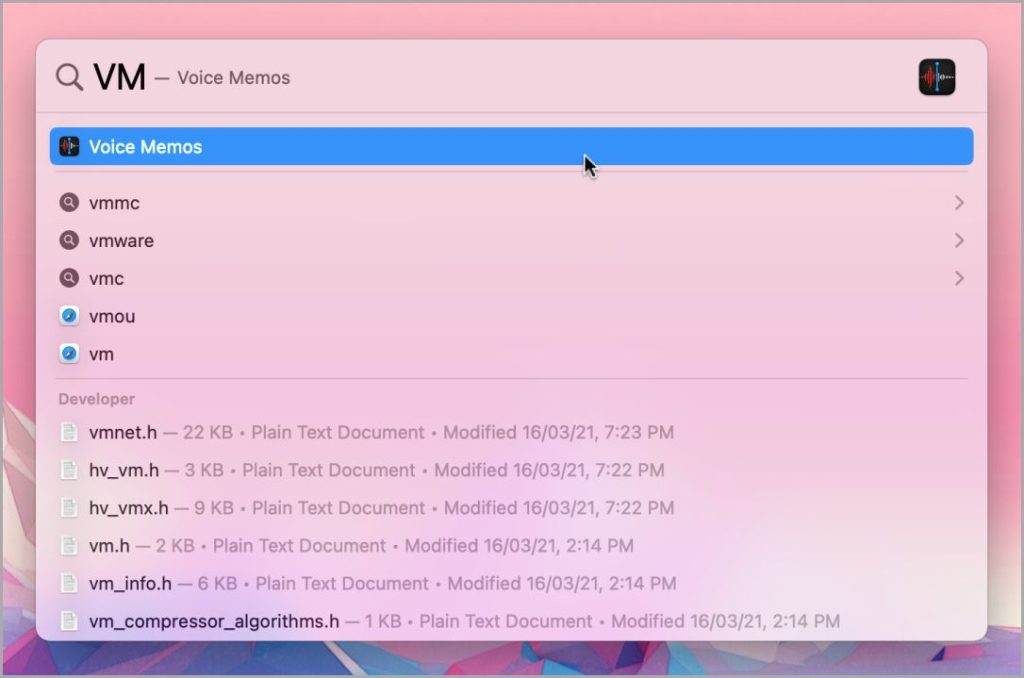
15. Search for an App Faster
you’re able to also practice the same Spotlight to search for an app quicker . It will save up you the trouble of launch Launchpad and chance the app in it . Let me show you the steps to do so .
1.Press theCmd + Spacekeys on your keyboard to summon the Spotlight search on your Mac .
2.Nowtype the app initialsin the Spotlight search to quickly search for the app . For good example , I ’ve typedFCPfor Final Cut Pro andVMfor Voice Memos .

16. Kill Unresponsive Apps
Many sentence an app gets becomes unresponsive and stuck on Mac . This can sound like a nightmare to students . In that causa , I would suggestkilling such unresponsive appsto get your Mac back up and running . Here are the steps to do so .
1.select theApple logotype , to begin with .
2.Now click onForce Quit .

3.tap theapplicationthat you want to force quit to select it and then get through onForce Quit .
4.A pop - up will appear on the concealment , click onForce Quitto leave office the frozen app on your Mac .
Some More Tips
Here are some more tips that are go to help you with your Mac a lot . These are many thing that you as a student may be doing repeatedly with your Mac . And with some fine - tuning , it can be more helpful to you . Let ’s take a look at some of these gratuity .
17. Take Screenshots and Annotate Them Natively
Screenshots are very helpful in grabbing something useful from a internet site or an article . But in lodge to keep a screenshot relevant and useful you need to footnote them properly . Let ’s take a look at how totake a screenshot and gloss themnatively on your Mac .
1.PressCmd + Shift + 3on your keyboard to take a screenshot on your Mac .
2.tap thescreenshot previewnear the bottom right street corner of the screen to launch the screenshot editor .

3.Now select theannotate toolin the screenshot editor .
4 . Select a toolfor annotating the screenshot by clicking on it . For example , I ’m proceed with the rectangular annotation puppet .
5.Annotate the screenshot with the service of your mouse . Once done editing click onDoneto save the screenshot .

18. More Screenshot Options
Mac also leave you with more options to catch a screenshot or screen recording natively without installing any third - political party apps . These additional options can be really helpful at times . Let ’s take a look at how to summon them when needed .
1.PressCmd + Shift + 5on your keyboard to summon the screenshot toolbar on your Mac .
2.you’re able to choose to screenshot or screen record from here also . Click onOptionsto show more options .

3.A menu will unfold , you may choose to have a timer , change thelocation of screenshotsand even show or blot out mouse pointers from here .
4.you’re able to alsopartially memorialise or take a screenshotof the screen on your Mac by tick on these two pick .
19. Do Minute Adjustments
Did you know that you’re able to now do minute adjustments to legal storey and brightness on your Mac ? The solvent is yes , this is a much less known tip that very few Mac users know of . Here are the step to do minute adjustments while adjusting sound layer , brightness , and even keyboard backlights .
1.Press thevolume up / downbutton to set the mass .
2.Now hold theShift + Optkey on the keyboard and press thevolume up / downbutton to do the minute of arc adaption . alternatively of increasing or decreasing one - stop , it will interchange by 1/4th of a stop .

Tip : you’re able to do the same with the display and keyboard brightness level as well .
20. Reveal Hidden Options
There are many useful options that are hidden in macOS . Once you hump how to get at them on your Mac , many of your workflows would get wide-eyed and easy . Let ’s teach how to get at or reveal some of those hide out options on your Mac .
1.Locate afile / pamphlet in Finderon your Mac and the right way - flick on it .
2.Now just press thealt - optionkey on the keyboard of your Mac to reveal more choice . As you bid the Francis Scott Key , some novel option will get revealed to you .

MacBook Tips and Tricks for Students
We hope these MacBook tips and tricks for you , the students , should serve importantly enhance your productiveness , organisation , and overall user experience . Using MacBook correctly can help you become effective and harness your academic tasks with comfort . So , give them a endeavor , and see how they can transform your studying experience for the better .
Apple iCloud Icons and Symbols Meaning – Complete Guide
Best Macbook in Every Price Range and Use Case: Mac…
Apple Could Launch Its Updated Macbook Air With M4 Later…
Turn Any Website Into Your Mac’s Wallpaper With This App
Apple M5 Chip: Why It’s Sticking to 3nm Technology
macOS 15.2 Beta: Add Weather Widget to Menu Bar on…
How to Check MacBook Battery’s Health and Cycle Count (M…
macOS Sequoia 15.1: How to Enable and Use Type to…
6 New Features Coming to macOS Sequoia 15.1
7 Settings to Make macOS Feel-Like Windows