When we want to edit out videos on Android or iOS , the Google Photos app hardly comes to our mind . It may surprise many of you but Google Photos app offer manyvideo redaction features . you could crop , well-kept , stabilize , rotate , and add outcome to your video in Google Photos . Wondering how to delete videos on Google Photos ? control out 10 tips to delete videos in the Google Photos app on Android and iPhone .
How to Edit Videos in Google Photos
The steps give below are the same on Android and iPhone , unless , otherwise mentioned .
1. Trim Video
To trim your TV ’s duration , follow these step :
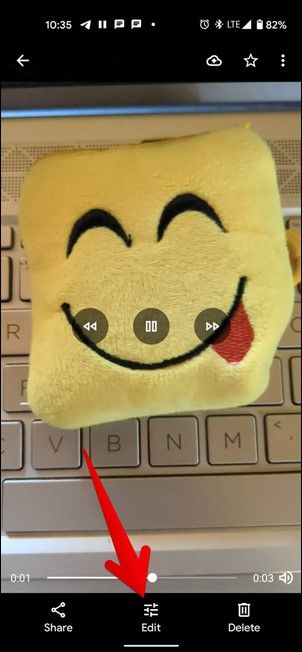
1.start the television that you want to edit in the Google Photos app and spigot on theEditicon at the bottom .
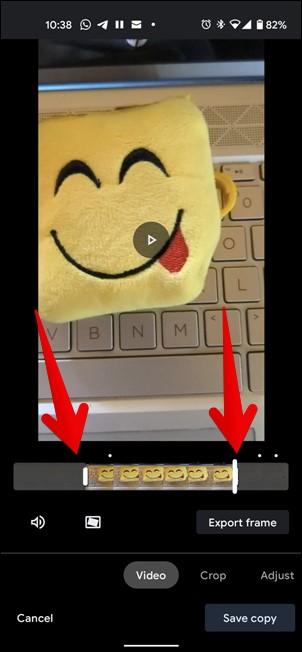
2.Tap on theVideotab ( first one ) at the bottom . Choose the beginning and final stage full point of your television by dragging the white bar present on the both end of the slider .
3.Tap onSave copyto download the trimmed video . The original video will remain unaffected .
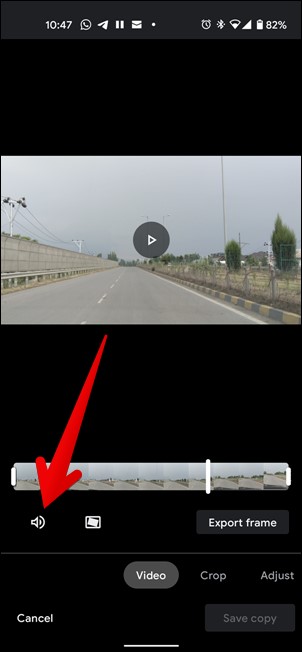
2. Mute Audio
Even though you may not contribute custom audio to videos in Google Photos , you may muffle the video ’s audio recording . For that , go into the redaction mode by tap on theEditicon . Then under theVideotab , you will regain theSpeakericon . water faucet on it to mute the sound recording .
For other devices , find out how toremove audio from video on any gadget .
3. Stabilize Video
Is your video too shaky ? you may stabilize it using Google Photos . At the time of written material , this feature is only available on the Google Photos Android app .
To stabilise a video , get in the Google Photos editing modal value . strike on theStabilizebutton present under the Video tab . It may take some time so be patient . Once the video has stabilise , you will remark the Stabilize picture has turned juicy .
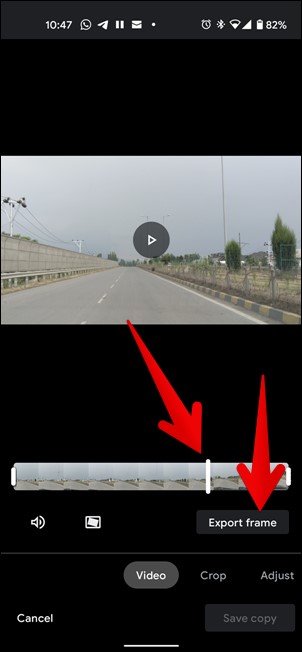
4. Export Image from Video
Many times , you might notice a frame in your video that you want to export as an image . Typically , you would retrieve of taking a screenshot . But there ’s an alternative . you could use the native characteristic of Export Frame in Google Photos .
enter the video that you require to edit in Google Photos . Once in the editing modality , solicit on the slider to go to the underframe that you desire to export . You will see a white bar at the selection point . Now tap onExport frame . The image will be saved to your phone ’s Gallery .
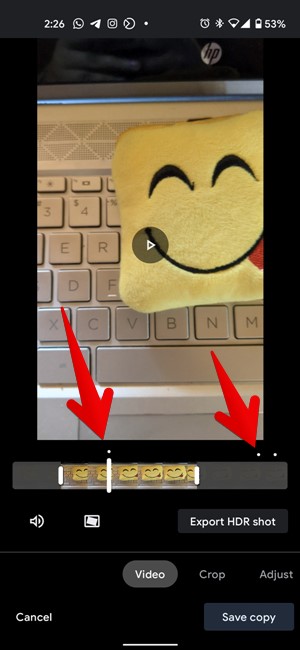
For sure video , you will notice flyspeck white DoT above the video skidder . Tap on them and you will be able to extract HDR photos . Tap on theExport HDR shotbutton once you recover the good physical body .
5. Crop, Rotate, and Change Perspective of Video
1.get to the picture to edit in Google Photos and hit theEditicon .
2.Go to theCroptab . Here you will find dissimilar video editing tool . To trim your picture , use the four tiny circle present at the corner of the video . Adjust the top and breadth of the picture by dragging the corners .
3 . Tap on theRotateicon repeatedly to rotate the video recording to the expect place . Similarly , use the Perspective cock to change the perspective of your video .
Tap onResetin face you do n’t wish the change you made under the Crop tab key using any instrument . If you do n’t wish the crop capabilities propose by Google Photos , you could use third - partyvideo editor in chief to crop telecasting .
6. Adjust Color and Light
you could set smartness , saturation , heat , and various other coloring material effects for your picture in Google Photos .
On Android , go into the redaction modality of Google Photos and knock on theAdjusttab . Here you will observe various tools . Tap on any puppet to activate it . set the intensity of the tool using the available slider . Once a slider is active , it turns blue .
On iPhone , enter the editing mode for your television . Tap on theAdjust light source and coloricon . Here you will find two slider – luminance and Color . Use them to edit your video . Alternatively , knock on the small down arrows next to Light and Color to bring out more editing sliders .

7. Add Filters
To further hike your television , you’re able to add together a filter to it . Go into redaction mode and pat on theFilterstab . You will see several filters . hydrant on the one that you want to use . Tap on it again to adjust its intensity . you could also check thebest video filter apps for Android and iPhone .
To remove filter , tap on theOriginal(iPhone ) andNone(Android ) option under Filters .
8. View Original Videos
At any point , while edit your videos if you want to compare the emended video with the original video , just touch and hold the video . The original picture will show up .
9. Draw on Video
Google Photos video editor get you draw on your videos on the Android app . Go to the editing mode and then tapdance on theMoretab follow byMarkup . Use the available colors and pen character to depict on your video . Remove the last drawing using the Undo button . Tap on Done to go back . Do n’t forget to pink on Save simulate to download the edited video on your sound . If you are concerned , find out how toadd move school text to your videos .
10. Save Video
On both Android and iPhone , use the Save copy release to save the edited telecasting to your sound . As obvious , the Save copy button create a new copy of the video . The original video remains untouched . So even if you mess up the video , your edited footage is safe and sound .
Wrap Up: Editing Videos in Google Photos
Google Photos television editor has improve drastically over the years . But it still lacks high - end features such as the ability to sum up transitions , combining multiple snip , and more . I go for Google add those features to Google Photos in the hereafter . Until then , you could take the assist of third - partyvideo editors on iPhone and Androidto edit videos . And if you are interested in edit out prototype on Google Photos , tick off outimage edit peak for Google Photos .
Android 16 Is Coming: 6 New Security Features to Keep…
Android 16 Bubble Bar: 7 Things Google Could Add To…
Google Accidentally Reveals Material 3 Expressive: Android’s Future and it…
5 Features We Hope to See in Google’s Desktop Mode…
Small Phones Are Making a Big Comeback: Why Now?
The Great Android Exodus: Chinese Smartphone Makers Plan To Build…
13 Surprisingly Useful Underrated Android Apps (May 2025)
How to use Gboard’s New “Browse” Feature for Emoji Kitchen…
How to Find Clipboard on iPhone and Android (Including Samsung)
Android Auto Icons and Symbols Meaning – Complete Guide